Recovering Exchange backups
Use the recovery feature to recover an entire database, storage group, or selected items from Exchange backups.
Before recovering, see these topics for details specific to your Exchange environment:
Exchange 2016, 2013, and 2010 use recovery databases. Each server has a recovery database, and there can only be a single mounted recovery database at a time.
Once you have created the recovery database, recover the backup to it. Then use the Microsoft Exchange Management Shell to extract mailbox data from the information store into the local mail.pst file. You can also merge the extracted data back into the currently active information store.
Recovery databases differ from the RSG (Recovery Storage Group) mechanism in Exchange 2007 and 2003.
Exchange 2007 uses the RSG (Recovery Storage Group) mechanism. RSG enables you to mount a second copy of an Exchange information store on any Exchange server that belongs to the same Exchange Administrative Group as the original, while the original information store is still active. This feature enables you to recover data from the backup copy of the information store without interfering with the on-going operation of the Exchange server.
Once you have created the RSG, you first recover the backup to it and then use the Microsoft Exchange Management Shell in Exchange 2007 to extract mailbox data from the information store into the local mail .pst file.
You can also merge the extracted data back into the currently active information store.
RSG differs from the recovery database mechanism in Exchange 2016, 2013, and 2010.
Direct recovery to the RSG (Recovery Storage Group) is not permitted for Exchange 2003 backups. Instead only recovering to the original location or to an alternate location is supported.
Use the procedures in this section to recover an Exchange database or storage group to a specific target. Before the recovery, verify the recovery target is set up as required and that any restrictions have been met. Choose from the following recovery targets:
Recovery to the Exchange server is the default recovery type. All database and transaction log files recover directly to the original location. To perform a successful recovery to the original Exchange server, the following conditions must be met:
|
Condition |
Explanation |
|---|---|
|
Database name and file name must remain unchanged from the time the backup was performed. |
The database name is the symbolic or displayable name of the database. For example, Mailbox Database or Mailbox1. The actual database file name, for example Mailbox1.edb, must also be unchanged since the backup was run. Note that the location of the database files and transaction log files may be changed after the backup has been performed, if needed. If the log files or database files must be moved to another volume or disk, the actual names of the database files must be preserved. |
|
Databases must be dismounted. |
For Exchange 2003 and 2007, this includes all databases contained in the storage group. For Exchange 2016, 2013, and 2010, only the database being recovered must be dismounted. |
|
Database must be in a Clean Shutdown state. |
If the database is in a Dirty Shutdown state, you can recover the backup, but need to bring the database into a Clean Shutdown state to mount the database. After recovering, if you cannot mount the database, see this Microsoft article to determine whether this is the problem: Exchange Database Is in a Dirty Shutdown State. |
|
Databases must be marked as overwrite allowed on restore. |
All databases must have the overwrite allowed on restore flag set. This task can be performed using the Exchange server administrative console or the appropriate Exchange server command line utility. If this is not the case, the recovery fails. |
|
Remove all existing database and transaction log files. |
Unitrends recommends that all database and transaction log files be removed from the recovery location. Recovering a differential, incremental, or a full backup recovers the server to a specific point-in-time. To ensure that the storage group or database can be remounted without integrity errors, any existing database and transaction log files should be removed before performing the recovery. |
You can recover from a backup by using the Backup Catalog or the Backup Browser. To recover from an imported backup or hot backup copy, you must use the Backup Catalog. See these topics for details:
Run this procedure from the backup appliance to recover an entire backup or imported backup copy. Run this procedure from the backup copy target appliance to recover an entire hot backup copy.
1. Verify that all prerequisites in Recovering to the original Exchange server have been met.
2. Log in to the backup appliance or target appliance (if recovering from a hot backup copy).
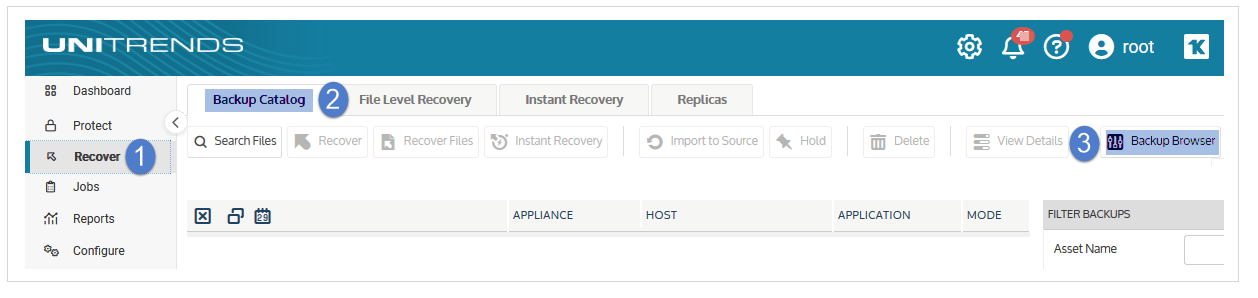
3. Select Recover and click the Backup Catalog tab.
(Optional) Use Filter Backups to the right to customize the backups that display. For details, see Working with custom filters.
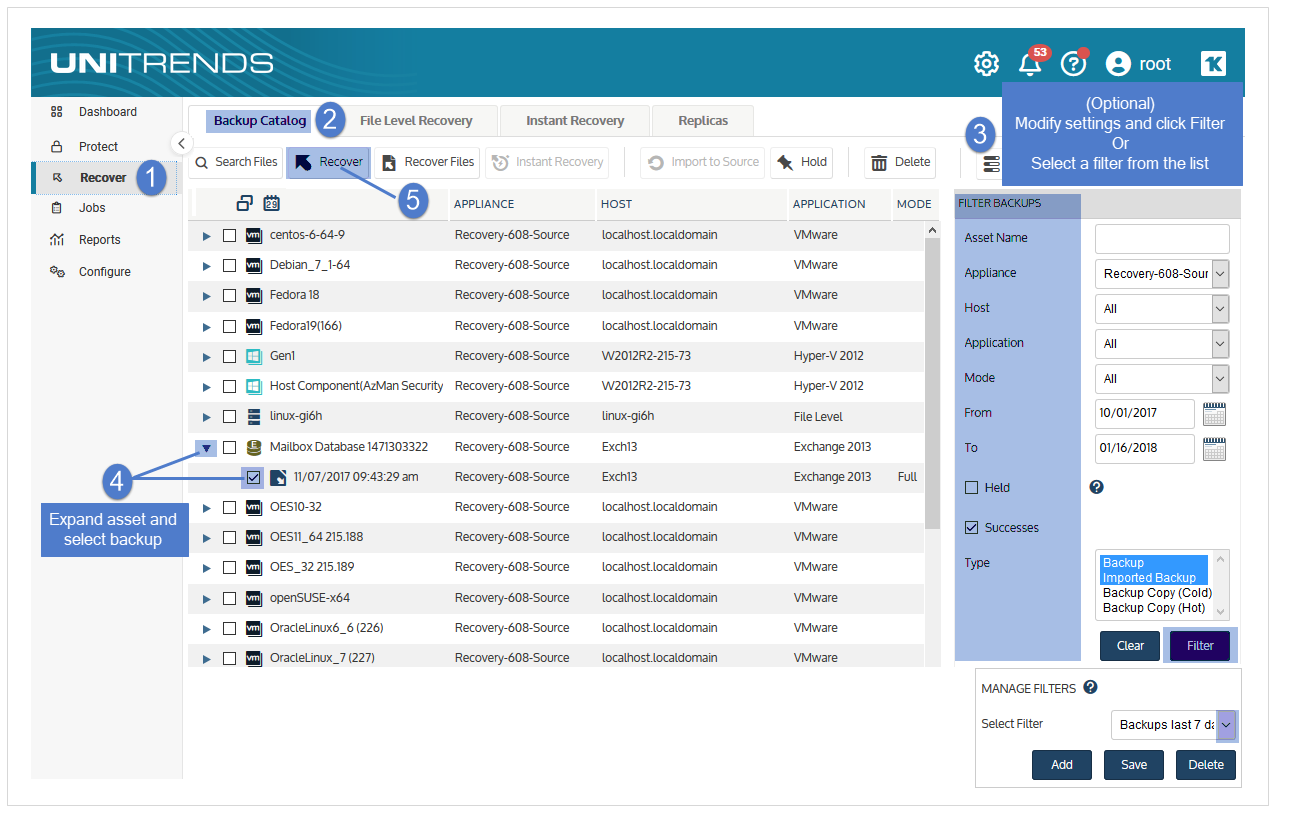
4. Expand the Exchange asset and select one of the following:
● An Exchange backup.
● An imported Exchange backup copy. (To import a backup copy, see To import a cold backup copy or To import a hot backup copy.)
● A hot backup copy (supported if performing the recovery on the target appliance where the hot copy resides).
5. Click Recover.

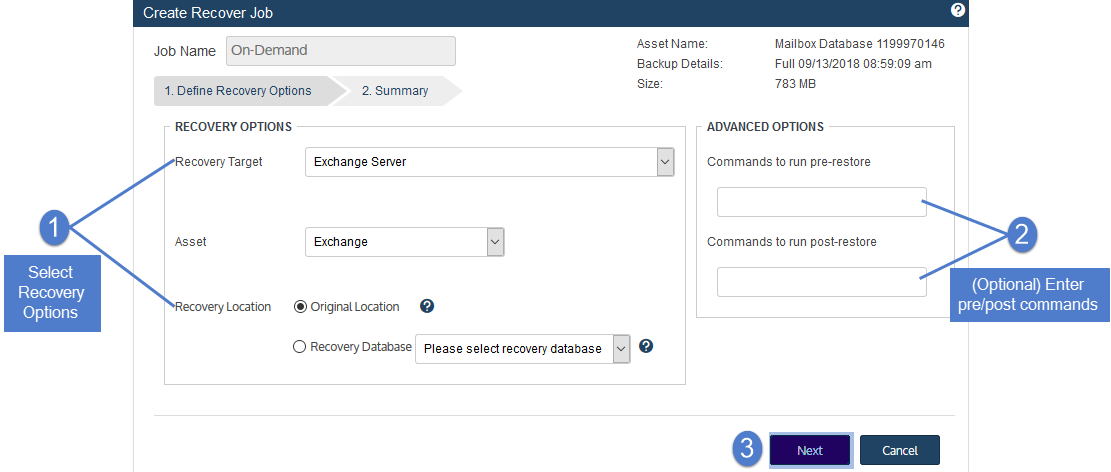
6. Select these Recovery Options:
● Exchange Server from the Recovery Target list.
● Exchange from the Asset list.
● Original Location for the Recovery Location(Optional) Specify asset-side commands to run by entering any system command or user script in Commands to run pre-restore and Commands to run post-restore.
7. Click Next.
8. Click Save.
● The recovery job is queued immediately. To view the running job, select Jobs > Active Job.
● All database and transaction log files are recovered directly to the original location.
9. Re-mount any databases you dismounted for the recovery.
Use this procedure to recover a backup to the original location.
NOTE This procedure is not supported for imported backups or hot backup copies. To recover an imported backup or backup copy, use the Backup Catalog procedure above.
1. Verify that all prerequisites in Recovering to the original Exchange server have been met.
2. Log in to the backup appliance.
3. Select Recover > Backup Catalog and click Backup Browser.
4. Select the Appliance and Date Range of backups to search. Backups that ran during the date range display.
5. (Optional) Refine the search:
● Enter text in any column field to filter the display.
● Click an arrow to sort by column.
● Click the accordion icon to add or remove columns from the display. (Not all columns display by default.)
● For a description of each column, see Backup Browser column descriptions.
6. Select the Exchange backup and click Recover.

7. Select these Recovery Options:
● Exchange Server from the Recovery Target list.
● Exchange from the Asset list.
● Original Location for the Recovery Location(Optional) Specify asset-side commands to run by entering any system command or user script in Commands to run pre-restore and Commands to run post-restore.
8. Click Next.
9. Click Save.
● The recovery job is queued immediately. To view the running job, select Jobs > Active Job.
● All database and transaction log files are recovered directly to the original location.
10. Re-mount any databases you dismounted for the recovery.
Recovery to a recovery area is supported only for Exchange 2016/2013/2010 (a recovery database) and Exchange 2007 RSG.
It is not supported for Exchange 2003 or earlier versions.
Additionally, it is only available if there is a recovery database or recovery storage group available in the backup.
To perform a successful recovery to a recovery database or recovery storage group, the following conditions must be met:
|
Condition |
Explanation |
|---|---|
|
Exchange 2016/2013/2010 recovery database or Exchange 2007 RSG |
Exchange 2003 or earlier versions are not supported. |
|
Databases must be dismounted. |
For Exchange 2007, this includes all databases contained in the storage group. For Exchange 2016, 2013, and 2010, only the recovery databases must be dismounted. |
|
Database must be in a Clean Shutdown state. |
If the database is in a Dirty Shutdown state, you can recover the backup but need to bring the database into a Clean Shutdown state to mount the database. After recovering, if you cannot mount the database, see this Microsoft article to determine whether this is the problem: Exchange Database Is in a Dirty Shutdown State. |
|
Databases flags must be set to True. |
All databases must have these flags set to True:
NOTE These flags can be set using the Exchange server administrative console or the appropriate Exchange server command line utility. This command will help verify that the database has the flags set correctly: Get-MailboxDatabase -Status -Server $env:computername | Format-Table Name,Server,Mounted,AllowFileRestore,Recovery -AutoSize |
|
Remove all existing database and transaction log files. |
Unitrends recommends that all database and transaction log files be removed from the recovery location. Recovering a differential, incremental, or a full backup recovers the server to a specific point-in-time state. To ensure that the storage group or database can be remounted without integrity errors, any existing database and transaction log files should be removed before performing the recovery. |
|
[Exchange 2007 only] |
Each database filename, for example mailbox1.edb or publicfolder.edb created in the recovery storage group must match the corresponding database file name in the original storage group that is being recovered. |
You can recover from a backup by using the Backup Catalog or the Backup Browser. To recover from an imported backup or hot backup copy, you must use the Backup Catalog. See these topics for details:
Run this procedure from the backup appliance to recover an entire backup or imported backup copy. Run this procedure from the backup copy target appliance to recover an entire hot backup copy.
1. Verify that all prerequisites in Recovering to a recovery area have been met.
2. Log in to the backup appliance or target appliance (if recovering from a hot backup copy).
3. Select Recover and click the Backup Catalog tab.
(Optional) Use Filter Backups to the right to customize the backups that display. For details, see Working with custom filters.
4. Expand the Exchange asset and select one of the following:
● An Exchange backup.
● An imported Exchange backup copy. (To import a backup copy, see To import a cold backup copy or To import a hot backup copy.)
● A hot backup copy (supported if performing the recovery on the target appliance where the hot copy resides).
5. Click Recover.
6. Select Original Exchange Server as the Recovery Target.
7. Select a Recovery Database from the drop-down.
8. (Optional) Specify asset-side commands to run by entering any system command or user script in Commands to run pre-restore and Commands to run post-restore.
9. Click Next.
10. Click Save.
The recovery job is queued immediately. To view the running job, select Jobs > Active Job.
Use this procedure to recover a backup to a recovery area.
NOTE This procedure is not supported for imported backups or hot backup copies. To recover an imported backup or backup copy, use the Backup Catalog procedure above.
1. Verify that all prerequisites in Recovering to a recovery area have been met.
2. Log in to the backup appliance.
3. Select Recover > Backup Catalog and click Backup Browser.
4. Select the Appliance and Date Range of backups to search. Backups that ran during the date range display.
5. (Optional) Refine the search:
● Enter text in any column field to filter the display.
● Click an arrow to sort by column.
● Click the accordion icon to add or remove columns from the display. (Not all columns display by default.)
● For a description of each column, see Backup Browser column descriptions.
6. Select the Exchange backup and click Recover.
7. Select Original Exchange Server as the Recovery Target.
8. Select a Recovery Database from the drop-down.
9. (Optional) Specify asset-side commands to run by entering any system command or user script in Commands to run pre-restore and Commands to run post-restore.
10. Click Next.
11. Click Save.
The recovery job is queued immediately. To view the running job, select Jobs > Active Job.
This option recovers the Exchange information store to be recovered to a location other than the original location where it resided when the backup occurred. The alternate location can be either to the same Exchange server host, a different Windows protected asset, the network share of your Unitrends appliance, or any CIFS/NFS network storage. To recover to CIFS/NFS network storage, you must first add the storage to the Unitrends appliance as a NAS asset. For details, see Managing protected assets.
The following specifies the difference between a full, differential, and incremental recovery to an alternate location:
|
Backup type |
Explanation |
|---|---|
|
Full |
All data associated with the Exchange information store is recovered to the specified location. |
|
Differential |
Only the data contained in the differential backup is recovered to the named location; the associated full backup is not recovered. A differential recovery should be used only if certain files within the backup are required or a third-party tool is used for individual mailbox or item recovery. |
|
Incremental |
Incremental backup chains can become very lengthy, creating a large recovery. To simplify the recovery process, the appliance creates a single recovery job on the recovery point chosen. |
You can recover from a backup by using the Backup Catalog or the Backup Browser. To recover from an imported backup or hot backup copy, you must use the Backup Catalog. See these topics for details:
Run this procedure from the backup appliance to recover an entire backup or imported backup copy. Run this procedure from the backup copy target appliance to recover an entire hot backup copy.
1. Verify that all prerequisites in Recovering Exchange backups have been met.
2. Log in to the backup appliance or target appliance (if recovering from a hot backup copy).
3. Select Recover and click the Backup Catalog tab.
(Optional) Use Filter Backups to the right to customize the backups that display. For details, see Working with custom filters.
4. Expand the Exchange asset and select one of the following:
● An Exchange backup.
● An imported Exchange backup copy. (To import a backup copy, see To import a cold backup copy or To import a hot backup copy.)
● A hot backup copy (supported if performing the recovery on the target appliance where the hot copy resides).
5. Click Recover.
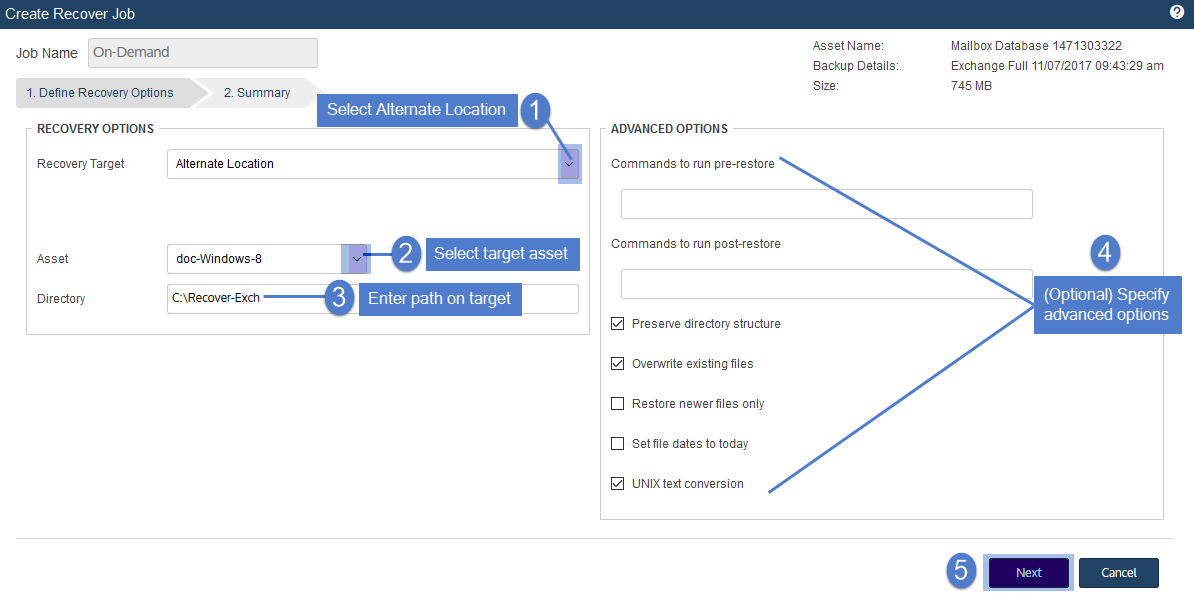
6. Select Alternate Location as the Recovery Target.
7. Select the asset where the backup will be recovered.
8. Enter the Directory Path where the backup will be recovered.
9. (Optional) Specify Advanced Options. To run client-side commands, enter any system command or user script in the Commands to run pre-restore and Commands to run post-restore fields.
10. Click Next.
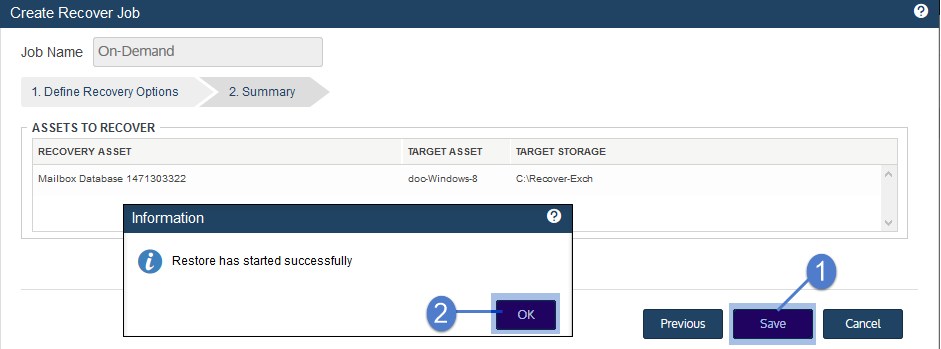
11. Review settings and click Save. Click OK to close the Information message.
12. To monitor the recovery job:
● Select Jobs > Active Jobs.
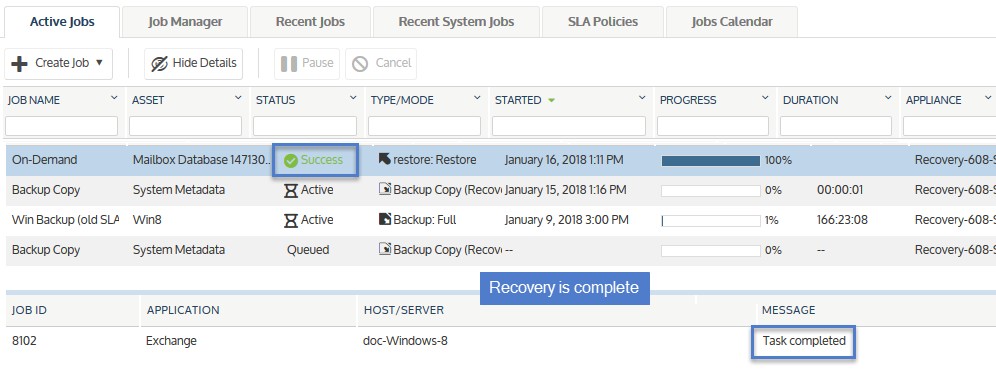
● Select the recovery job in the list and click View Details.
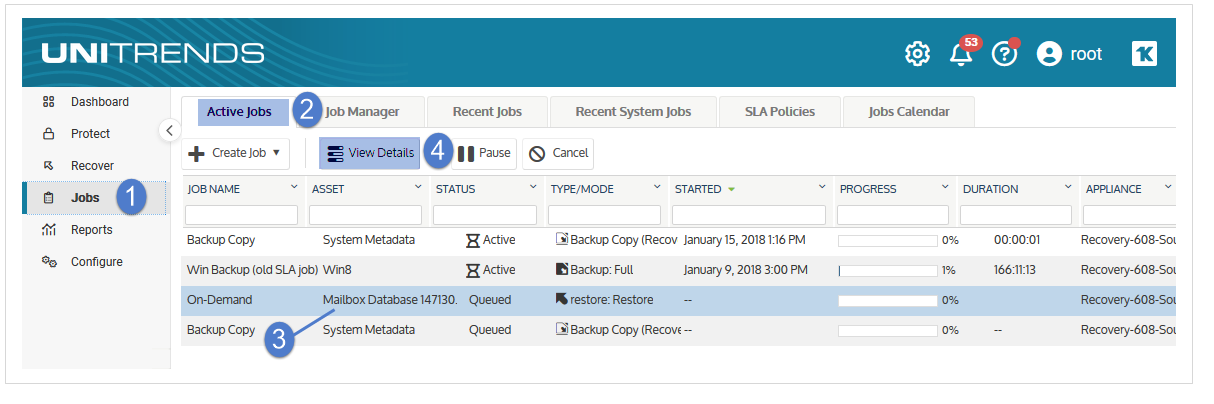
● The recovery is complete when the job's status changes to Success.
13. Access the recovered data on the recovery target.

Use this procedure to recover a backup to an alternate location.
NOTE This procedure is not supported for imported backups or hot backup copies. To recover an imported backup or backup copy, use the Backup Catalog procedure above.
1. Verify that all prerequisites in Recovering Exchange backups have been met.
2. Log in to the backup appliance.
3. Select Recover > Backup Catalog and click Backup Browser.
4. Select the Appliance and Date Range of backups to search. Backups that ran during the date range display.
5. (Optional) Refine the search:
● Enter text in any column field to filter the display.
● Click an arrow to sort by column.
● Click the accordion icon to add or remove columns from the display. (Not all columns display by default.)
● For a description of each column, see Backup Browser column descriptions.
6. Select the Exchange backup and click Recover.
7. Select Alternate Location as the Recovery Target.
8. Select the asset where the backup will be recovered.
9. Enter the Directory Path where the backup will be recovered.
10. (Optional) Specify Advanced Options. To run client-side commands, enter any system command or user script in the Commands to run pre-restore and Commands to run post-restore fields.
11. Click Next.
12. Review settings and click Save. Click OK to close the Information message.
13. To monitor the recovery job:
● Select Jobs > Active Jobs.
● Select the recovery job in the list and click View Details.
● The recovery is complete when the job's status changes to Success.
14. Access the recovered data on the recovery target.


