Recovery assurance procedures
Creating data copy access jobs
Data copy access (DCA) jobs can be created on your source backup appliance, managed appliances, and distributed appliances. The steps required vary by where the DCA VMs will reside:
● On-virtual host DCA job – When creating your first on-virtual host job, you must create a lab profile that enables you to apply consistent settings across multiple DCA jobs. This step can be omitted when subsequent data copy access jobs are created. For details, see To create an on-virtual host DCA job.
● On-box DCA job – When creating an on-box job, a lab profile is created automatically. There is no need to enter location details since the DCA VMs will reside on the physical appliance itself. For details, see To create an on-box data copy access job.
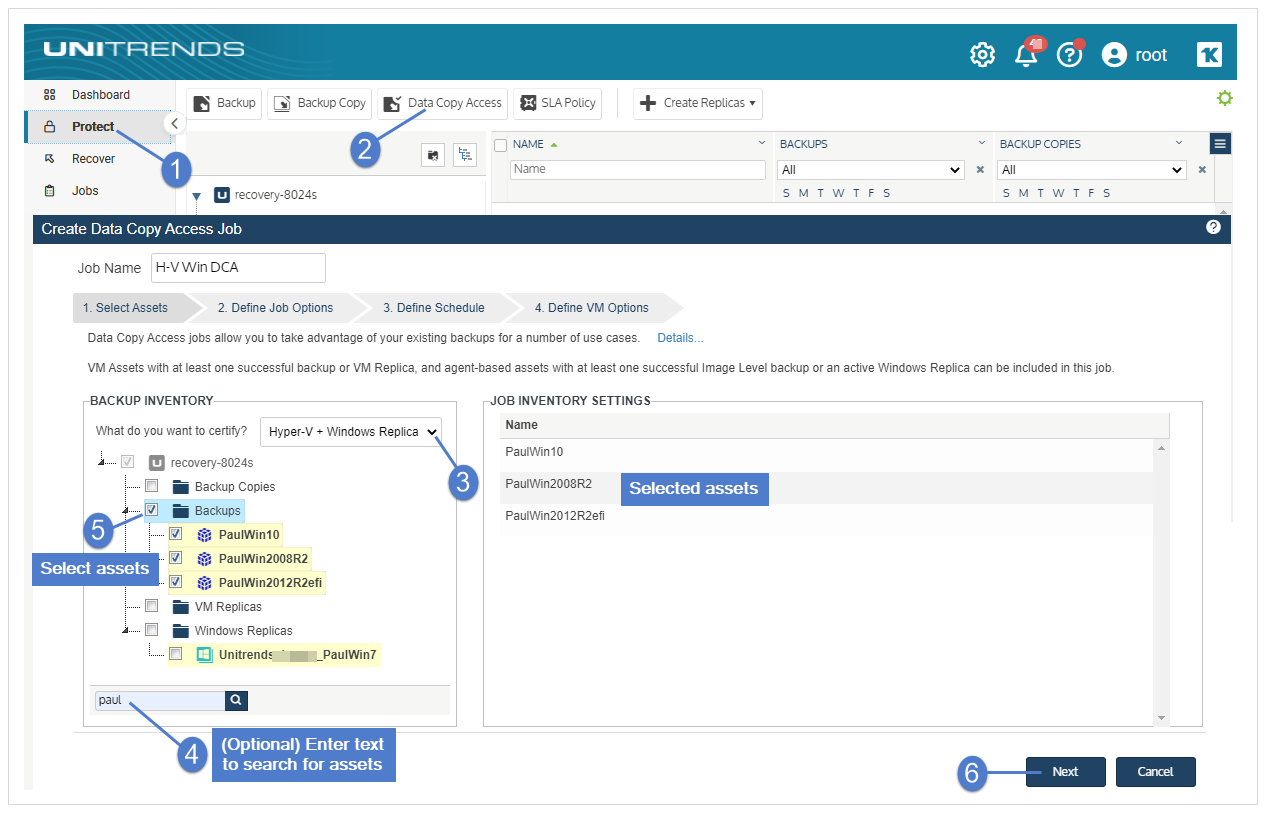
Use these steps to create a job that will stand up VMs on your ESXi or Hyper-V server.
1. Select Protect > Data Copy Access.
2. Enter a job name.
3. Select one of the following in the What do you want to certify list: VMware + Windows Replica or Hyper-V + Windows Replica.
NOTES
● A job can contain either a combination of VMware assets, image-level backups, and Windows replicas, or a combination of Hyper-V assets, image-level backups, and Windows replicas. VMware and Hyper-V assets cannot be included in the same data copy access job.
● Windows replicas must reside on a Hyper-V or ESXi host. Replicas located on the backup appliance are not supported.
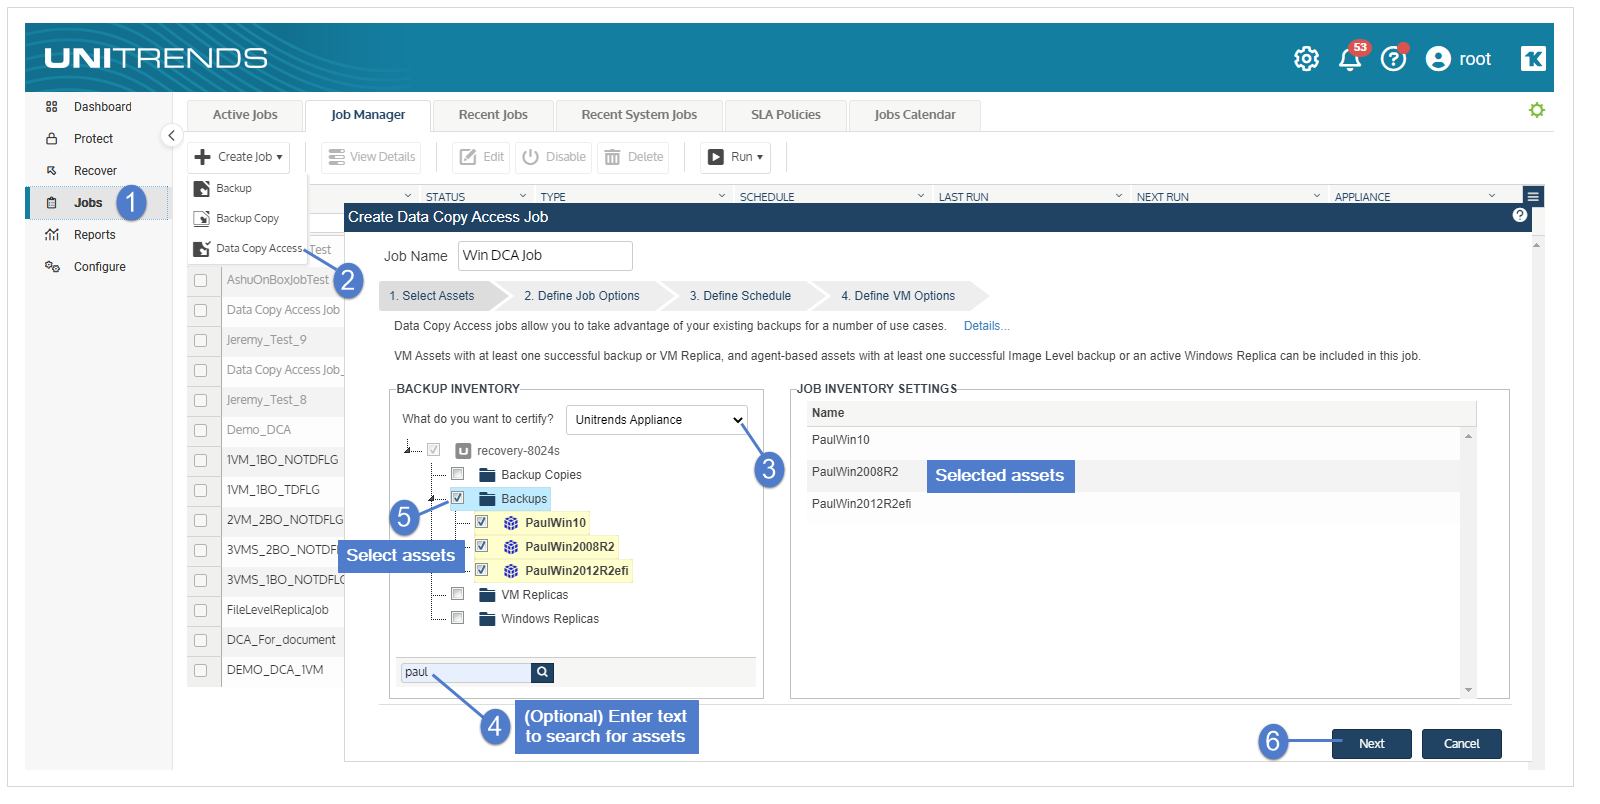
4. Check boxes to select assets to include in the job. Click Next.
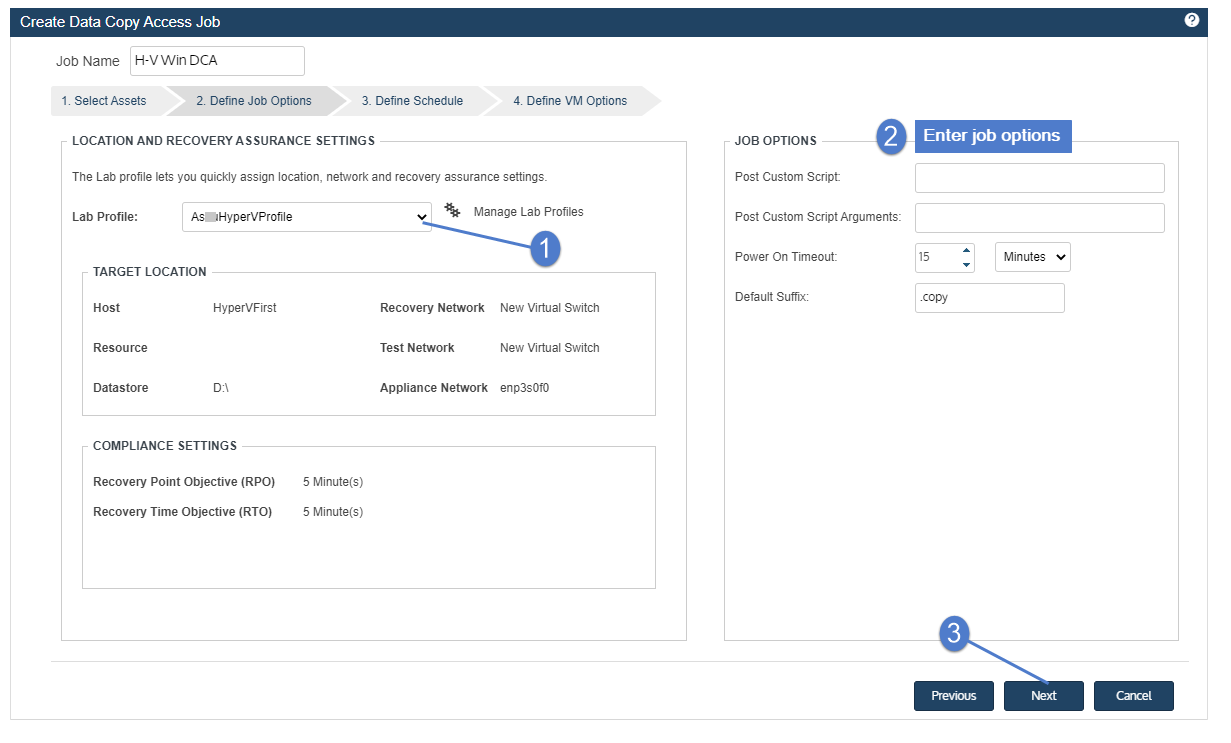
5. Enter location and recovery assurance settings by selecting a lab profile from the list.
If needed, use these steps to create a new lab profile:
● Select Manage Lab Profiles. Click Add.
● Enter a Profile Name.
● Enter Target Location settings:
|
Setting |
Description |
|---|---|
|
Type |
The virtual host type you selected. |
|
Host |
Select a virtual host from this list. |
|
Storage (Hyper-V only) |
Select a storage volume. |
|
Resource (VMware only) |
Resource pools configured on your selected ESXi host are listed here. You can opt to select a resource pool. |
|
Datastore (VMware only) |
Datastores configured on your selected ESXi host are listed here. Select a datastore from the list. |
|
Recovery Network |
Networks you have configured via your hypervisor display in this list. The recovery network is where your VMs will be stood up when the data copy access job runs in failover mode. |
|
Test Network |
Networks you have configured via your hypervisor display in this list. The test network is where your VMs will be stood up when the data copy access job runs in either Run Test or Instant Lab mode. WARNING! The test network must be isolated from your production VMs. Failure to contain tests and instant labs within an isolated test network may allow them to interfere with your production VMs. |
|
Appliance Network |
Select the VLAN you are using to connect to your virtual hosts. |
● Enter Recovery Assurance settings:
|
Setting |
Description |
|---|---|
|
Enable RPO/RTO tracking |
Check this box. RPO/RTO tracking must be enabled in order to certify backups as RPO/RTO compliant recovery points. |
|
Recovery Point Objective (RPO) |
The maximum amount of data loss, measured in time, that your business continuity plan can tolerate. |
|
Recovery Time Objective (RTO) |
The maximum amount of downtime that your business continuity plan can tolerate. |
● Click Save.
6. Enter Job Options. Click Next.
|
Setting |
Description |
|---|---|
|
Post Custom Script |
Enter the filename of a script you wish to run upon conclusion of the data copy access job. NOTE All custom scripts must output a result. |
|
Post Custom Script Arguments |
Enter any arguments for the post custom script. |
|
Power On Timeout |
If a VM fails to power on in this amount of time, it is omitted from the data copy access job. NOTE The inclusion of custom tests and replicas may necessitate longer timeout periods. |
|
Default Suffix |
This suffix will be appended to the VM's name when it is stood up on the hypervisor. |
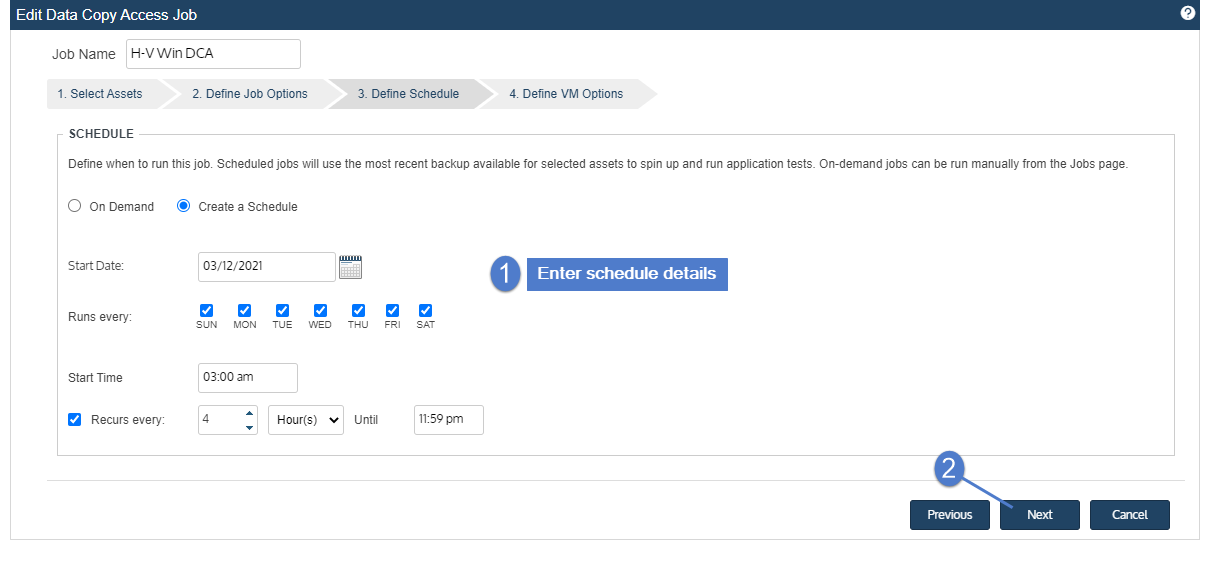
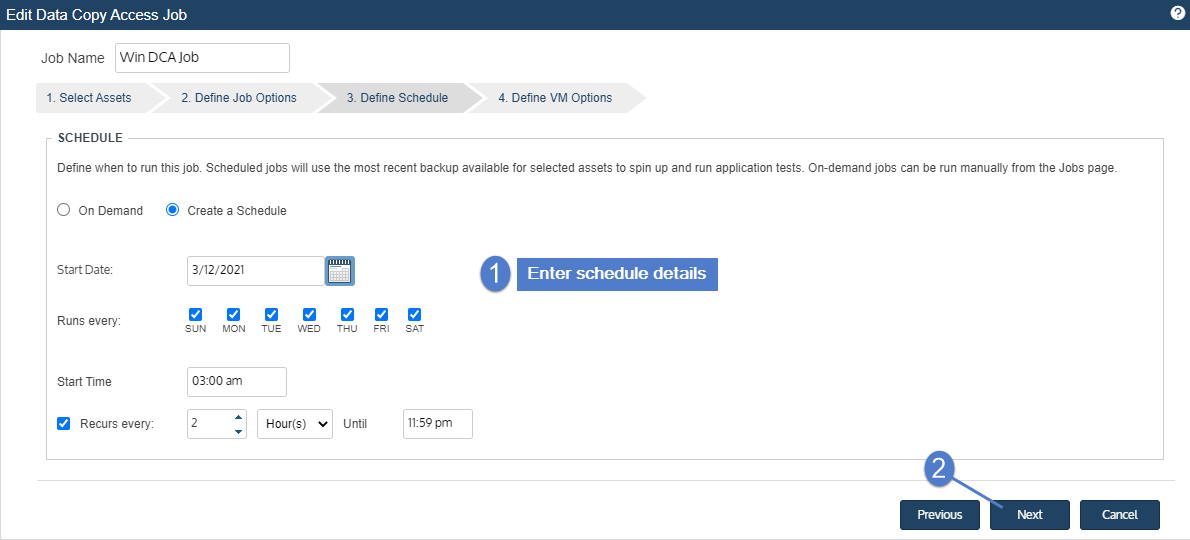
7. Define the test schedule. Click Next.
Scheduled data copy access jobs run in Run Test mode.
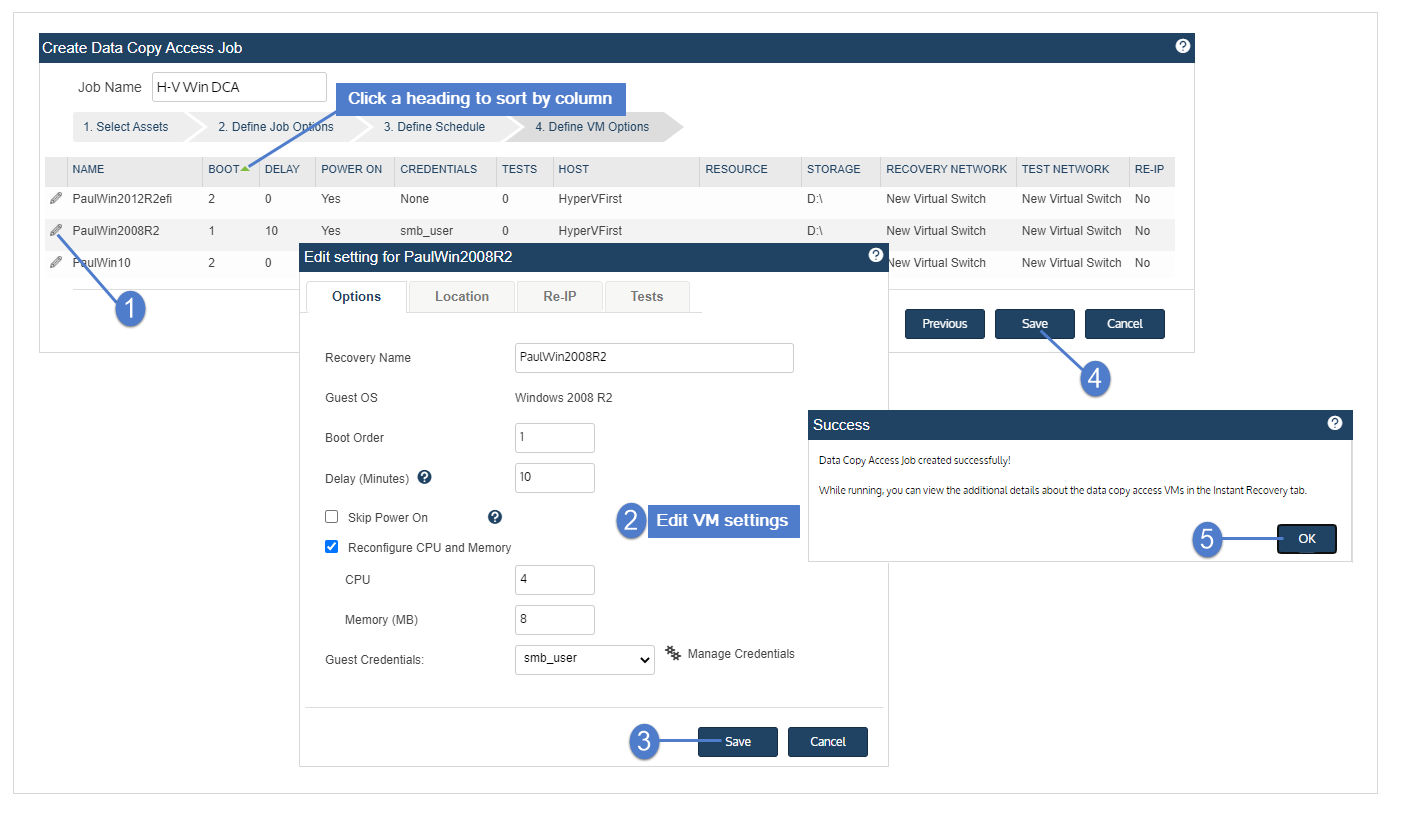
8. Define VM settings. After editing settings for all VMs, click Save to create the job.
Click the pencil icon adjacent to each VM in your job and review or edit the settings on each tab. Settings vary based on your individual use case, however guest credentials (on the Options tab) must be configured for each VM. See the tables below for descriptions of these settings.
|
Setting |
Description |
|---|---|
|
Recovery Name |
If desired, you can enter a new name for your VM in this box. |
|
Guest OS |
Displays the VM's guest OS. |
|
Boot Order |
This value determines this VMs position in the boot sequence relative to other VMs in the job. If two or more VMs are assigned the same boot order value, they are sequenced at random relative to each other. |
|
Delay |
This value determines the number of minutes to delay custom tests and re-IP after the VM is powered on. |
|
Skip Power On |
If this option is selected, the VM is stood up on the test network or recovery network (depending on the job mode) but not turned on. |
|
Reconfigure CPU and Memory |
When the data copy access job stands up your VM on either your recovery network or test network, these CPU and memory settings replace the settings the VM was configured with when the backup was taken. |
|
Guest Credentials |
Select the guest OS credentials used to log in to this VM. For further information, see Managing protected assets. |
If location settings are entered for this individual VM, they override the location settings specified in your lab profile.
Review and edit settings, then click Save.
Click Add to assign new IP settings to your VM. When the data copy access job stands up your VM on either your recovery network or test network, these IP settings replace the IP address the VM was configured with when the backup was taken.
NOTE Adapter Name refers to the network adapter found within the guest OS of your VM.
Click Save after making changes to these settings.
Add or edit custom tests, then click Save. For further instructions on adding custom tests to data copy access jobs, see Custom tests.
Use these steps to create a job that will stand up VMs on your physical Unitrends appliance.
1. Select Jobs > Create Job > Data Copy Access.
2. Enter a job name.
3. Select Unitrends Appliance from the What do you want to certify list.
4. Check boxes to select Windows image-level assets to include in the job. Click Next.
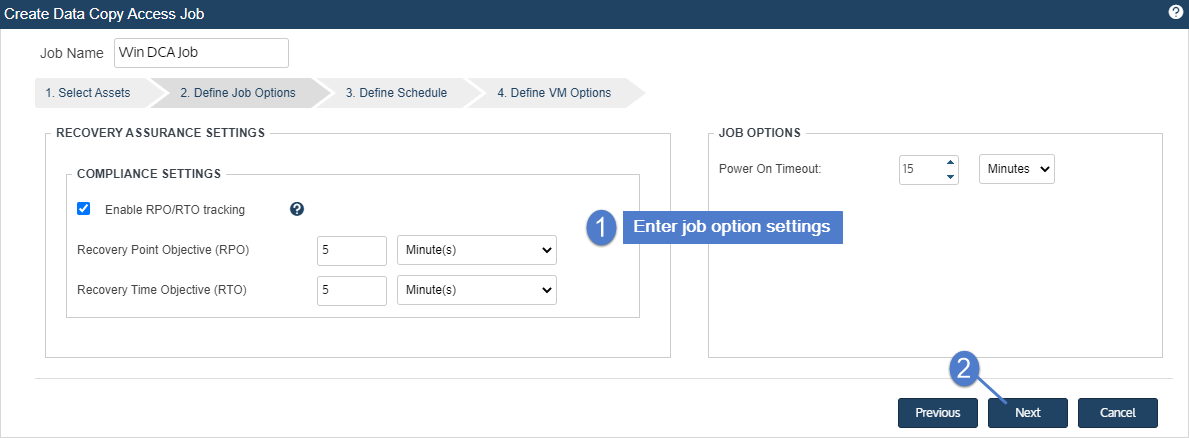
5. Enter job options. Click Next.
● Enable RPO/RTO tracking – Check this box. RPO/RTO tracking must be enabled to certify backups as RPO/RTO compliant recovery points.
● Recovery Point Objective (RPO) – The maximum amount of data loss, measured in time, that your business continuity plan can tolerate.
● Recover Time Objective (RTO) – The maximum amount of downtime that your business continuity plan can tolerate.
● Power On Timeout – If a VM fails to power on in this amount of time, it is omitted from the data copy access job.
6. Define the test schedule. Click Next.
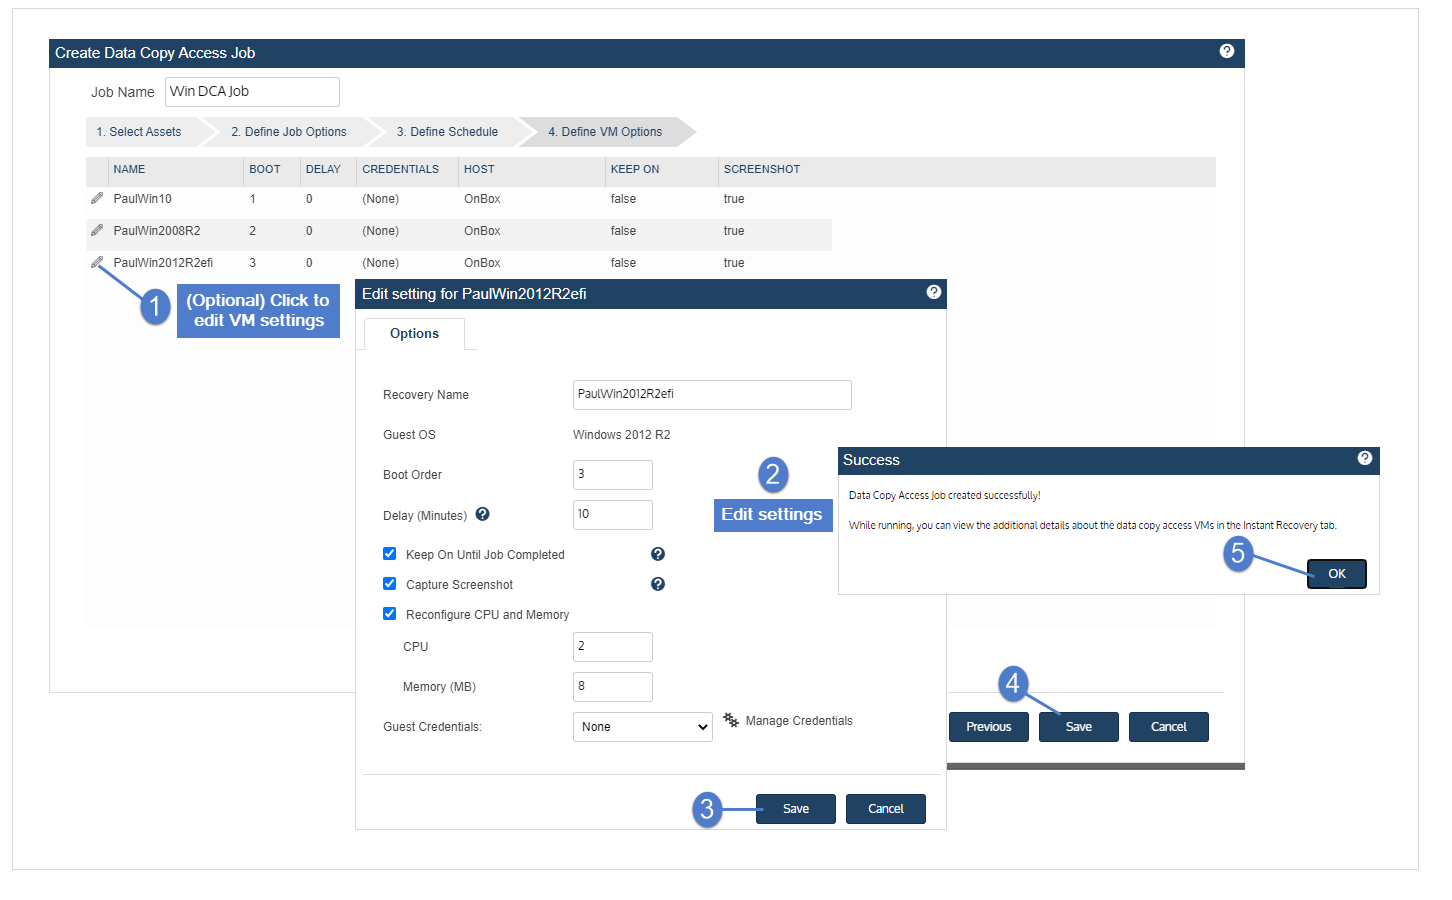
7. Review VM settings. If needed, click the pencil icon to edit a VM's settings. After editing and saving settings for all VMs, click Save to create the job.
|
Setting |
Description |
|---|---|
|
Recovery Name |
If desired, you can enter a new name for your VM in this box. |
|
Guest OS |
Displays the VM's guest OS. |
|
Boot Order |
This value determines this VMs position in the boot sequence relative to other VMs in the job. If two or more VMs are assigned the same boot order value, they are sequenced at random relative to each other. For on-box DCA jobs, it is recommended to boot VMs serially (one at a time) to reduce the impact to appliance performance. |
|
Delay |
Number of minutes the VM will remain powered on before being powered off. |
|
Keep On Until Job Completed |
Check this box to keep the VM powered on until the job is finished. |
|
Capture Screenshot |
Check this box to capture a screenshot of the VM desktop. This screenshot is included in the emailed DCA Job Notifications report. |
|
Reconfigure CPU and Memory |
When the data copy access job stands up your VM on your test network, these CPU and memory settings replace the settings the VM was configured with when the backup was taken. |
|
Guest Credentials |
Select the guest OS credentials used to log in to this VM. For details, see Managing protected assets. |
Running data copy access jobs
If you created a schedule for your data copy access job, it will run in Run Test mode at the times specified. This job displays on the Job Manager tab, where you can select the job to view details, edit settings, or run it on-demand.
For on-box DCA jobs, use the To run a DCA job in Run Test mode procedure to run the job on-demand.
For on-virtual host DCA jobs, you can run the job in any of the three data copy access job modes by using these procedures: To run a DCA job in Run Test mode, To run an on-virtual host DCA job in Instant Lab mode, or To run an on-virtual host DCA job in Failover Mode.
WARNING! Canceling a data copy access job that is in progress can result in orphaned virtual machine instant recovery sessions.
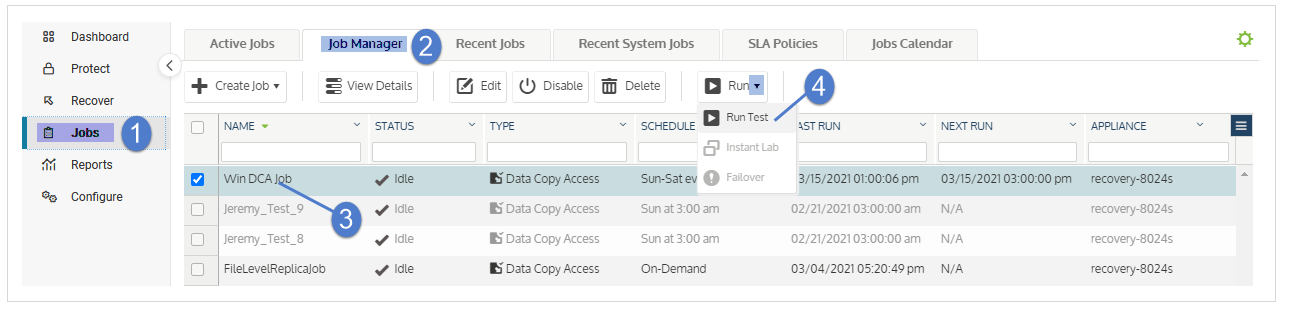
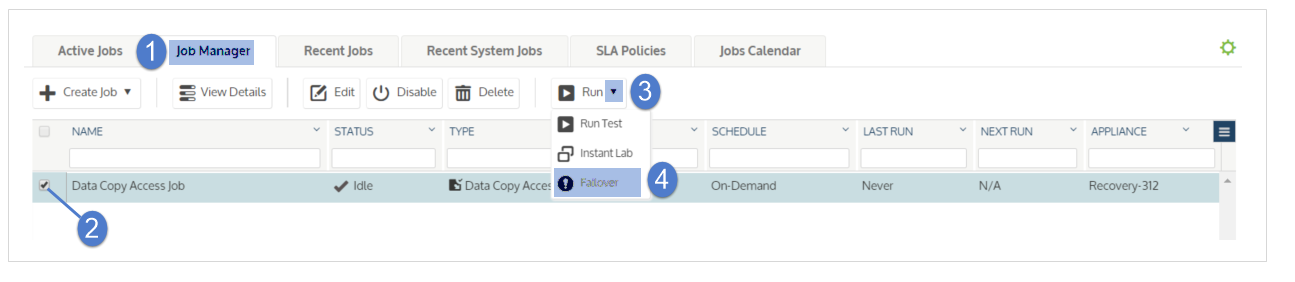
1. Select Jobs > Job Manager.
2. Select the job.
3. Click Run.
4. Select Run Test.
This procedure is supported for virtual host targets only.
WARNING! Before running this procedure, be sure the job's lab profile is configured to use an isolated test network on your hypervisor. Failure to contain tests and instant labs within an isolated VM test network may allow them to interfere with your production VMs.
1. Select Jobs > Job Manager.
2. Select the job.
3. Click Run.
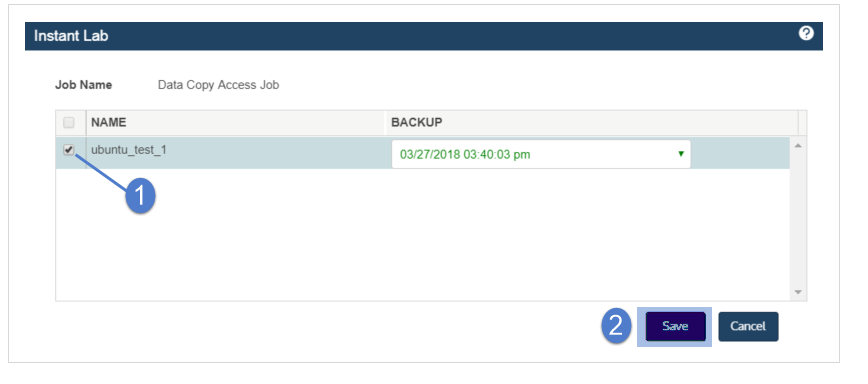
4. Select Instant Lab.

5. Select your desired VMs and recovery points.
● Green text – This backup has passed all tests specified in the initial Run Test job.
● Red text – This backup has failed one or more tests specified in the initial Run Test job.
● Black text – This backup has not been tested.
● Failure to latest recovery point – Select the latest recovery point if recovering from a VM replica or Windows replica.
6. Click Save. The dialog closes.
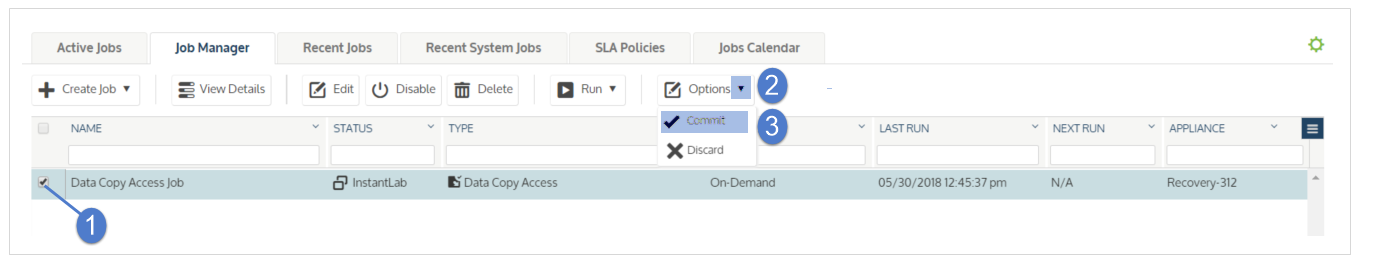
7. Reselect the job.
8. Click Options.
9. Select Commit. This triggers VM stand-up on your virtual host. Any replicas included in the job will be stood up in audit mode.
This procedure is supported for virtual host targets only.
WARNING! Before running this procedure, be sure the job's lab profile is configured to use an isolated test network on your hypervisor. Failure to contain tests and instant labs within an isolated VM test network may allow them to interfere with your production VMs.
1. Select Jobs > Job Manager.
2. Select the job.
3. Click Run.
4. Select Failover.
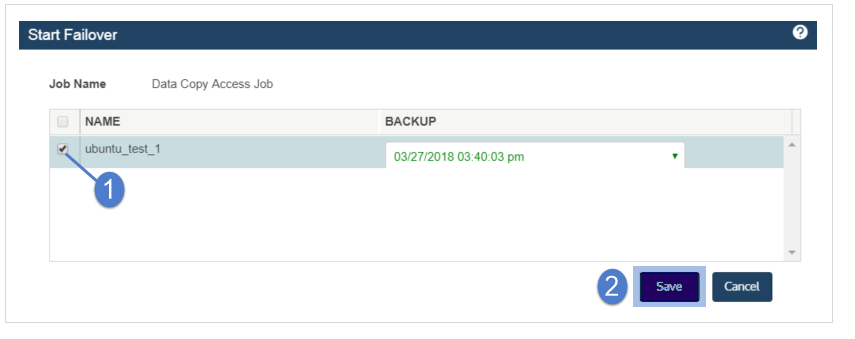
5. Select your desired VMs and recovery points.
● Green text - This backup has passed all tests specified in the initial Run Test job.
● Red text - This backup has failed one or more tests specified in the initial Run Test job.
● Black text - This backup has not been tested.
● Failure to latest recovery point – If recovering from a VM replica or Windows replica, select the latest recovery point.
6. Click Save.
7. Reselect the job.
8. Click Options.
9. Select Commit. This completes the failover process.
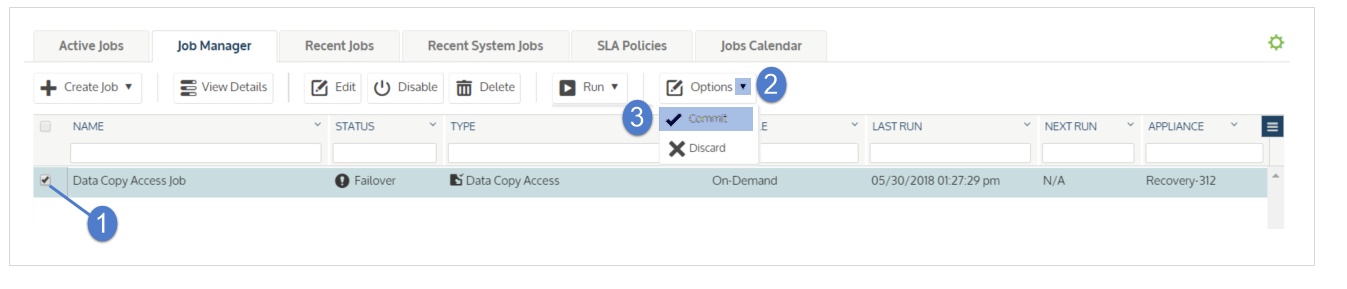
NOTE Any replicas included in the job will stand up in audit mode. In a disaster recovery scenario you may wish to put your replicas in live mode. For further information see Working with Windows file-level replicas for Windows replicas and Working with VM replicas for VM replicas.
Viewing the results of data copy access jobs
The results of a data copy access job can be viewed from within the Jobs menu or the Recovery Assurance and Compliance reports. For further information, see Working with reports.
1. Select Jobs > Recent Jobs.
2. Select job.
3. Click View Log.
The tasks included in the data copy access job display in a vertical list.

Troubleshooting: Data Copy Access Fails Due to VMware Tools
This section addresses issues where Data Copy Access (DCA) jobs for Windows virtual machines in a VMware/ESXi environment fail with a "VMware tools not installed" error.
Symptom
When running a Data Copy Access (DCA) job for a Windows image-level backup (e.g., Windows Server 2022, Windows Server 2012 R2) on a VMware/ESXi virtual machine, the job fails with the error message:
VMware tools not installed
You might observe that even if the system logs indicate a successful VMware Tools installation, the job still fails.
This can happen because the installation is not fully complete and might be awaiting a system reboot.
Cause
This issue typically occurs for one of two reasons:
- The Windows agent on your protected virtual machine does not have the most current script to manage VMware Tools installations during the DCA test.
- The VMware Tools installation on the VM was not fully completed or is pending a system reboot, causing the DCA to incorrectly report that VMware Tools are not installed.
Resolution
For most Windows Assets (e.g., Windows Server 2022)
Follow these steps to resolve the issue for most Windows Server versions:
- Update the Windows Agent: Ensure the Windows agent installed on the protected virtual machine is updated to the latest version. This update includes the most current scripts for handling VMware Tools installations.
- Perform a New Backup: After updating the agent, run a new image-level backup of the Windows asset.
- Re-run the DCA Test: Attempt to run the DCA Test job again using the newly created backup.
- Check for Pending Reboots (if needed): If the DCA Test still fails with "VMware tools not installed", log in to the VM console of the protected VM and check if VMware Tools installation is still in progress or if a reboot is pending.
- If a reboot is pending, manually restart the VM.
- After the reboot, confirm that VMware Tools are reported as "Installed" and "Running" within vSphere.
- Run another image-level backup, then re-run the DCA Test.
For Windows Server 2012 R2
Due to specific compatibility challenges, Windows Server 2012 R2 virtual machines may require manual intervention to fully resolve this issue:
- Access the VM: Log in directly to your Windows Server 2012 R2 virtual machine.
- Repair/Reinstall VMware Tools: From vSphere, initiate a repair or reinstallation of VMware Tools. Follow the prompts within the guest operating system to complete the installation, including any necessary reboots.
- Verify Installation: After completing the repair/reinstallation, confirm that VMware Tools are correctly installed and running on the VM, and that no reboot is pending.
- Perform New Backup and Test: Once VMware Tools are properly installed, run a new image-level backup of the Windows Server 2012 R2 asset, and then re-run the DCA Test.
Related workaround: Adjust timeouts so VMware Tools can finish installing
When Instant Lab or Failover fails with the error “VMware tools not installed” even though VMware Tools shows as installed on the VM, the problem is that the VM does not have enough time to:
- Install VMware Tools (approximately 4 minutes)
- Wait for the Windows Agent delay (
WIRSQLDelayRestore, default 10 minutes) - Complete additional communication with the Unitrends appliance (approximately 1 minute)
The total required time is about 15–17 minutes, while the Power On Timeout in the DCA job is typically set to 15 minutes. As a result, the job can time out just as the VM becomes ready.
You can work around this by either:
- Shortening the Windows Agent delay, or
- Increasing the DCA Power On Timeout.
Option 1 – Lower the Windows Agent delay on the protected Windows asset
-
Log in to the protected Windows server
Use an account with administrative rights.
-
Open the Unitrends Windows Agent configuration file
- Browse to the folder where the Unitrends Windows Agent is installed (commonly under
C:\PCBP\or similar). - Locate the file named
master.ini.
- Browse to the folder where the Unitrends Windows Agent is installed (commonly under
-
Edit the
master.inifile- Open
master.iniin a text editor running as Administrator (for example, Notepad started with “Run as administrator”). - Find the setting:
WIRSQLDelayRestore=10The default value of
10means a 10-minute delay. - Open
-
Reduce the delay value
Change the value to something lower so that the overall time fits well under your current DCA Power On Timeout. For example:
WIRSQLDelayRestore=9Save the file.
-
Restart the Unitrends Windows Agent service (if required in your environment)
- Open Services on the Windows server.
- Locate the Unitrends (or Kaseya/Unitrends) Windows Agent service.
- Restart the service so the updated setting is applied.
-
Re-run the DCA Instant Lab or Failover job
Start the same job again and confirm it now completes successfully.
Option 2 – Increase the Power On Timeout in the DCA job
If you prefer not to change the Windows Agent delay, or you want more buffer time, increase the Power On Timeout in the DCA job configuration.
-
Open the Unitrends UI
Log in to the Unitrends appliance web interface.
-
Locate the affected DCA job
- Go to your DCA / Instant Lab / Failover section.
- Find the job that is failing with the “VMware tools not installed” error.
-
Edit the job settings
- Open the job configuration for editing.
- Find the Power On Timeout setting (default is typically 15 minutes).
-
Increase the Power On Timeout
Set this to a higher value that comfortably covers:
- VMware Tools install time (approximately 4 minutes)
WIRSQLDelayRestore(default 10 minutes)- Additional communication (approximately 1 minute)
In testing for this issue, increasing the Power On Timeout to around 20 minutes allowed the job to succeed. For example, change:
- 15 minutes → 20 minutes
-
Save the job and re-run it
Save your changes, then run the Instant Lab or Failover job again and verify that it completes successfully.
Which option should I use?
- If you manage only a few affected Windows assets and want to keep your DCA timeouts unchanged, use Option 1 (lower
WIRSQLDelayRestore). - If you want a central, job-level change that helps multiple assets, or you do not want to modify agent configuration on each VM, use Option 2 (increase Power On Timeout).
Both approaches ensure that the VM has enough time to complete VMware Tools installation and agent initialization before the DCA job times out.
Expected Outcome After Mitigations
Once the steps above are successfully completed:
- The Windows agent on the protected VM will use the correct and updated VMware Tools installation logic.
- VMware Tools will be fully and correctly installed and running on the Windows VM, without any pending restarts or partial installations.
- The DCA Test will proceed successfully, recognizing the presence of VMware Tools, and will complete its validation steps without the "VMware tools not installed" error.
- System logs will accurately reflect the true status of VMware Tools installations, preventing misleading "success" messages when a reboot is still required.


