Create a file-level backup job
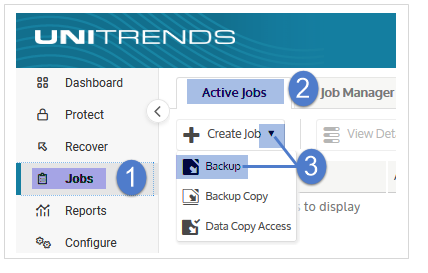
NAVIGATION Jobs > Active Jobs > Create Job > Backup
PERMISSIONS Administrator
Create a file-level backup job to protect physical machines (other than iSeries servers), Windows and Linux servers, and any virtual machine that runs the Unitrends agent.
File-level assets include all supported physical machines and agent-protected VMs.
BEFORE YOU BEGIN Review Backup jobs and ensure you have added all assets you want to protect to the Unitrends appliance.
See Managing protected assets for instructions.
Create a file-level backup job
NOTE A file-level asset can be assigned to one or more manually created backup schedules or to one SLA policy.
SLA policies are supported for Windows and Linux assets only.
WARNING! Do not create multiple file-level schedules against a single asset.
To work with multiple custom schedules, use aliases.
See Creating aliases for agent-based assets.
To create a file-level backup job, complete the following steps:
-
Select Jobs > Active Jobs > Create Job > Backup.
- Select File Level in the What do you want to backup? list.
- In the Inventory tree, check boxes to select the assets you want to protect.
Selected assets display in the Job Inventory Settings area.
To locate an asset by name, use the Search field below.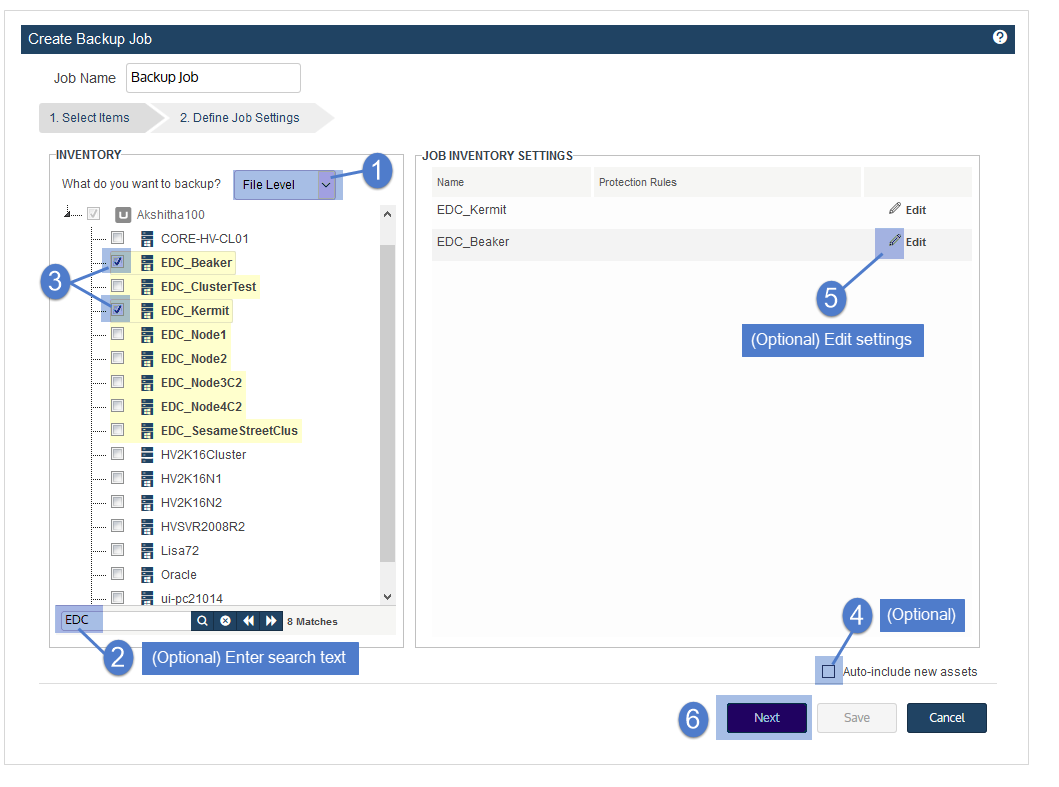
- (Optional) Check the Auto-include new assets box to automatically add newly discovered file-level assets to the schedule.
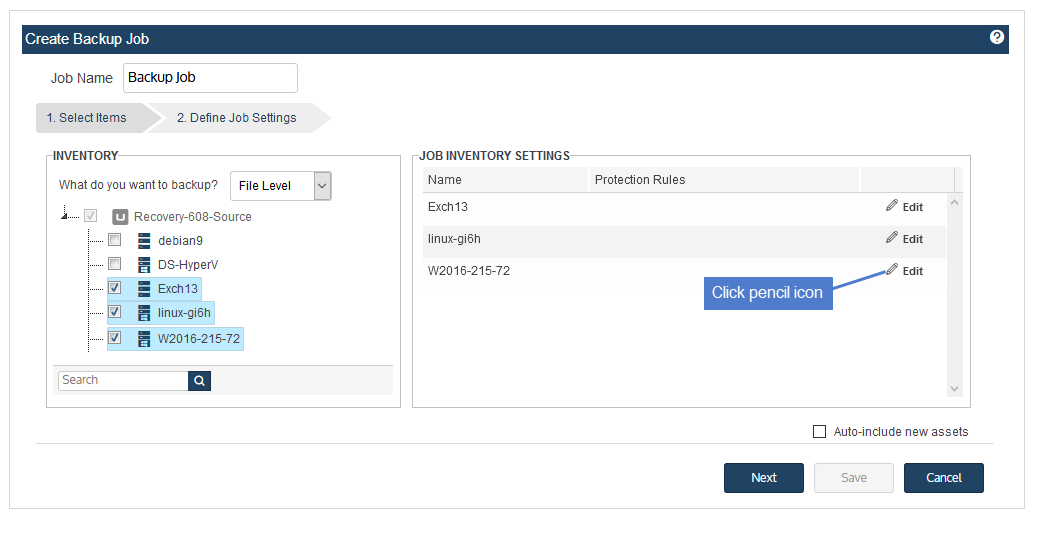
- (Optional) Edit Job Inventory Settings to apply options such as files to include or exclude and pre/post-backup commands: locate the asset in the list and click Edit, modify settings, then click Save to retain any changes.
File-level setting
Description
General considerations for including or excluding data from an asset's backups
Review the following before specifying data to include or exclude:
● When creating a schedule, any inclusions or exclusions you add are applied to jobs run by that schedule only.
Inclusions and exclusions are not applied automatically in other cases.● Running an on-demand backup of the asset does not automatically apply any inclusions or exclusions specified in the asset's schedule.
To run an on-demand backup, do one of the following:● Create a one-time job that has the same inclusions and exclusions as in the schedule.
● Manually run the schedule (select the schedule under Jobs > Job Manager and click Run).
● Run a one-time Selective backup (so that a new full is not created).
● If you specify both files to include and files to exclude, the inclusion is applied first.
Any exclusions are then applied to the subset of included files.Inclusion tab
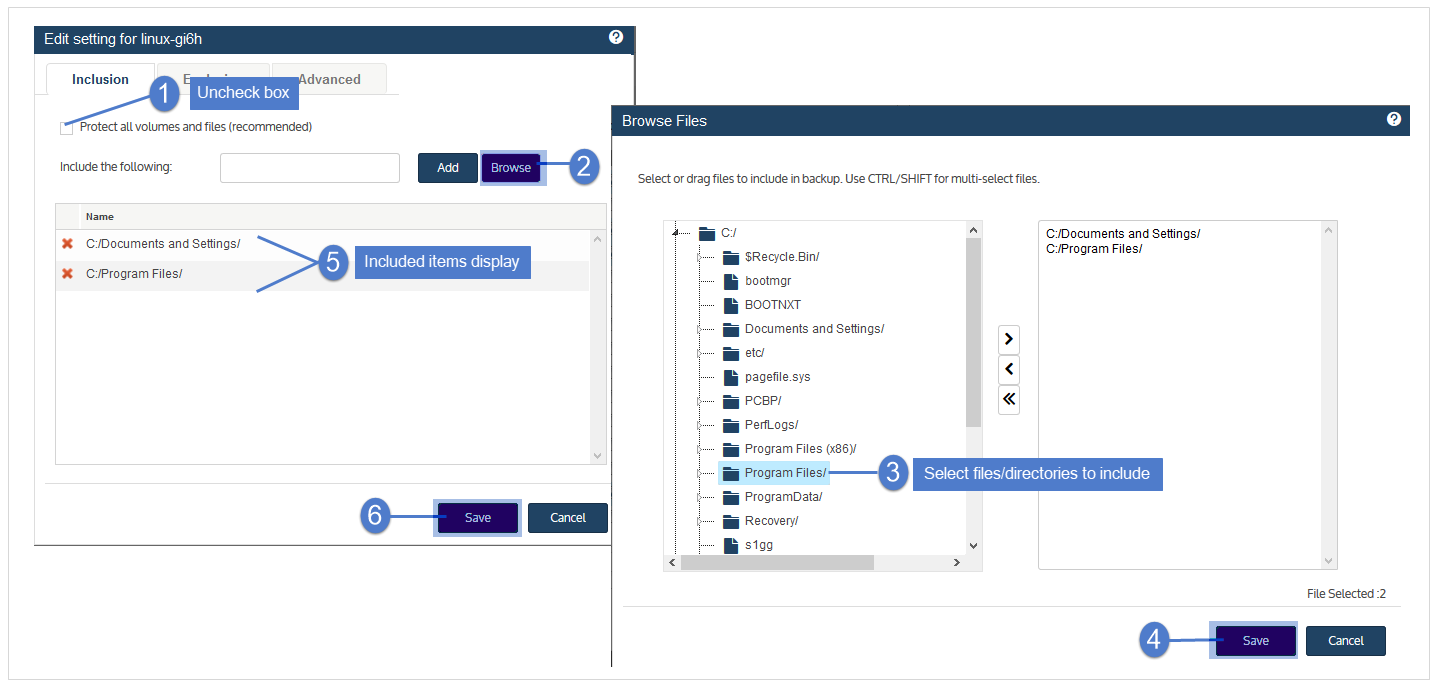
Click to specify files, folders, or volumes to include in backups of this asset.
● Data that does not meet the criteria you specify here is NOT included in the backup.
● Type in the full path (for example, C:/Documents) or Browse the asset to specify data to include. (Wildcards are not supported.)
● If you are running a full backup and include files or folders in the system drive (typically C:), do not check the System State box on the Advanced tab.
Full backups fail if system state is excluded.● Run a new full backup upon creating or modifying included files.
Example:
Exclusion tab
Click to specify files, folders, or volumes to exclude from backups of this asset.
● Data that does not meet the criteria you specify here IS included in the backup.
● To specify files to exclude, do any of the following:
● Type in the full path (for example, C:/Documents).
● Browse the asset.
● Enter a selection pattern.
Wildcards are supported for Windows assets.
Wildcards are not supported for these asset types: Linux, Unix, and NAS.
See these rows below for usage examples: Wildcard * usage, Wildcard ? usage, and Multiple wildcards.● Run a new full backup upon creating or modifying excluded files.
Example:
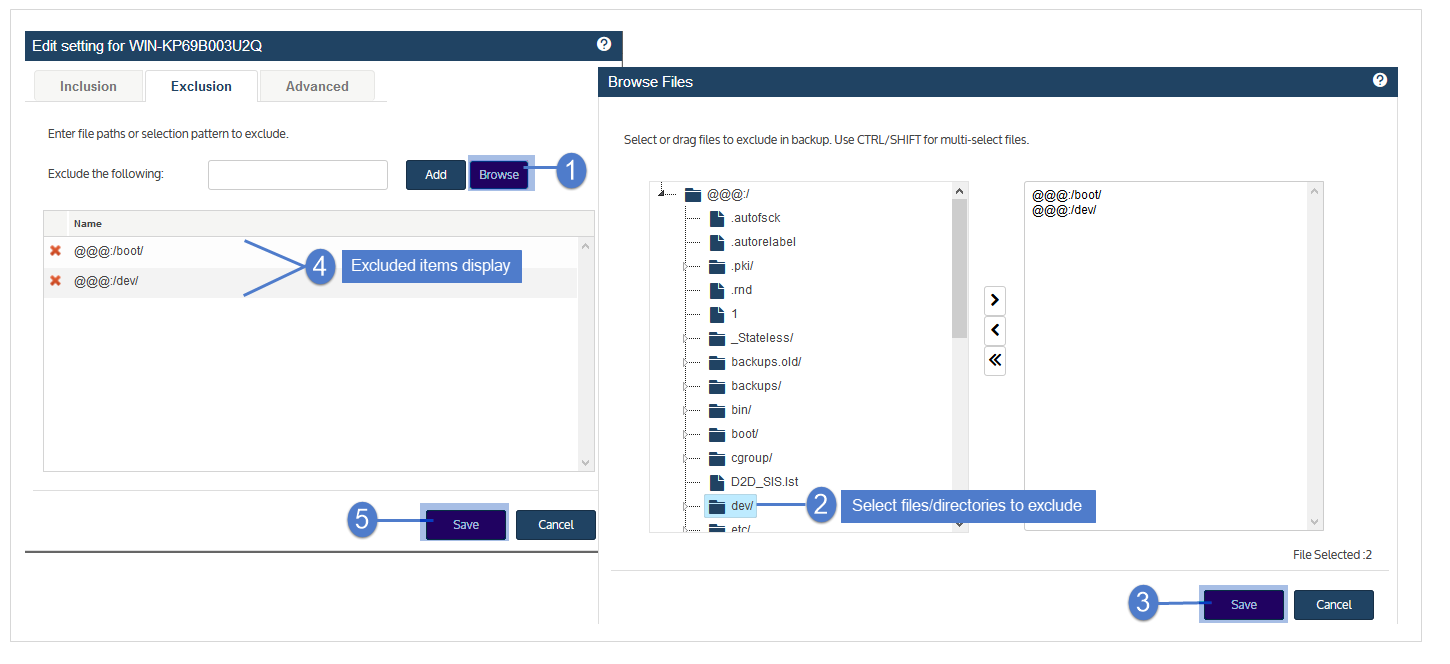
An example of how to exclude all files with zero or more characters that match exclusion pattern:
*.txt
An example of how to exclude directories with zero or more characters and their contents within a specified path that match the exclusion pattern:
C:/windows/sys*
Limitations:
● *folder_abc cannot be used to exclude all folders that match folder_abc on the protected asset.
The full path must be provided.● If an entire directory is excluded, the directory name will still appear in the backup; however, its contents will be empty.
● Multiple wildcard matches like the following are not supported:
C:\*\*\abc.txt
An example of how to exclude all files within specified path that matches a single character within exclusion pattern:
C:/PCBP/Lists.dir/pro_client?.spr
An example of how to exclude all directories and their contents within specified path that matches a single character within exclusion pattern:
C:/Programfiles/Case?/
Limitation: If an entire directory is excluded, the directory name itself will still appear in the backup; however its contents will be empty.
An example that uses multiple “?” wildcards and only one * wildcard:
C:/?Log?/*.logs
Limitation: If an entire directory is excluded, the directory name itself will still appear in the backup; however its contents will be empty.
Advanced tab
Use this tab to specify advanced options.
See these rows below for details: Advanced Exclusions, Command to run Pre-Backup, and Command to run Post-Backup.Example:
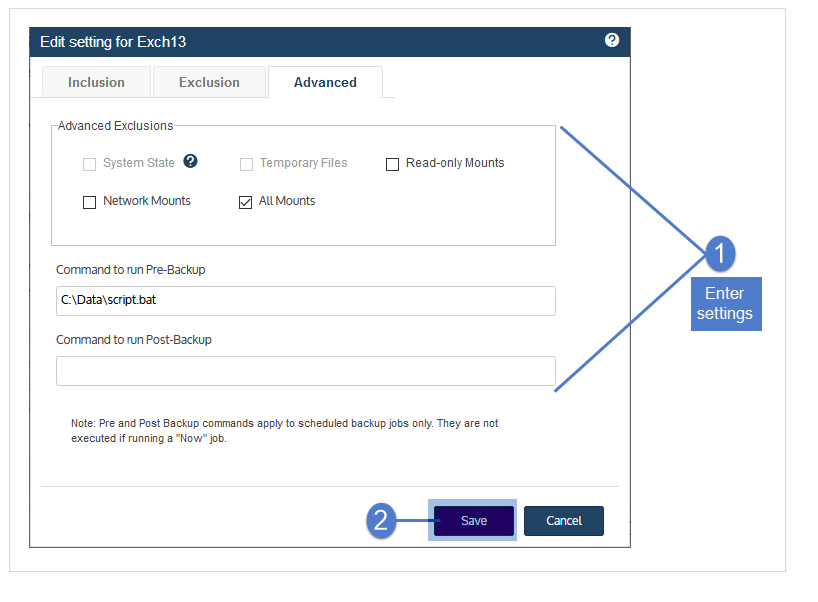
Check one or more boxes to exclude any of the following: system state, temporary files, read-only mounts, network mounts, or all mounts.
Consider the following before applying advanced exclusions:
● To perform bare metal recovery or use Windows replicas, the following must be included in the backup: system state and all boot and critical system (OS) disks/volumes.
If you need these features for the asset, do not specify data to include or exclude unless you are sure these disks/volumes will be included.● If you are running a full backup and have selected files or folders in the system drive (typically C:) on the Inclusion tab, do not check the System State box on the Advanced tab.
Full backups fail if system state is excluded.● Creating aliases for an asset - Adhere to the following when creating aliases for an asset:
● You must include the system state on the asset whose backups contain the boot and critical OS volumes.
● You must exclude the system state on the other aliased assets.
This approach ensures you can perform bare metal recovery of the asset.● Only one asset can include the system state.
Disaster recovery of the asset fails if the system state is not included with the boot and OS volume or if the system state is included on aliased assets that do not include the boot and OS volume.IMPORTANT For Windows assets, the backup must contain the system state, boot disk and any other system critical volumes to use the integrated bare metal recovery and Windows replica features.
Be sure one of the aliased assets contains all of these disks to use these features.To run a command or script on the asset before a scheduled backup starts, enter the full path to the command or script in the Command to run Pre-Backup field.
The only allowed command is bp_cmd_pre_backup For windows, the extensions .bat or .cmd are allowed.
For linux, the extension .sh is allowed.For example C:\Data\bp_cmd_pre_backup.bat or /usr/jsmith/bp_cmd_pre_backup
NOTE Pre-backup commands are used for scheduled jobs only.
These commands are not applied to on-demand jobs (jobs run by selecting the Now option).To run a command or script on the asset after a scheduled backup completes, enter the full path to the command or script in the Command to run Post-Backup field.
The only allowed command is bp_cmd_post_backup For windows, the extensions .bat or .cmd are allowed.
For linux, the extension .sh is allowed.For example C:\Data\bp_cmd_post_backup.bat or /usr/jsmith/bp_cmd_post_backup
NOTE Post-backup commands are used for scheduled jobs only.
These commands are not applied to on-demand jobs (jobs run by selecting the Now option). - Click Next.
-
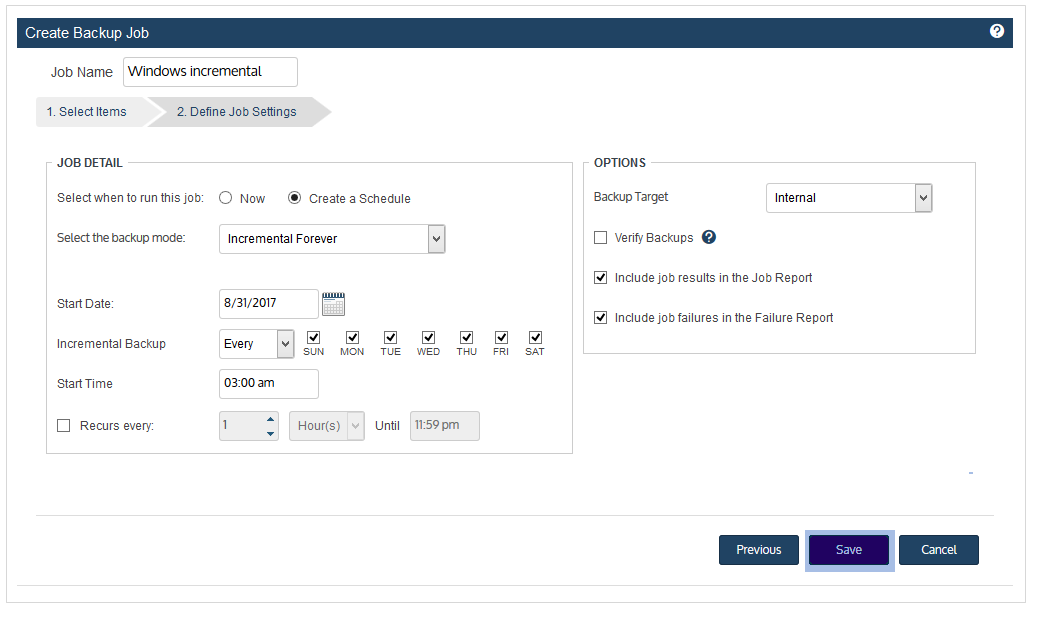
Select Now or Create a Schedule to specify when you want this job to run.
If you create a schedule, enter a unique job name. - Set remaining Job Details and Options.
In most cases, the standard backup modes can be used to create the schedule.
If you need more granularity, choose Custom to create a custom backup calendar.
See Configure a custom backup schedule for details. - Click Save.
-
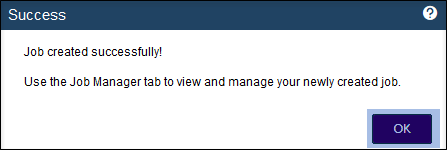
Click OK to close the Success message.
- If you created a schedule, the job runs at the date and times you specified.
- If you chose Now, the job queues immediately.
Click Active Jobs to view the running job.
The file-level backup job is created.
Unitrends protects the selected assets according to the schedule you configured.
View running jobs at Jobs > Active Jobs.


