Using Assets
See these topics to manage your Unitrends assets and backup policies:
Viewing assets
On the Protect page, click Assets to switch to Assets view. The view displays the assets protected by all Unitrends appliances that have been added to your backup.net instance. Click a column heading to change the sort order of the display. To view additional pages of assets, use the scroll arrows below. (To filter the display, see Filtering the Assets view.)
The following information is given for each asset:
- Select checkbox –
- Use with Set Backup Policy or Remove Backup Policy to quickly modify the backup policy of one or more Windows image-level assets, Windows file-level assets, VMware virtual machines, or Hyper-V virtual machines. You can only select Windows image-level assets, Windows file-level assets, or VMware/Hyper-V VMs that are protected by host-level backups. For details, see Working with backup policies.
- Use with Remove to quickly remove selected assets from appliances. For details, seeRemoving assets.
IMPORTANT When an asset is removed, all associated backups of that asset are also deleted. When removing a virtual host, all backups of its VMs are also deleted. Be sure to review the Prerequisites and considerations for removing assets and use caution when removing an asset.
- Type icon – Indicates the asset type. Hover over the icon for type description. Asset type examples: VMware VM Instance, Windows (file-level), Image Level Instance (Windows), Linux, and SQL.
- Name – Asset name.
- Appliance – Appliance name.
- Backup Policy – Asset's backup policy: Weekly, Daily, 4x/day, Bihourly, Hourly, Custom, Appliance UI, or Error. See Backup policy descriptions for details.
 – Hot copy icon. Indicates that the asset's backup policy is copying backups to the Unitrends Cloud. For details, see Working with backup policies.
 – Cold copy icon. Indicates that the asset's backup policy is copying backups to a third-party cloud target. For details, seeApplying backup policies to an appliance's assets.
- Last Full – Size of the last successful full backup.
- Last Backup – Number of minutes, hours, days, weeks, or months since the last backup.
- Recent Backups – Icons indicating the status of backups over the last seven days. Hover over an icon to see job details. Click an icon to view asset details.
 All backups were successful
 Recovery point has been certified by a data copy access (DCA) job. For details, see Recovery Assurance.
 One or more backups failed or ran with warnings
  Backup was successful but was not certified
 All backups failed
  No backups were taken
- Last Backup Copy – Number of minutes, hours, days, weeks, or months since the last hot or cold backup copy.
- Recent Backup Copies – Icons indicating the status of backup copies over the last seven days. Hover over an icon to see job details (date/time and the number of hot and cold backup copies). Click an icon to view asset details.
- All backup copies were successful
- One or more backup copies failed or ran with warnings
- All backup copies failed
- No backup copy was taken
- Last Certified – Number of minutes, hours, days, weeks, or months since a backup has been certified by a data copy access (DCA) job.
Click the asset to view these details:
- Last Full – Size of the last successful full backup.
- Last Backup – Number of minutes, hours, days, weeks, or months since the last backup.
- Last Backup Copy – Number of minutes, hours, days, weeks, or months since the last hot or cold backup copy.
- Last Certified – Number of minutes, hours, days, weeks, or months since a backup has been certified by a data copy access (DCA) job.
- Job Details – Lists jobs that are currently running or have completed in the last few minutes. Shows the job name, status, and progress bar. If a job is currently running, you may opt to click X to cancel the job. Click See All to view all active jobs.
- Recovery Points – Lists the asset's recovery points (local backups and backup copies) by date.
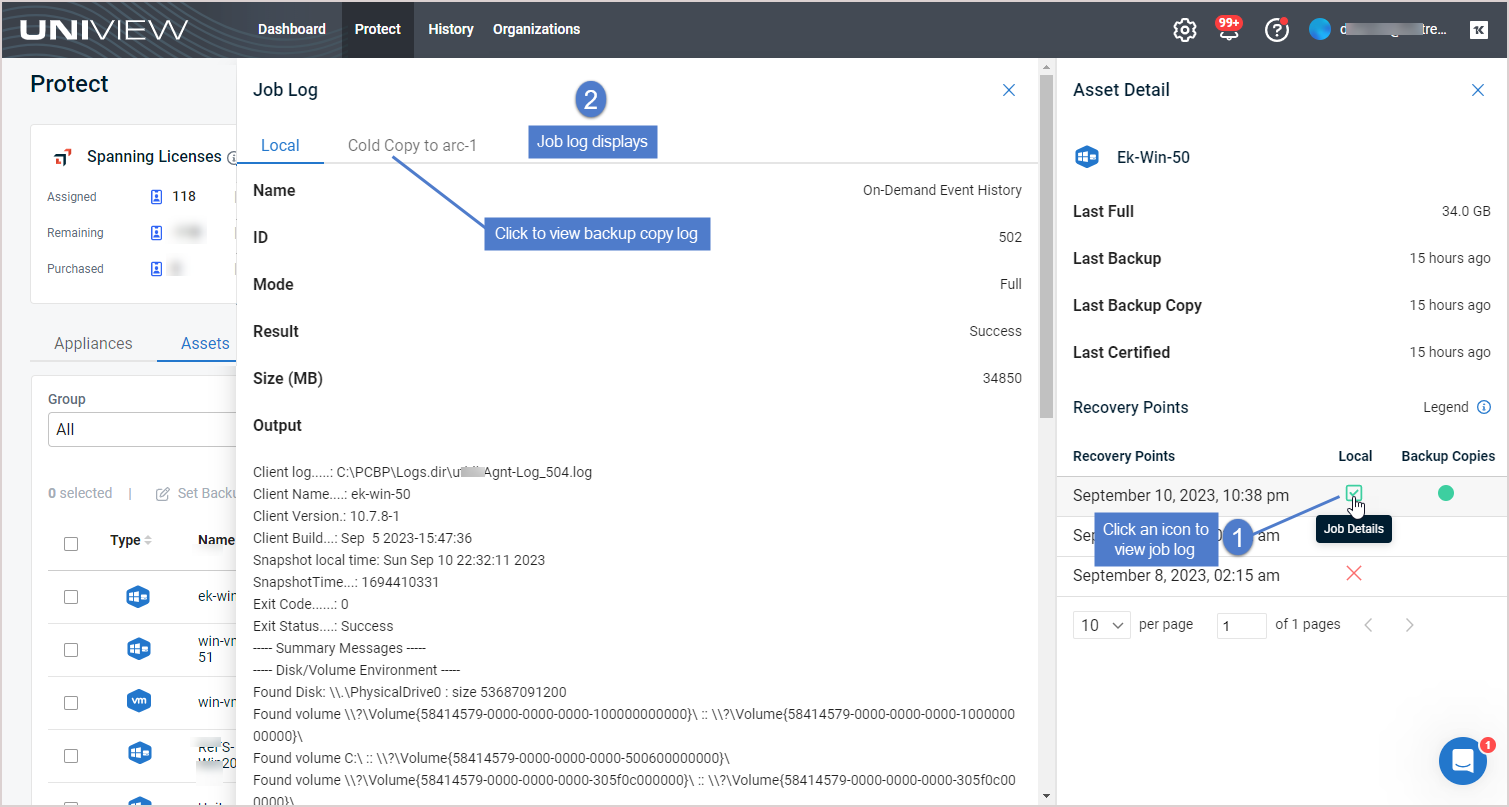
- Local – Icon indicating the status of the backup. Click an icon to view log details.
- for success
 for job ran with warnings
  for failure
 - for recovery point has been certified by a data copy access (DCA) job. For details, see Recovery Assurance.
- for DCA certification job ran with warnings.
- Backup Copies – Icon indicating whether a hot or cold backup copy was taken for the backup: indicates a successful copy was taken, indicates a copy ran with warnings, indicates a copy was attempted but failed, no icon indicates that no copy was taken. Hover over an icon to see the backup copy type (hot or cold).
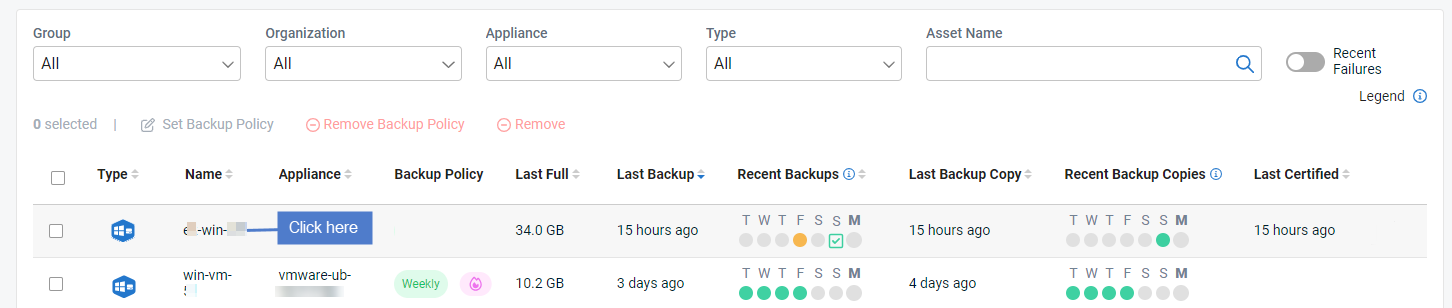
Click a recovery point or status icon to view the job log:
Filtering the Assets view
The Assets view displays the assets protected by all Unitrends appliances that have been added to your backup.net instance.
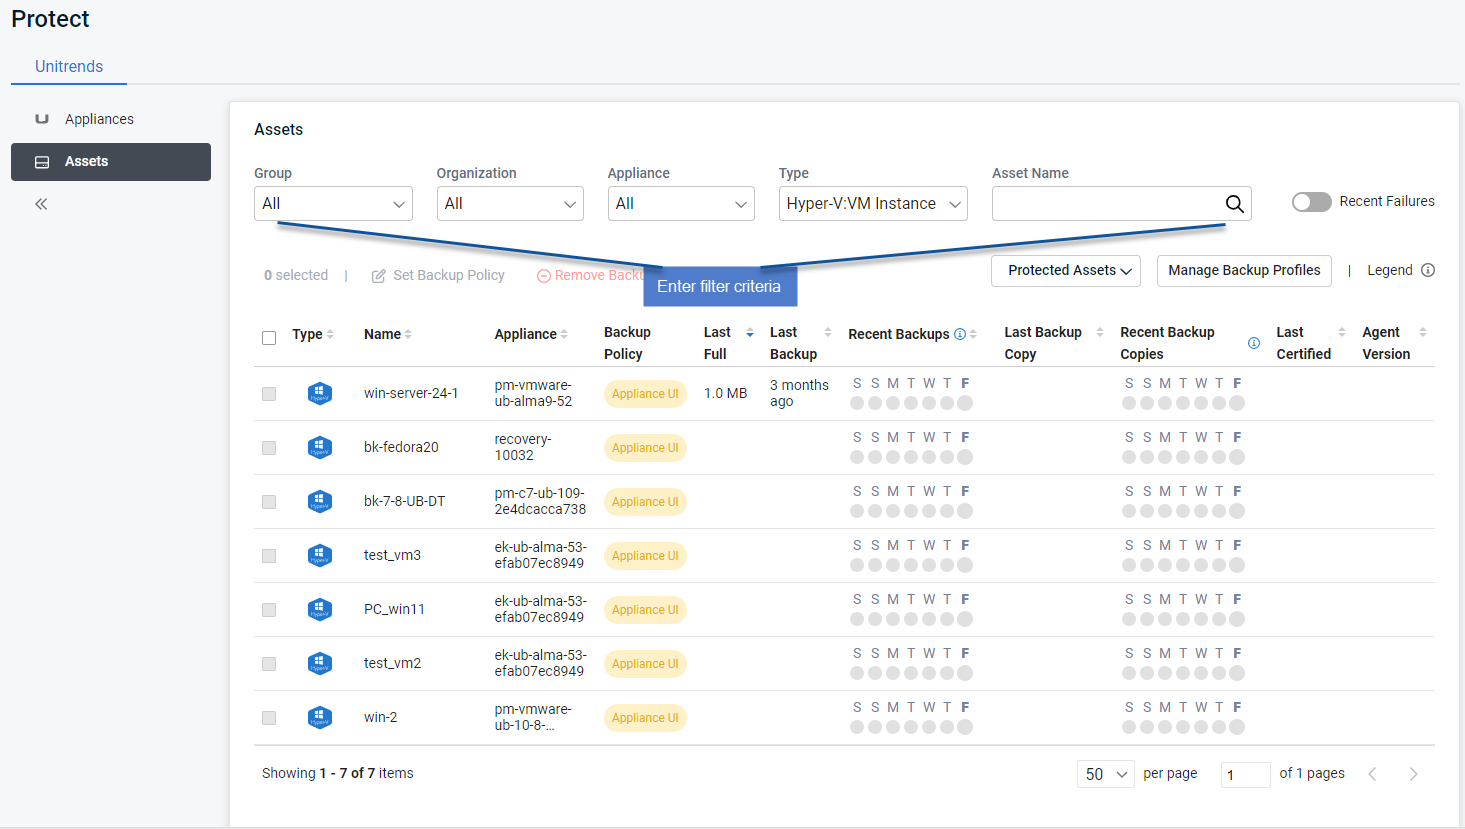
To filter the display, enter filter criteria in any of the following:
- Group – Select a group from the list. (Select All to clear the group filter.)
- Organization – Select an organization from the list. (Select All to clear the organization filter.)
- Appliance – Select an appliance from the list. (Select All to clear the appliance filter.)
- Type – Select one of the following to filter by asset type: AHV VM Instance, AIX, Exchange, Exchange Instance, Generic OS, Hyper-V, Hyper-V VM Instance, Image Level Instance (Windows), iSeries, Linux, Mac OS, NDMP Device, NDMP Device Instance, Novell OES, Oracle, Oracle Instance, Other OS, SCO, SharePoint, SharePoint Instance, Solaris, SQL Server, SQL Server Instance, UCS Service Profile, UCS Service Profile Instance, VMware, VMware VM Instance, Windows (file-level), Xen, or Xen VM Instance. (Select All to clear the filter.)
- Asset Name field – Enter a text string, then press Enter to apply. Asset names containing the text you entered display.
- Recent Failures – Click to slide the switch and view assets with recent failures.
Removing assets
UniView enables you to remove these asset types from your Unitrends appliances:
- Windows physical machines
- Linux physical machines
- vCenter or ESXi servers
- Hyper-V servers
From the Assets page, you can remove assets from multiple appliances in a single operation. Before removing an asset, review the Prerequisites and considerations for removing assets. Then use the To remove assets from appliances procedure to remove assets.
NOTE You can also use the Appliance Detail page to remove assets from an appliance. For details, see Removing assets from an appliance.
Prerequisites and considerations for removing assets
The following requirements and considerations apply:
- Before you can remove an asset, you must remove any UniView backup policy or remove the asset from any Unitrends job schedules.
- When an asset is removed, all associated backups of that asset are also deleted. Please use caution when removing an asset.
- Removing an asset also removes any associated asset instances, along with the backups of those instances. For example, removing an ESXi host removes its hosted VMs and the VM backups. Removing a Windows asset removes its image-level instance and any hosted application instances (e.g., Exchange or SQL), and backups of these instances.
- When a Hyper-V or VMware virtual host is removed, all backups of its VMs are also deleted. However, if you have added a vCenter server and the ESXi hosts it's managing, the VM backups are not deleted from the appliance if you remove only the vCenter server. The backups are not deleted unless you also remove the ESXi host servers.
- Hyper-V runs on a Windows server. When you add a Hyper-V server, the following assets are added:
- The Hyper-V host (which is the Windows server that is running the Hyper-V application; asset type is Windows)
- Hosted virtual machines (asset type is Hyper-V: VM Instance)
- One or more Hyper-V application instances (asset type is Hyper-V)
- An application instance that can be used to run image-level backups of the Windows Hyper-V host server (asset type is Image Level Instance)
To remove the Hyper-V server you must remove the Windows server asset. 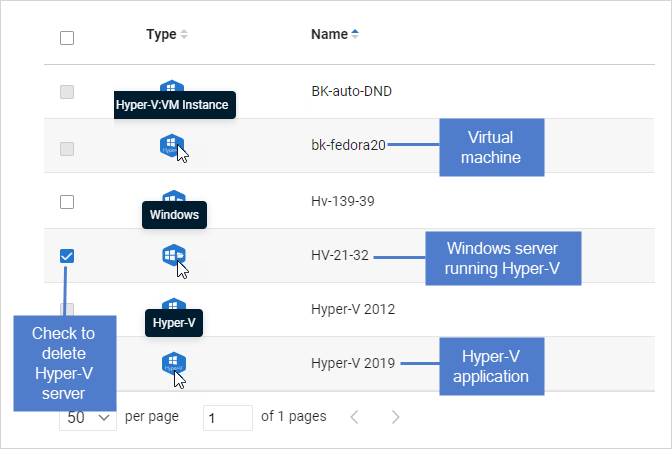
- Windows agent – For Windows assets protected with a Unitrends agent:
- Asset configuration settings are saved in the master.ini file, which is located in the \PCBP directory on the Windows system drive (e.g., C:\PCBP\). Deleting the asset from the Unitrends appliance also removes this file from the asset itself and any customized settings you have added are lost. Be sure to save the asset’s master.ini file before deleting if you think you may want to add the asset to this or another Unitrends appliance and want to use these settings. After adding the asset back to an appliance, replace the standard master.ini file with the one you have saved.
- If you are using Windows replicas and you remove the Windows asset while a virtual recovery is in progress, the deletion may not be instantaneous. The clean up takes time because the recovery is shut down and the virtual replica asset is removed.
- Linux agent – For Linux assets protected with a Unitrends agent, asset configuration settings are saved in the master.ini file (located here by default: /usr/bp/bpinit/master.ini). Deleting the asset from the Unitrends appliance also removes this file from the asset itself and any customized settings you have added are lost. Be sure to save the asset’s master.ini file before deleting if you think you may want to add the asset to this or another Unitrends appliance and want to use these settings. After adding the asset back to an appliance, replace the standard master.ini file with the one you have saved.
To remove assets from appliances
Use this procedure to remove assets from one or more appliances.
IMPORTANT When an asset is removed, all associated backups of that asset are also deleted. When removing a virtual host, all backups of its VMs are also deleted. Be sure to review the Prerequisites and considerations for removing assets and use caution when removing an asset.
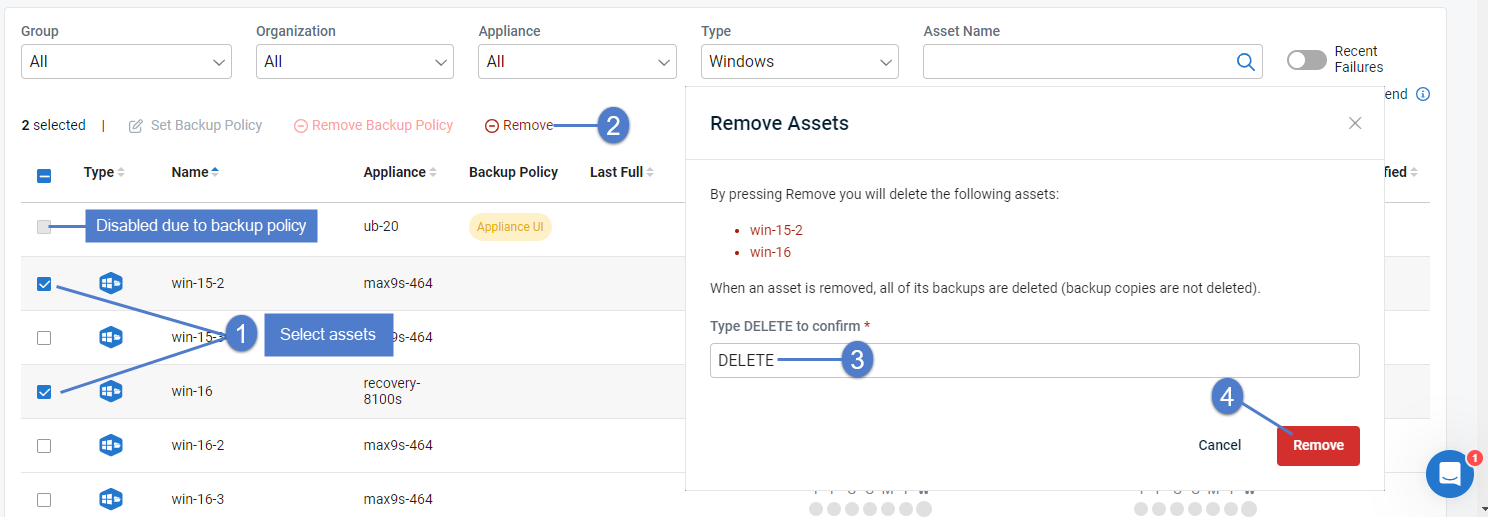
- In the Assets view, check boxes to select the assets that you will remove.
You can remove these asset types (hover over the Type icon to check an asset's type):
- Windows – Use to remove a Windows asset or a Hyper-V server (for details, see Prerequisites and considerations for removing assets)
- Linux – Use to remove a Linux asset
- VMware – Use to remove a vCenter or ESXi server
NOTE You can filter the assets list to quickly locate the assets to delete. In our example, we've applied a Type filter to display only Windows assets.
- Click Remove.
NOTE Removing an asset also removes any hosted application instances and backups of those hosted instances.
- Type DELETE and click Remove to remove the assets.
Working with backup policies
Backup policies enable you to customize your backup strategy to meet the recovery point objectives (RPOs) and recovery time objectives (RTOs) required for your business continuity plan.
From the Protect > Assets page, you can quickly view and manage the policies that define the frequency at which backups are taken for your assets— and set or remove policies for multiple assets in a single operation. If you have appliances that are copying backups to the Unitrends Cloud, you can enable hot copies for their protected assets right from the backup policy.
NOTE To include cold copies in a backup policy, you must create the policy from the Appliance Detail page using this procedure: Applying backup policies to an appliance's assets.
Backup policies utilize the incremental forever backup strategy. Once a good full backup has been taken, subsequent incrementals run to capture only the changes in the protected data since the last successful backup.
Backups initiated by a policy display on the Jobs page. They are labeled with the job name "UV-AssetName" or "UniView-AssetName", as shown here: 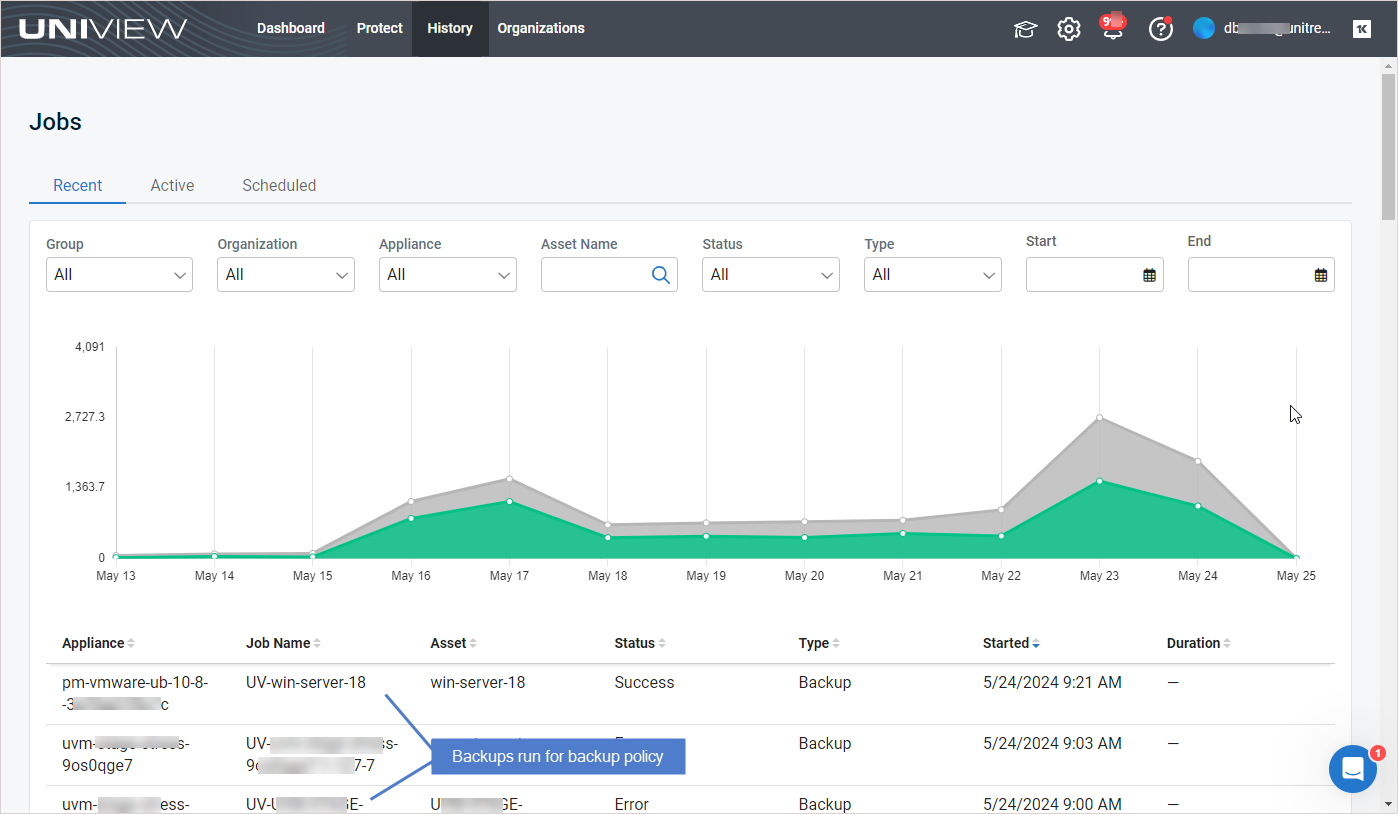
NOTE For more on working with the jobs initiated by backup policies, see Using Jobs.
For details on working with backup policies, see these procedures:
To view backup policies
On the Protect page, click Assets. The Assets view displays the assets protected by all Unitrends appliances that have been added to your backup.net instance. The Backup Policy column shows the asset's backup policy. Each backup policy type is described below. 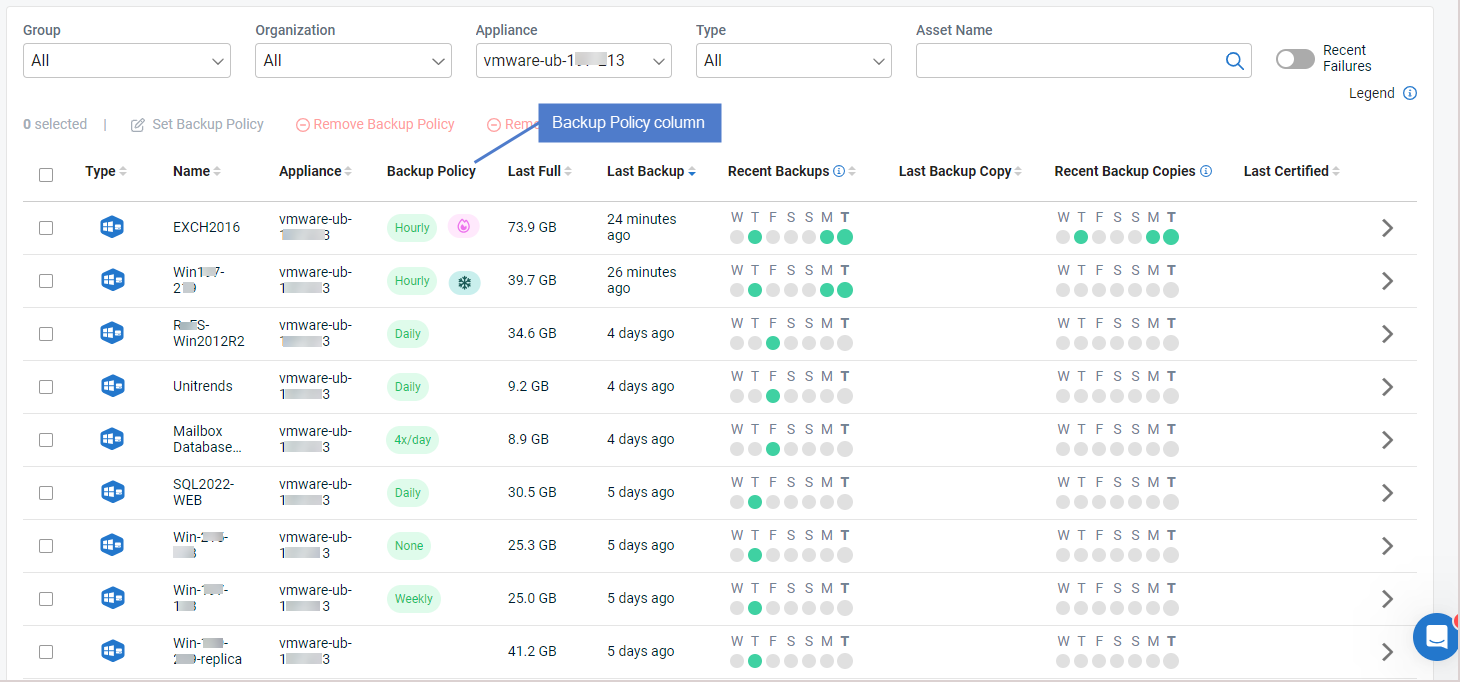
Backup policy descriptions
NOTE If the policy is copying backups to the Unitrends Cloud, this hot copy icon displays next to the policy name: . If the policy is copying backups to a third-party cloud target, this cold copy icon displays next to the policy name: .
- Daily – A backup is taken once a day.
- Hourly – A backup is taken each hour.
- Bihourly – A backup is taken 12 times a day, at 2-hour intervals.
- 4x/day – A backup is taken 4 times a day, at 6-hour intervals.
- Weekly – A backup is taken once a week.
- Blank space – The asset is not protected by a backup policy.
- Appliance UI – The asset is protected by a backup job that was created by using the Unitrends appliance UI. You must use the appliance UI to manage the asset's backup policy (by modifying its Unitrends backup job).
- Custom – The asset is protected by a backup job that was modified by using the Unitrends appliance UI. You must use the appliance UI to manage the asset's backup policy (by modifying its Unitrends backup job).
NOTES
● Backup policies are supported only for Windows image-level assets, Windows file-level assets, Hyper-V VMs, and VMware VMs. (For VMs, the policy runs host-level backups.)
● You can use the appliance UI to remove the asset from any Unitrends jobs, then set a backup policy for the asset in UniView. Upon removing the asset from the Unitrends job, it can take some time (typically 30 minutes) to update the asset's policy in UniView. Wait until the Backup Policy changes to blank space in UniView before attempting to set a backup policy for the asset.
● For Windows image-level assets, Windows file-level assets, Hyper-V VMs, and VMware VMs, we recommend setting a policy in UniView for easier management unless you need to use advanced settings (e.g., exclusion lists and inclusion lists).
To select assets for backup policies
Checkboxes enable you to quickly set or remove backup policies for multiple Windows image-level assets, Windows file-level assets, Hyper-V virtual machines, or VMware virtual machines in a single operation.
A single backup policy can contain only one asset type. When setting a backup policy, filter the assets list by Type to display only the asset type you will include in the backup policy. Examples:
- To protect Windows image-level assets, select Image Level Instance in the Type drop-down.
- To protect Windows file-level assets, select Windows in the Type drop-down.
- To protect VMware virtual machines, select VMware: VM Instance in the Type drop-down.
- To protect Hyper-V virtual machines, select Hyper-V: VM Instance in the Type drop-down.
When setting a policy, you can add assets from multiple pages (use the scroll arrows below to view more pages). To clear your selections on all pages, reload the page.
When removing a backup policy, you can select multiple asset types as shown here: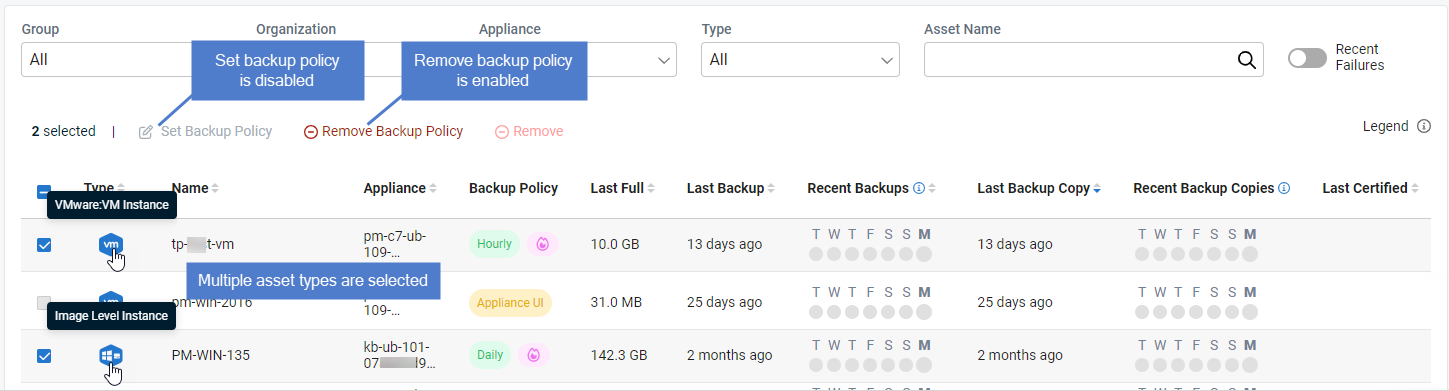
An asset's checkbox is disabled if the backup policy and remove asset features are not supported for the asset (e.g., the asset type cannot be used with these features).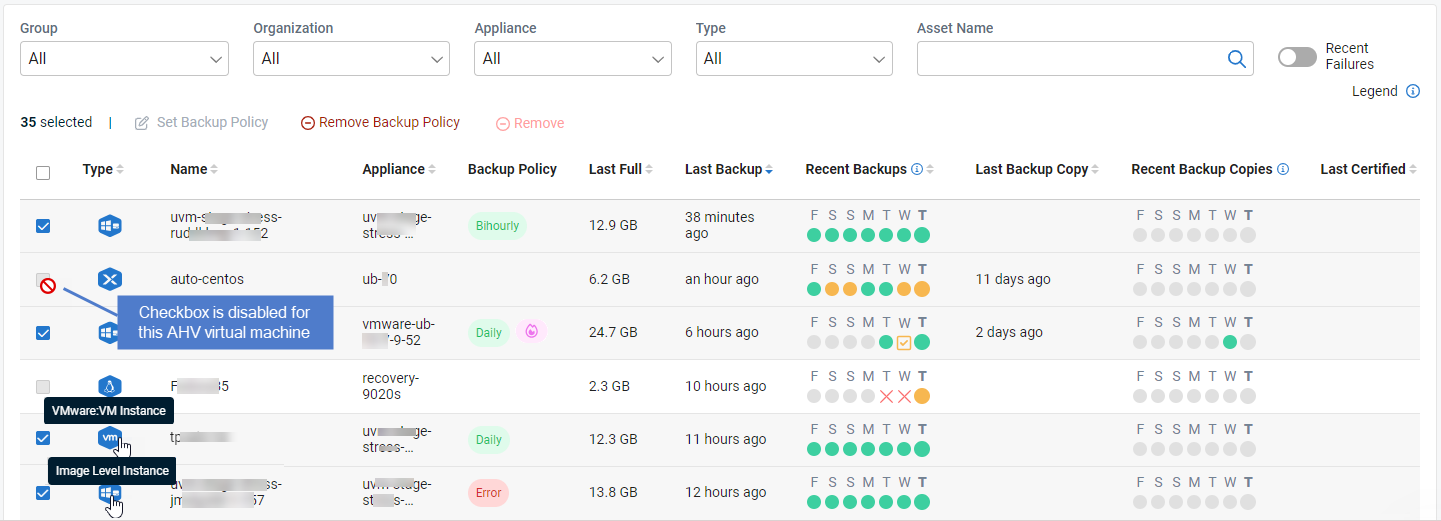
See these procedures to set or remove the backup policy for selected assets: To set a backup policy or To remove a backup policy.
To set a backup policy
Use this procedure to create a backup policy and apply it to one or more Windows image-level assets, Windows file-level assets, VMware virtual machines, or Hyper-V virtual machines. A single backup policy can contain only one asset type. Repeat this procedure as needed to create separate policies for additional asset types.
NOTES
● If the asset already has a backup policy, this procedure updates the policy settings.
● This procedure cannot be used to configure a backup policy with cold copies. To include cold copies to a third-party cloud target, you must create the backup policy from the Appliance Detail page (see Applying backup policies to an appliance's assets).
● Backup policies are supported only for Windows image-level assets, Windows file-level assets, Hyper-V VMs, and VMware VMs. Do not select other asset types.
- In the Protect > Assets view, filter the assets list by Type to display only the asset type you will include in this backup policy. Select one of these supported asset types: Image Level Instance, Windows, VMware: VM Instance, or Hyper-V: VM Instance.
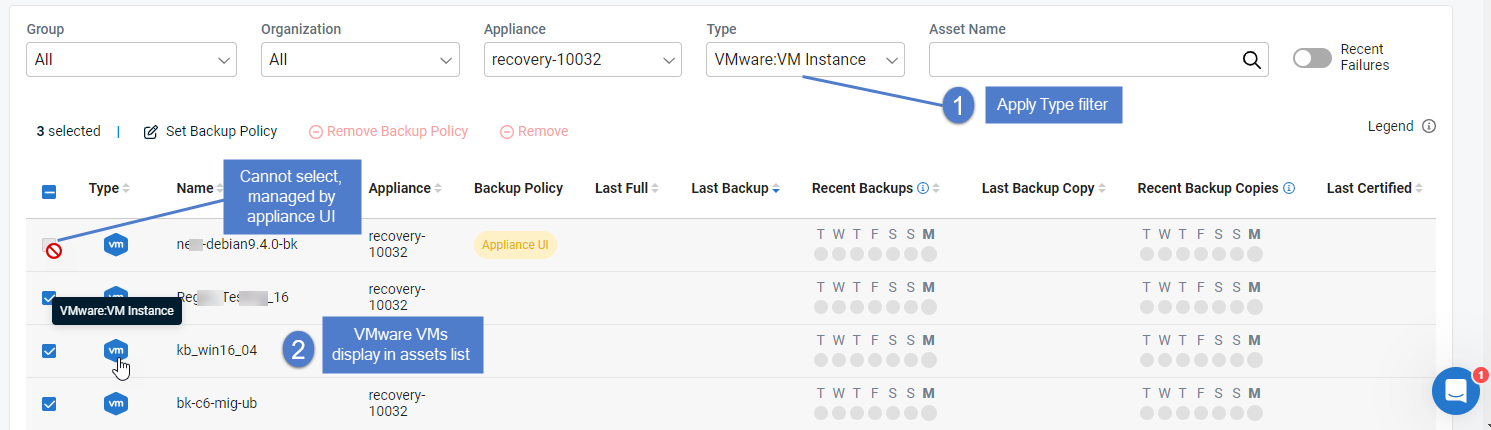
- Check boxes to select the assets to which the policy will be applied.
NOTES
● You can add assets from multiple pages to a single policy (use the scroll arrows below to view more pages).
● To clear your selections on all pages, reload the page.
- Click Set Backup Policy.
- In the Set Backup Policy dialog, select the following:
- Backup Schedule – Select a frequency from the list. (For details, see Backup policy descriptions.)
NOTE The asset's first backup is a full, which takes more time to run than subsequent incrementals. Adjust the backup frequency as needed once you have taken some incrementals.
- (Optional) Exclude Weekends – Click to enable the toggle.
- Schedule Backups – Click
to select a start date, click
to select a start time.
NOTE The policy's start date and time use the timezone of the Unitrends appliance.
- Hot Copy Target – Enable or disable the Unitrends Cloud toggle. If enabled, new backups of assets in this policy are copied to the Unitrends Cloud. If disabled, backups are not copied to the Unitrends Cloud.
NOTE The Unitrends Cloud toggle is enabled by default if a Unitrends Cloud hot copy target has been added to the appliances that are protecting the assets you have selected. The toggle is disabled and cannot be enabled if a Unitrends Cloud hot copy target has not been added to one or more appliances that are protecting the assets you have selected. (If needed, you can change your selected assets before enabling or disabling the toggle. To add a Unitrends Cloud target to an appliance using the appliance UI, see Adding a Unitrends Cloud backup copy target. To create a backup policy for one appliance's assets, see Applying backup policies to an appliance's assets.)
- Click Save.
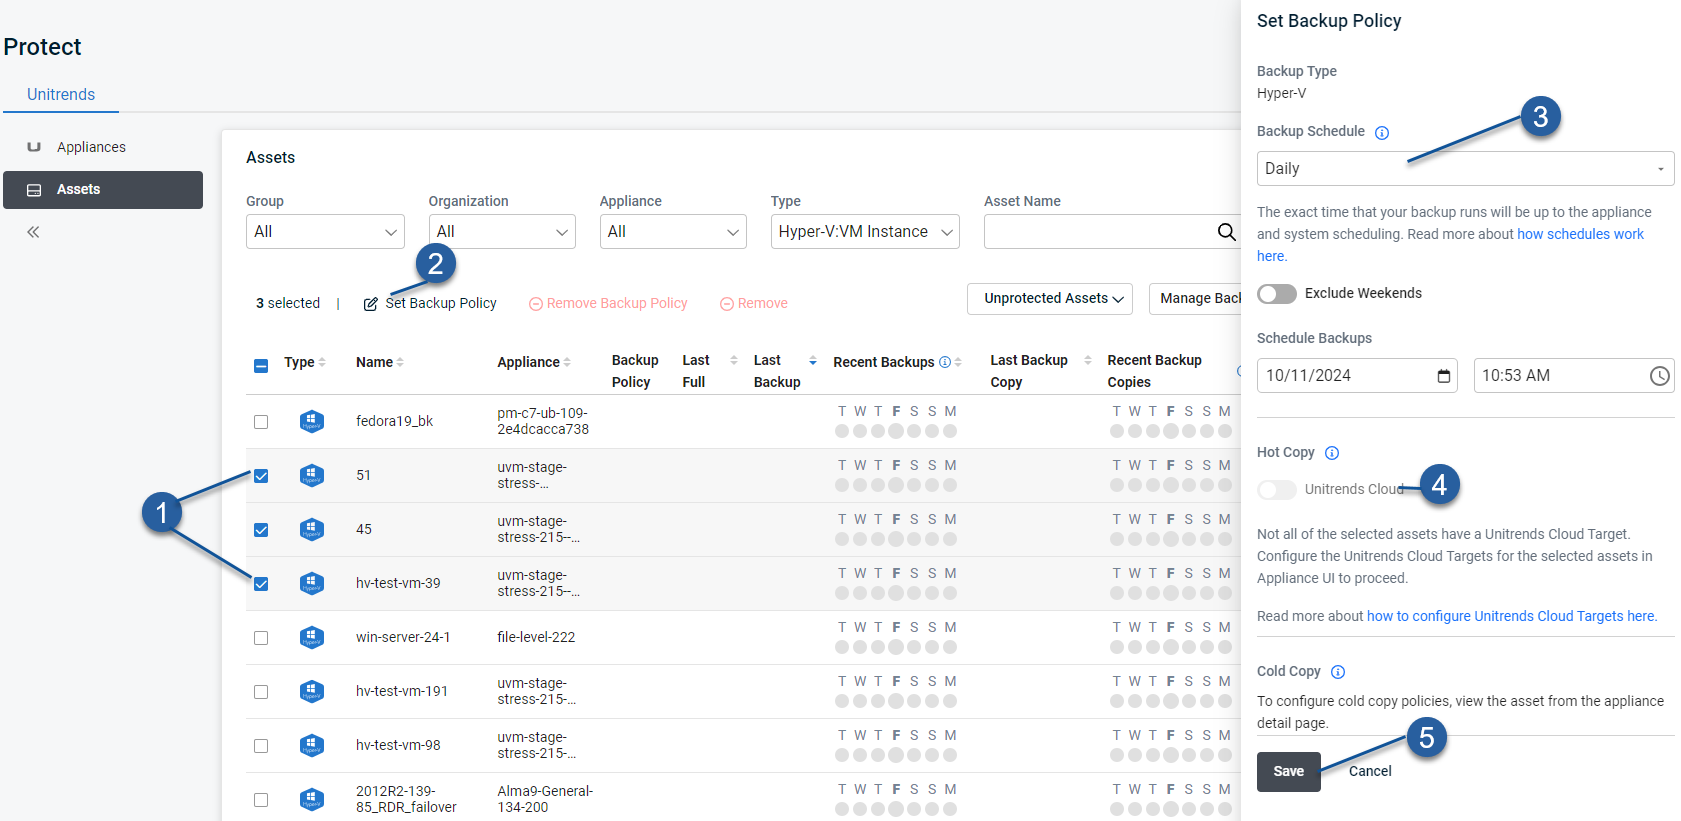
While the policy is being created, you see a spinner and the asset's checkbox is disabled. Creating the policy can take some time (typically 30 minutes).
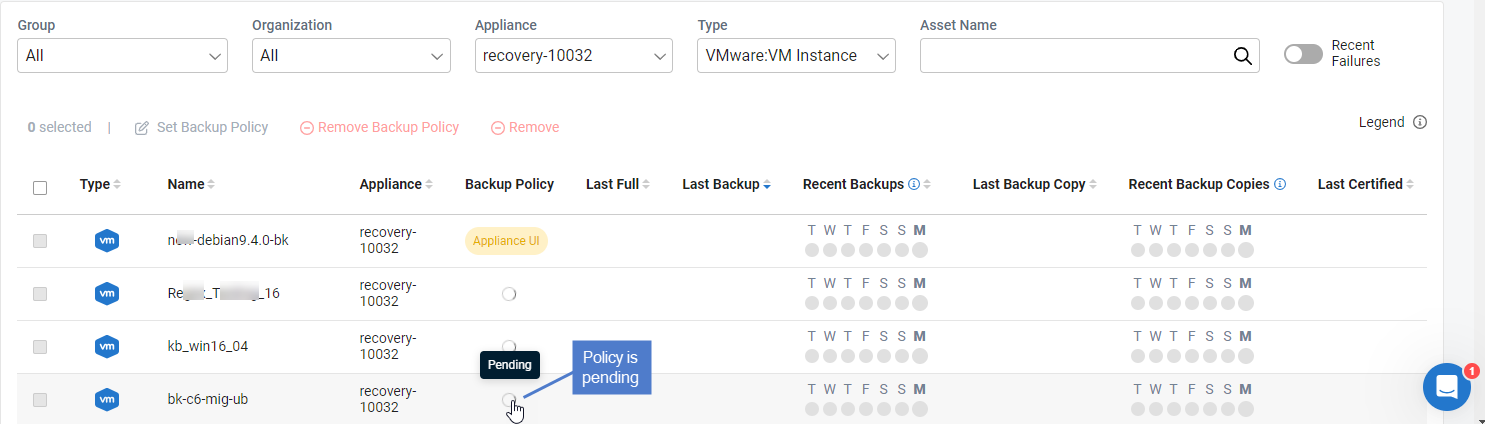
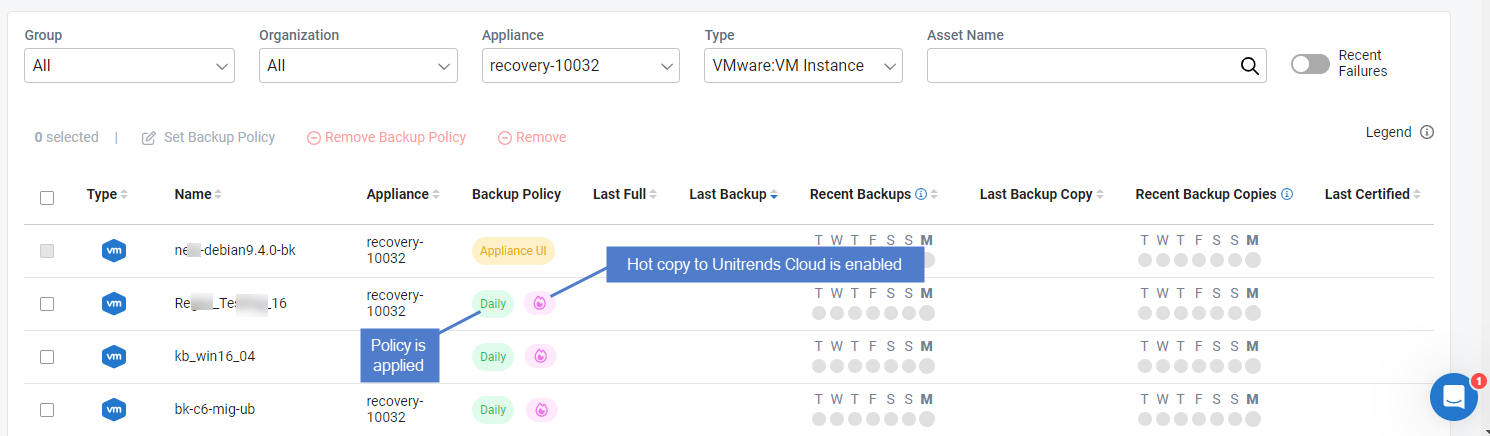
The backup policy name displays when the policy has been applied to the asset. If the policy is copying the asset's backups to the Unitrends Cloud, the
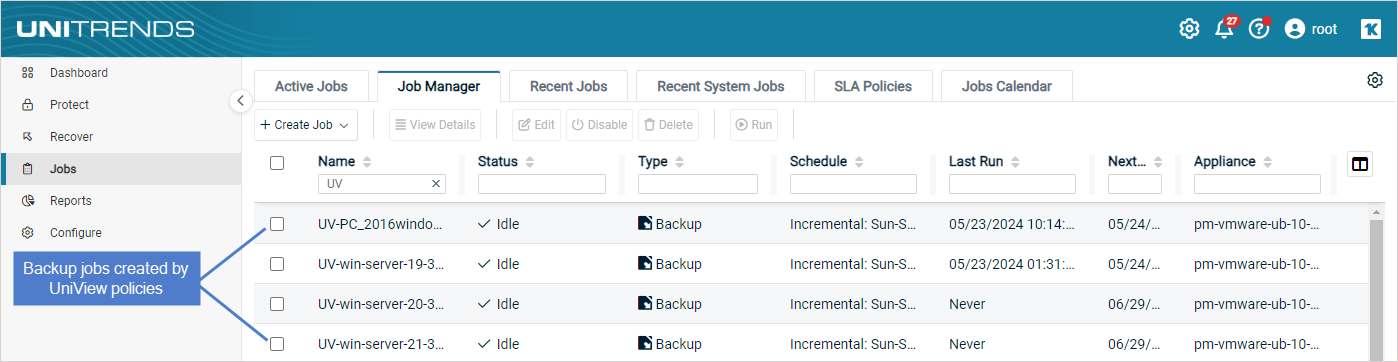
- A backup job is created for each asset in the policy. These jobs display on the UniView Portal Jobs page and the appliance Jobs > Job Manager page:
On the UniView Portal Jobs page, backups initiated by a policy are labeled with the job name "UV-AssetName" or "UniView-AssetName", as shown here:
On the appliance Jobs > Job Manager page, jobs created by a UniView Portal policy are labeled with the job name "UV-AssetName" or "UniView-AssetName", as shown here:
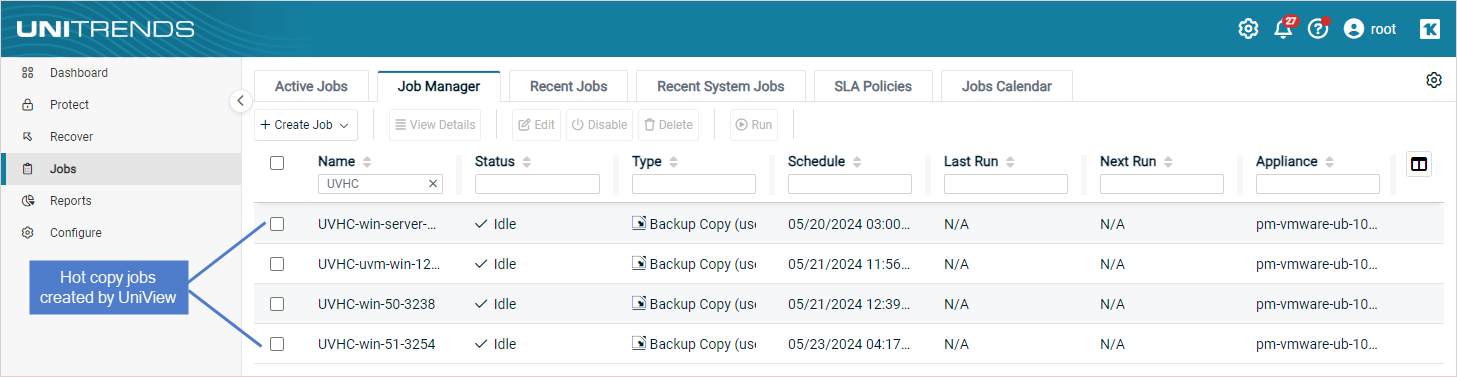
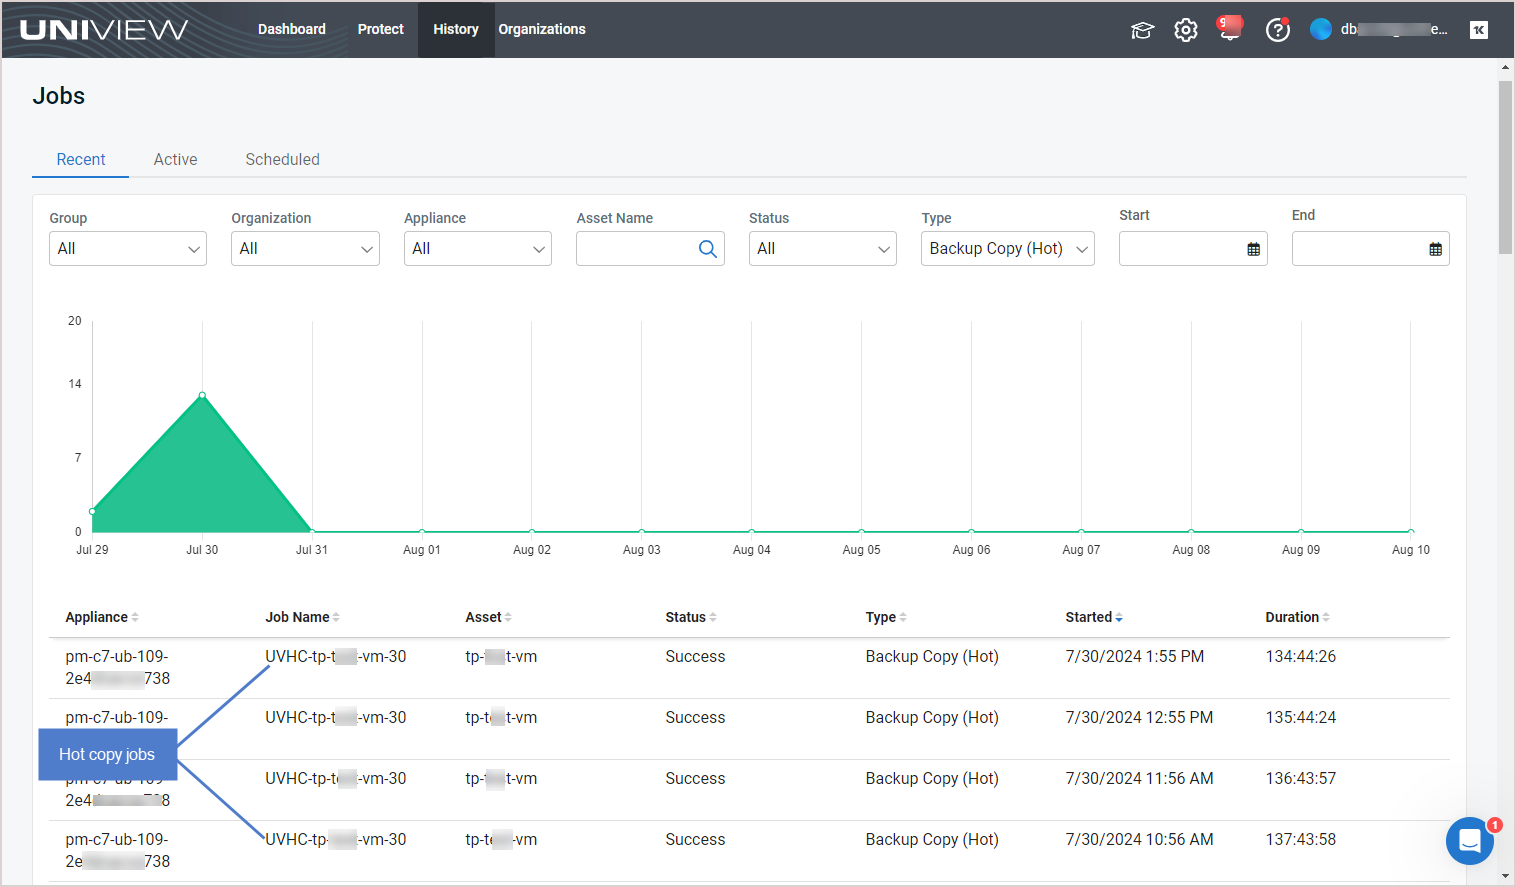
- If hot copies to the Unitrends Cloud were enabled in the policy, hot copy jobs are created for the assets on the Unitrends appliance and also display on the UniView Portal Jobs page. These jobs are named "UVHC-assetName", as shown here:
To remove a backup policy
Use this procedure to remove a backup policy from one or more assets.
NOTE To temporarily pause an asset's backups, see this procedure: Disabling or enabling a job schedule.
- In the Protect > Assets view, check boxes to select one or more assets. You can select assets on multiple pages (use the scroll arrows below to view more pages). To clear your selections on all pages, reload the page.
NOTE You cannot select an asset with the Appliance UI policy. The asset is protected by a backup job that was created by using the Unitrends appliance UI. You must use the appliance UI to manage the asset's backup policy (by modifying its Unitrends backup job).
- Click Remove Backup Policy.
- Click Remove to confirm.
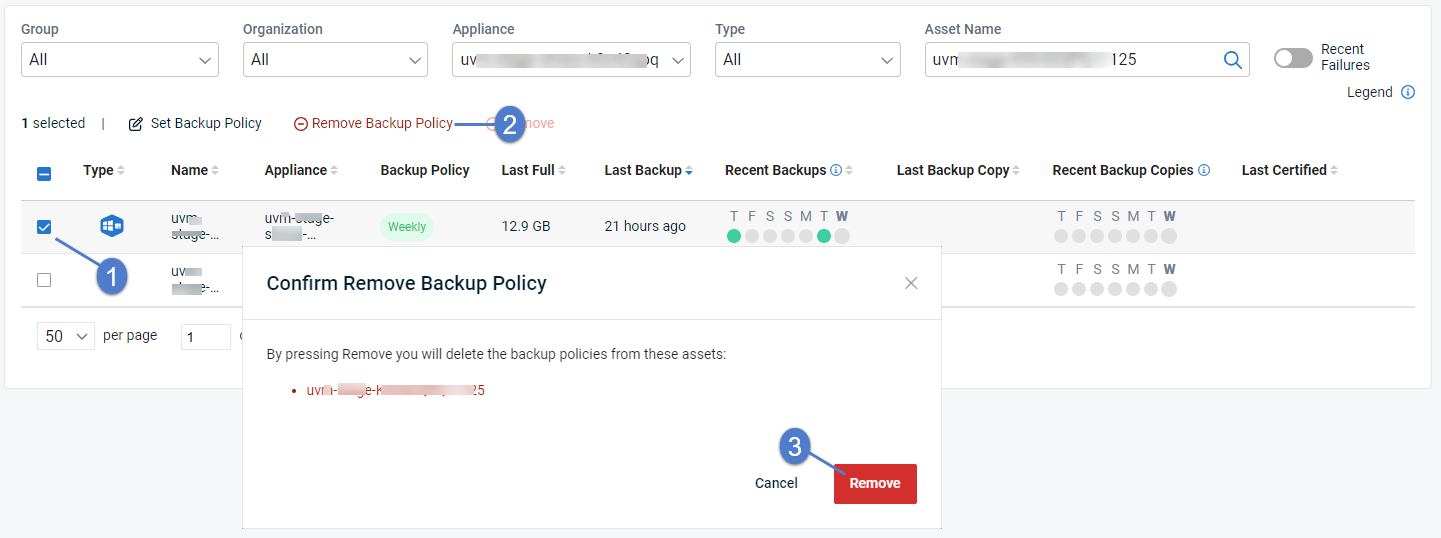
While the policy is being removed, you see a spinner and the asset's checkbox is disabled. Removing the policy can take some time (typically 30 minutes).
Blank space displays when the policy has been removed.
Working with backup profiles
Backup profiles give you intuitive and powerful tools to selectively include or exclude data during backup policy creation and modification.
From the Unitrends > Assets page, you can use the Manage Backup Profiles button to quickly view and manage backup profiles.
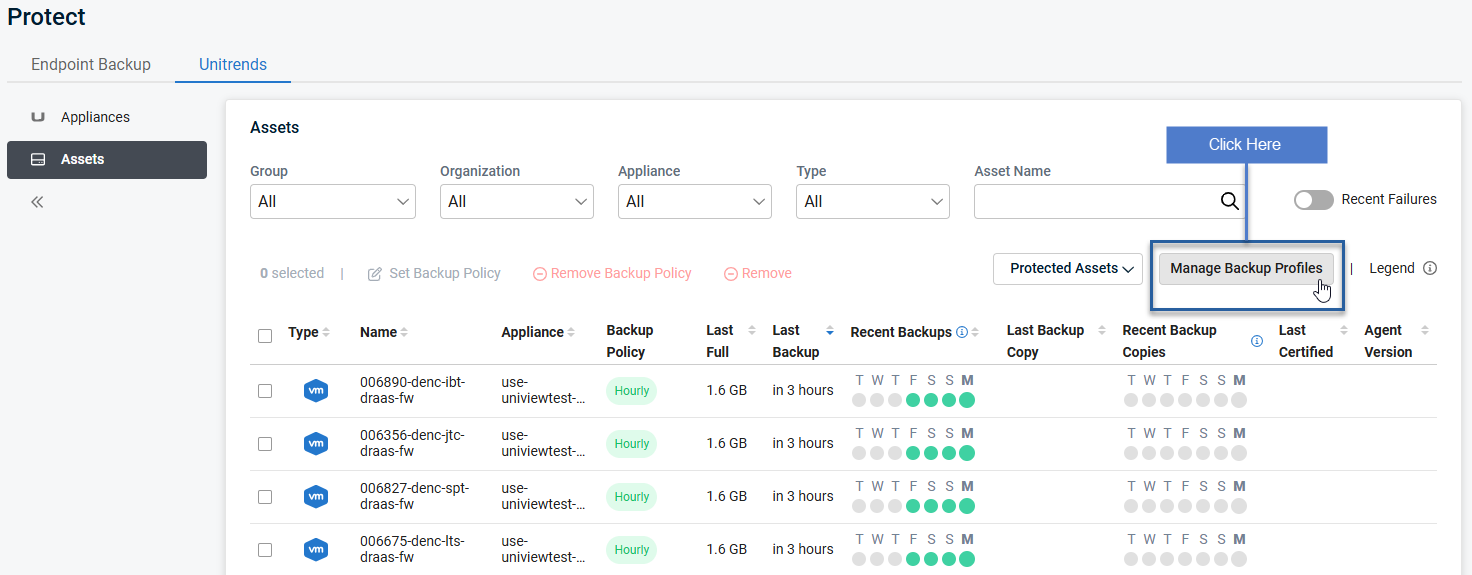
To add a backup profile
- Click Add Profile to begin.
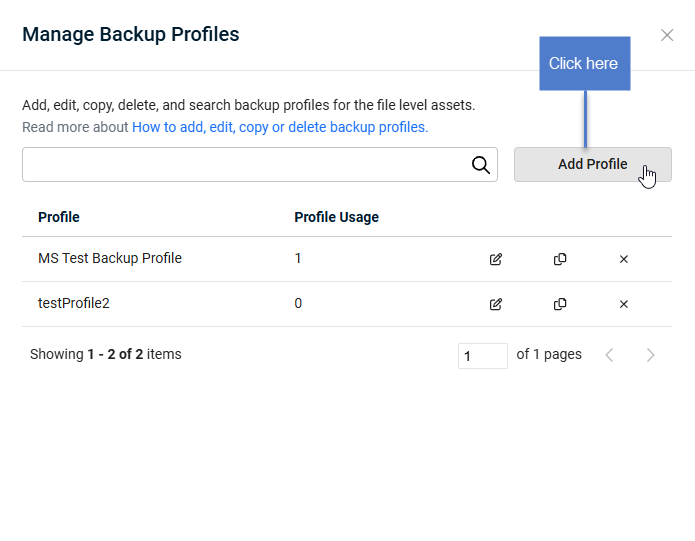
- Enter a Profile Name.
- Enter the file paths to be Included in the backup policy.
- Enter the file paths to be Excluded from the backup policy.
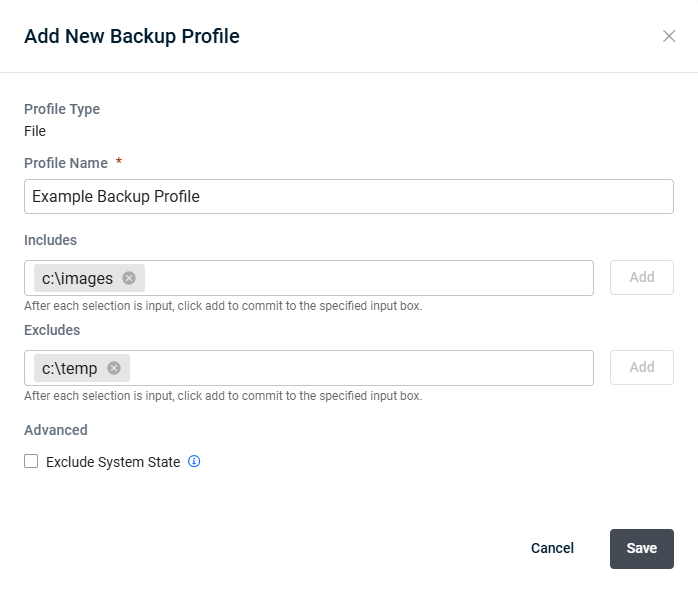
- Click the Advanced check box if you want to Exclude System State (Windows only).
- Click Save
To edit a backup profile
- From the Unitrends > Assets > Manage Backup Profiles screen, click the edit icon for the backup profile you would like to edit.
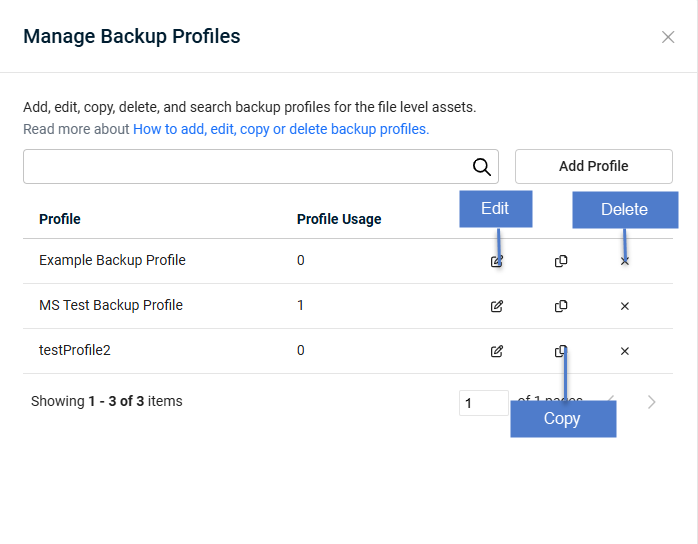
- Change the Includes and Excludes lists as required.
- Click Save.
- Type EDIT to Confirm.
To assign a backup profile to an asset
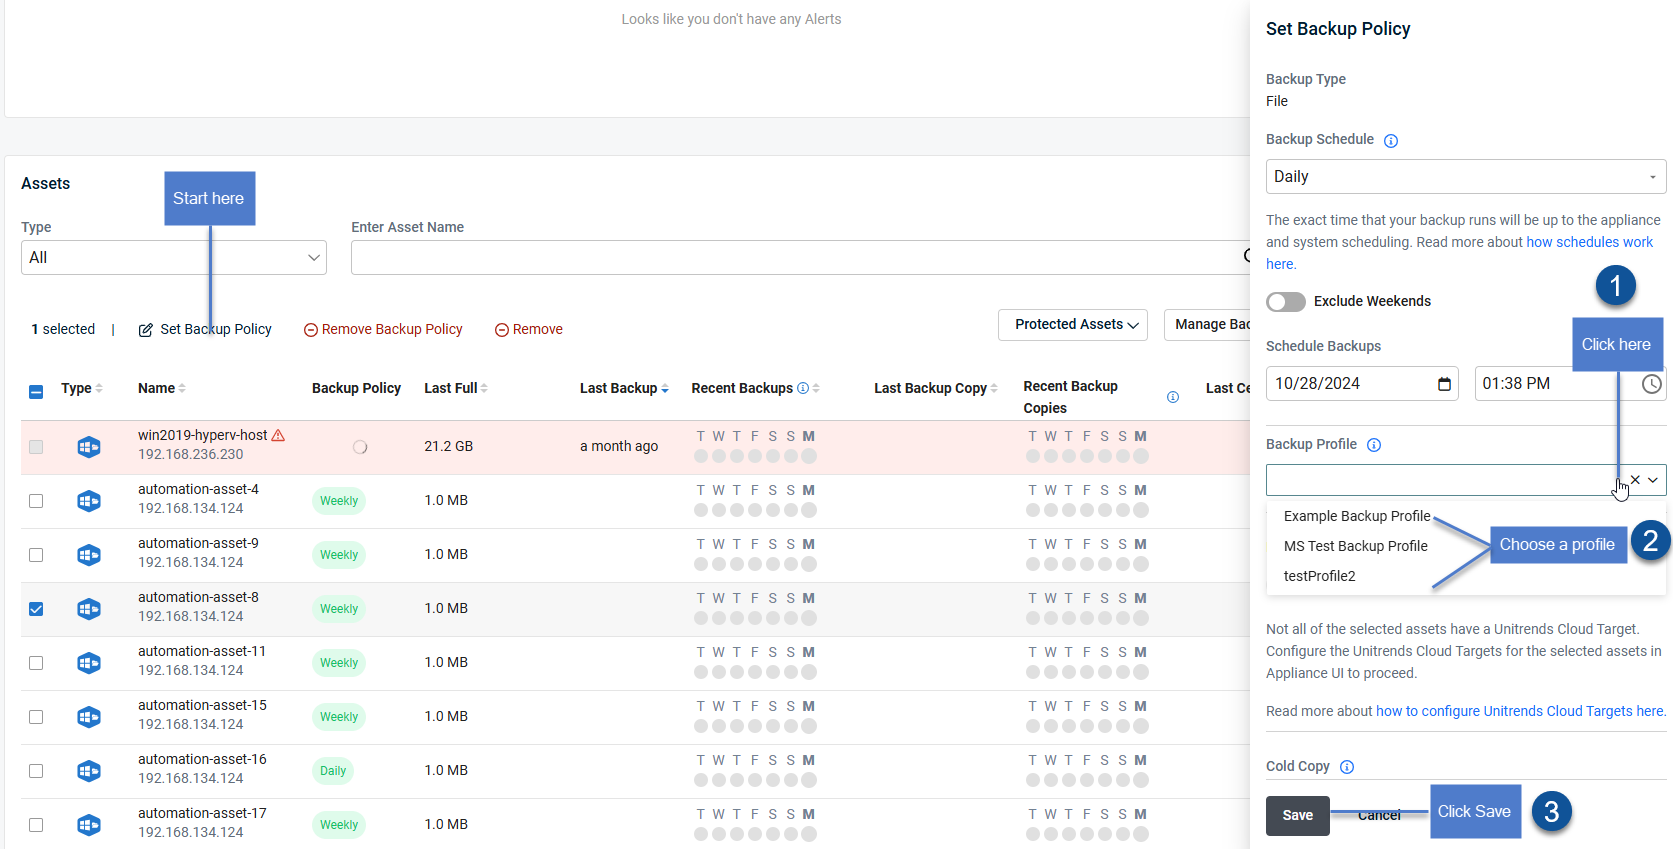
- In the Unitrends > Assets view, use check boxes to select one or more assets. You can select assets on multiple pages (use the scroll arrows below to view more pages). To clear your selections on all pages, reload the page.
- Click Set Backup Policy
- Use the Backup Profile drop-down menu to choose which backup profile to apply.
- Click Save.
To copy a backup profile
- From the Unitrends > Assets > Manage Backup Profiles screen, click the copy icon for the backup profile you would like to copy.
- On the Copy Backup Profile screen, provide a unique Profile Name for the backup profile copy.
- Click Save to change the copied backup profile.
To delete a backup profile
Use this procedure to delete a backup profile
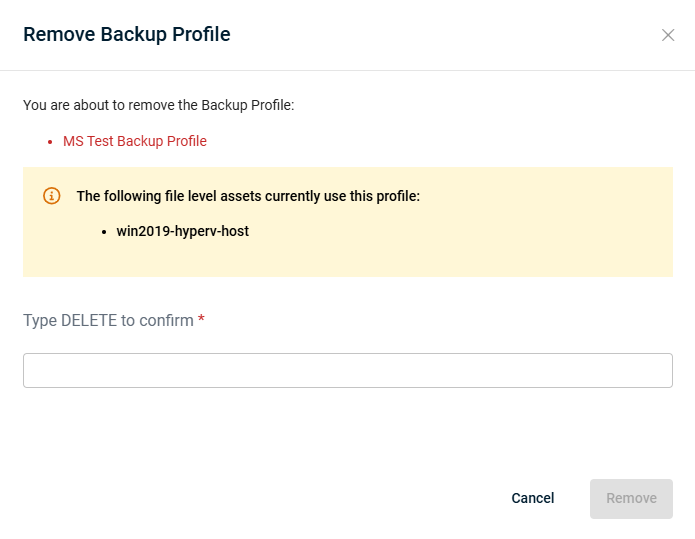
- From the Unitrends > Assets > Manage Backup Profiles screen, click the delete icon for the backup profile you would like to delete.
- Type DELETE to confirm the deletion request. If the backup profile is in use, you will see a list of assets that currently use this profile.