Using Unitrends Appliances
Use the Appliances view to manage, add, and connect to appliances. See these topics for details:
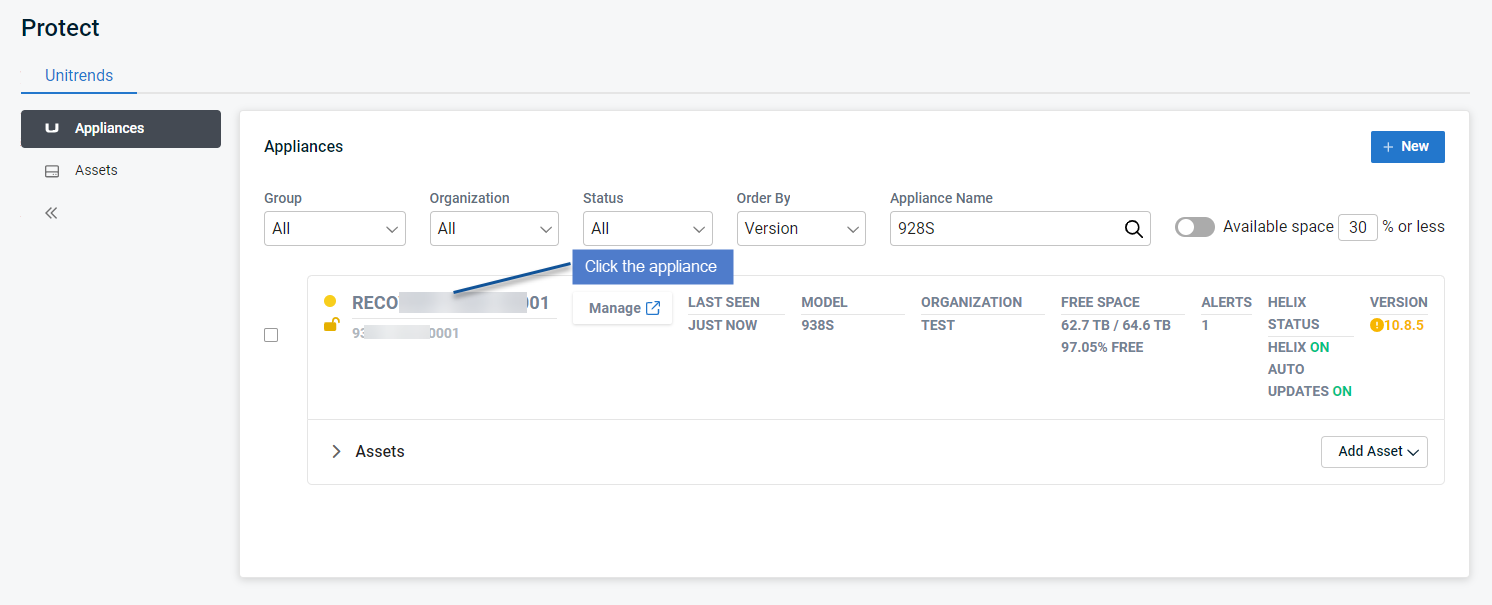
The Appliances view displays all Unitrends appliances that have been added to your backup.net instance.
The following information is given for each appliance:
NOTE Appliance information is updated hourly.
- + New – Click to add an appliance. For details, see Adding an appliance.
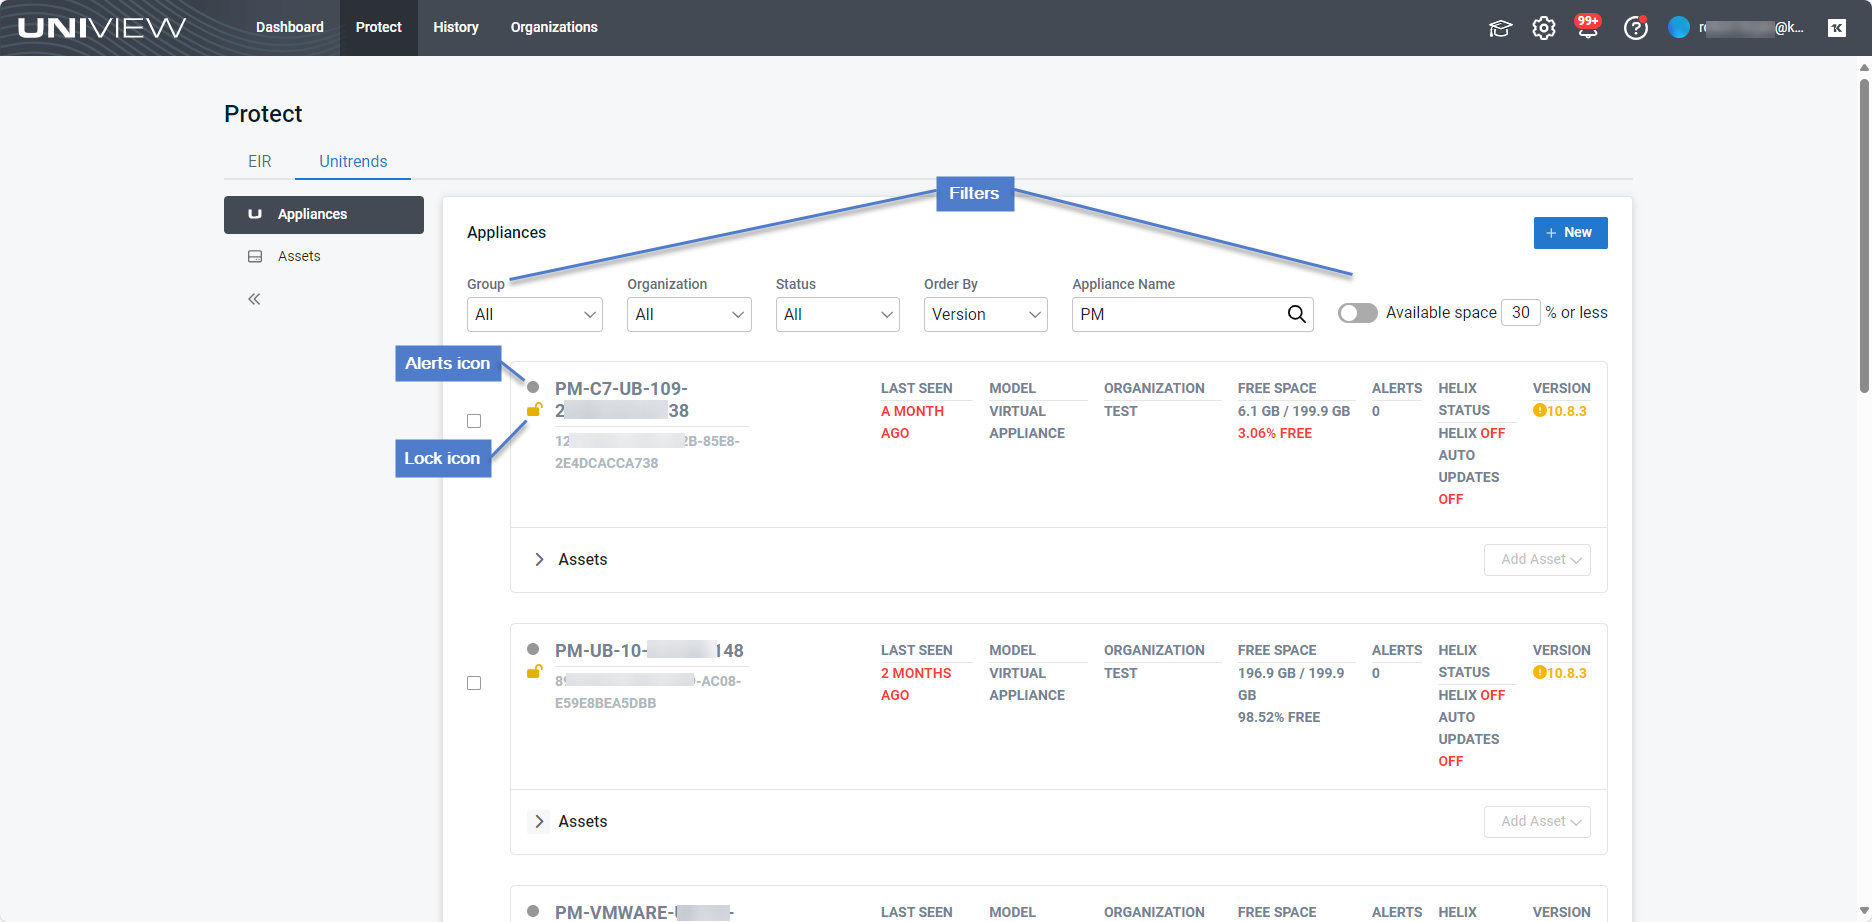
- Filter fields – Enter criteria in these fields to filter the list of appliances that display. For details, see Filtering the Appliances view.
- Select checkbox – Check boxes to modify selected appliance's Helix settings. For details, see Modifying Helix Auto Update settings.
- Alerts icon – Indicates whether the appliance has unresolved alerts: green for no alerts, yellow for warnings, red for critical.
- Lock icon – Indicates whether local access to the appliance has been blocked:
 for blocked,
  for unblocked. Once local access has been blocked, users can no longer log in directly to the appliance UI. Instead, users must connect to the appliance from UniView (as described in Connecting to an appliance). For more on this feature, see Blocking or unblocking local access to an appliance.
 - Name and asset tag – The appliance name and asset tag.
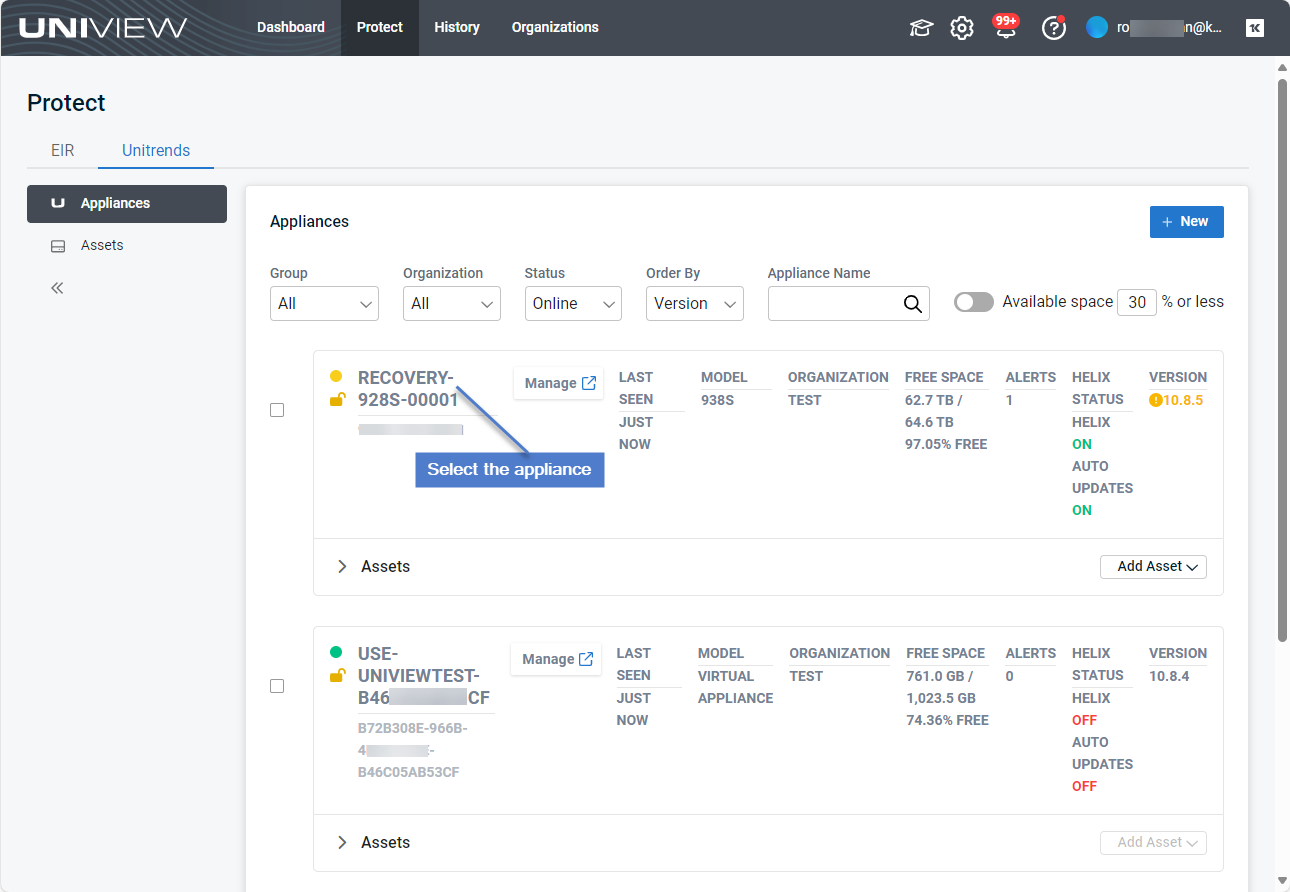
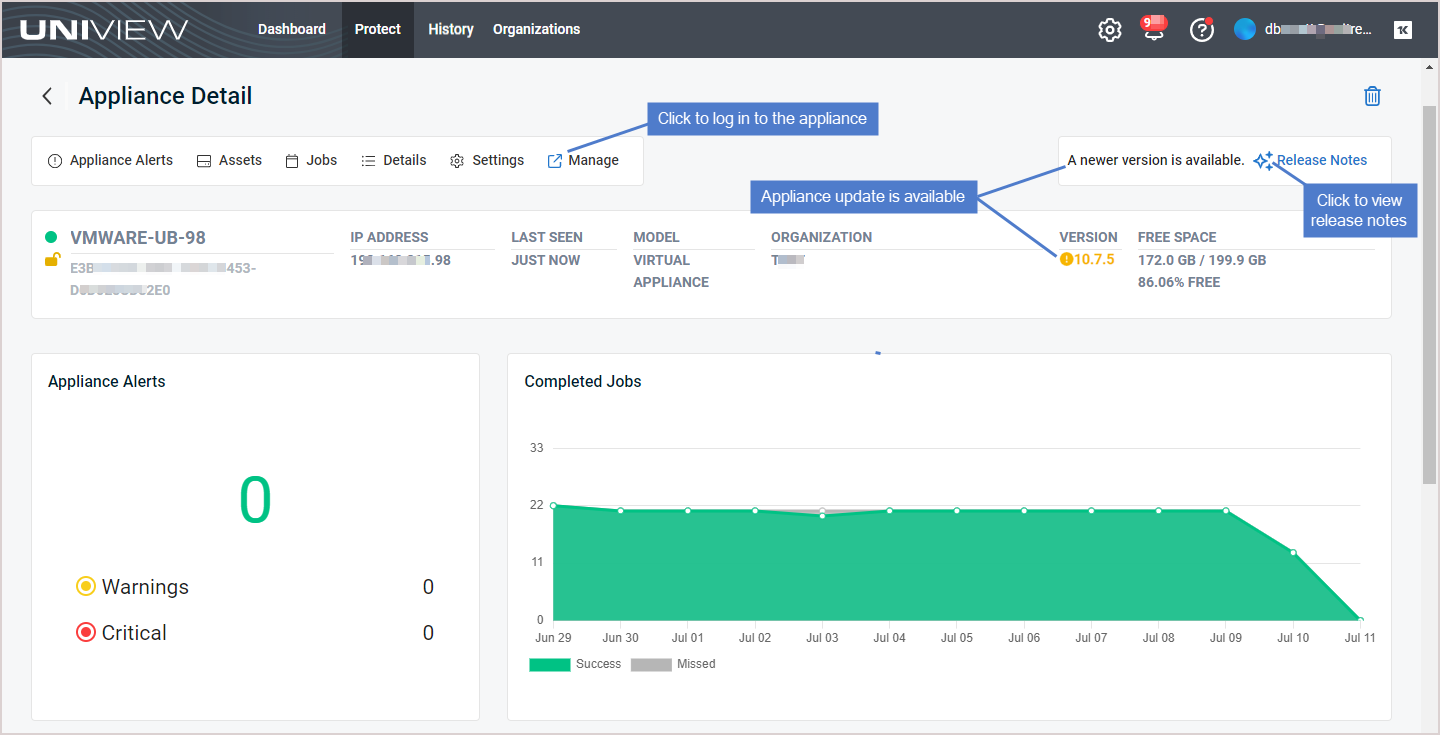
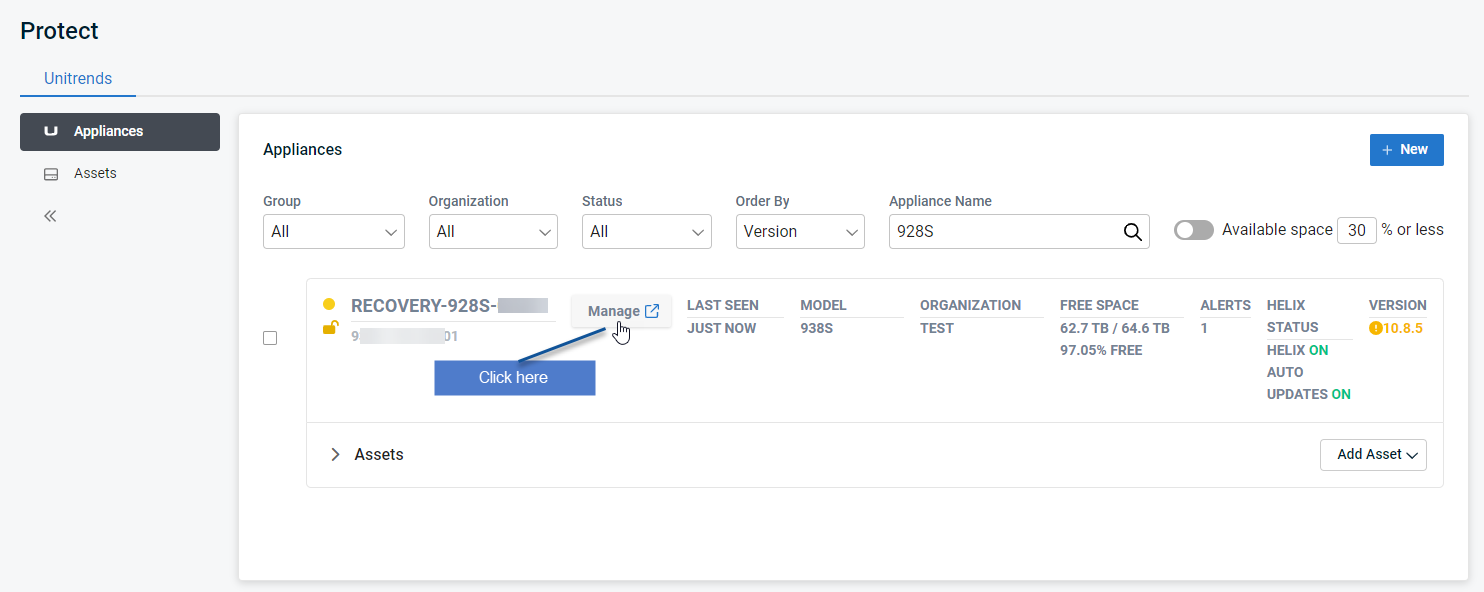
- Manage – Click to connect to the appliance. (The Manage button does not display for offline appliances.) For appliance procedures, see the Administrator Guide for Recovery Series and Unitrends Backup.
- Last Seen – Indicates whether the appliance is online or offline. Just Now indicates the appliance is online. If the appliance is offline, shows the number of hours, days, months, or years since the appliance was last seen.
- Model – Appliance model. Virtual Appliance for Unitrends Backup virtual appliances. Model number for Unitrends physical appliances.
- Organization – Appliance's organization.
- Free Space – Shows the amount of free space on the appliance, in terabytes (TB) or gigabytes (GB), and as a percent of total space.
- Alerts – Number of unresolved alerts on the appliance. To address alerts, see Alerts.
- Helix Status – Indicates whether the following have been enabled on the appliance: Helix and Helix auto updates. On for enabled, Off for disabled, or ! for Helix status unavailable.
- Version – Unitrends version running on the appliance.
If the appliance is not running the latest release, the version number displays in yellow indicating that an update is available. Click Manage to log in to the appliance and install the latest Unitrends software version.
- Protected Assets – Click to view protected assets (assets that are protected by a backup schedule). Click a row in the Protected Assets table to view asset details. Click Protected Assets again to hide the protected assets list.
- Add Asset – Click to add an asset to the appliance. For details, see Adding assets to an appliance.
The Appliances view displays all appliances that have been added to your backup.net instance.
To filter the display, enter filter criteria:
- Group – Select a group from the list. (Select All to clear the group filter.)
- Organization – Select an organization from the list. (Select All to clear the organization filter.)
- Status – Select Online or Offline to filter by appliance status. (Select All to clear the status filter.)
- Order By– Select Last Time Seen, Name, Model, Alerts, Free Space, or Version.
- Appliance Name field – Enter a text string, then press Enter to apply. Appliance names containing the text you entered display.
- Available space 30% or less – Filter by amount of free space on the appliance.
To view appliance details:
- In the Appliances view, click the appliance.
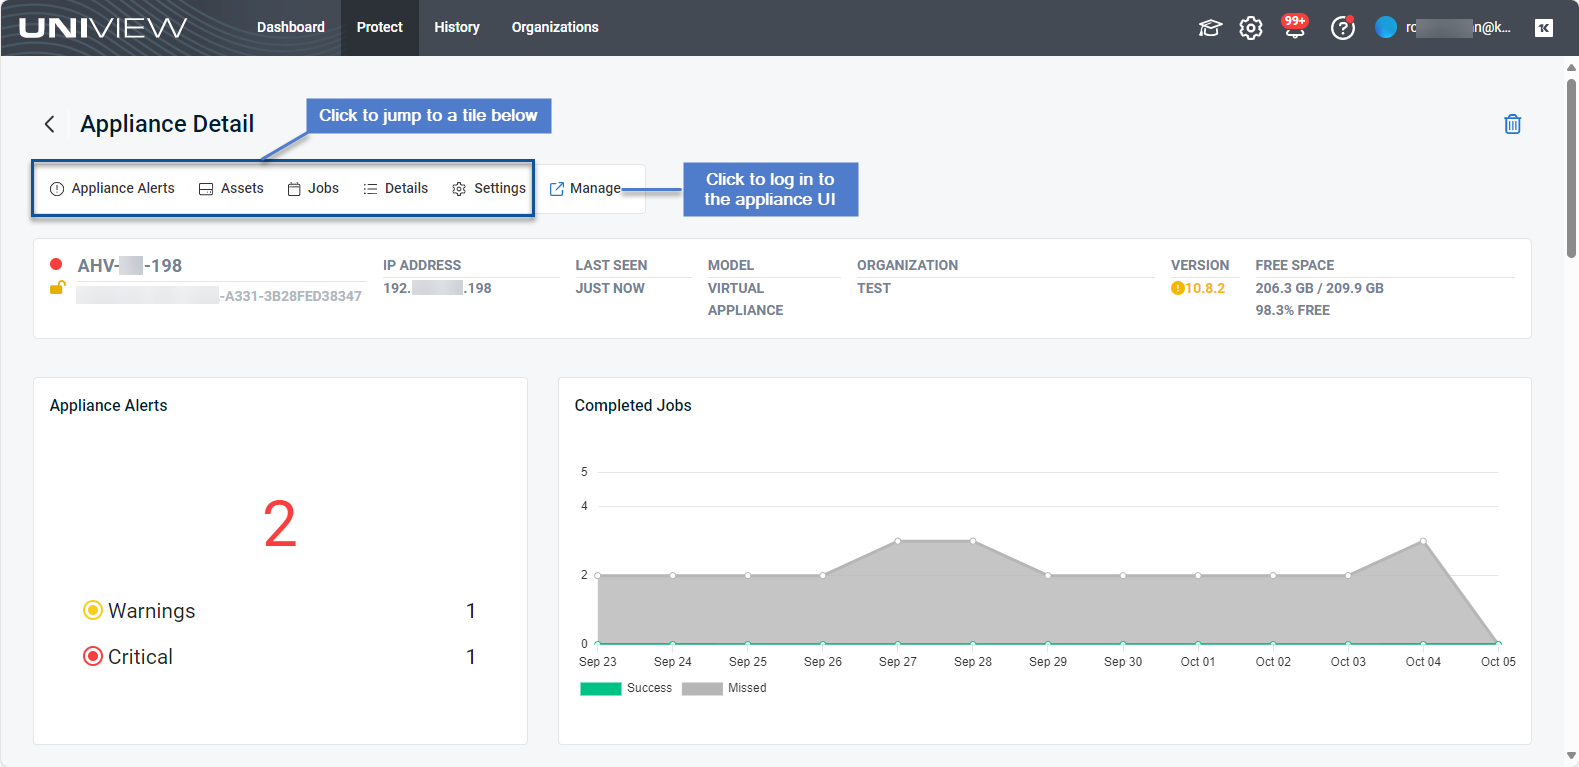
- Details display for the selected appliance. Scroll to view more information or click an item in the toolbar to jump to a specific tile below. See the following table for more about the Appliance Detail page:
| Item | Description | Learn more |
|---|---|---|
| Alerts icon | Indicates whether the appliance has unresolved alerts: green for no alerts, yellow for warnings, red for critical. | |
| Lock icon | Indicates whether local access to the appliance has been blocked: |
|
| Name and asset tag | The appliance name and asset tag. | 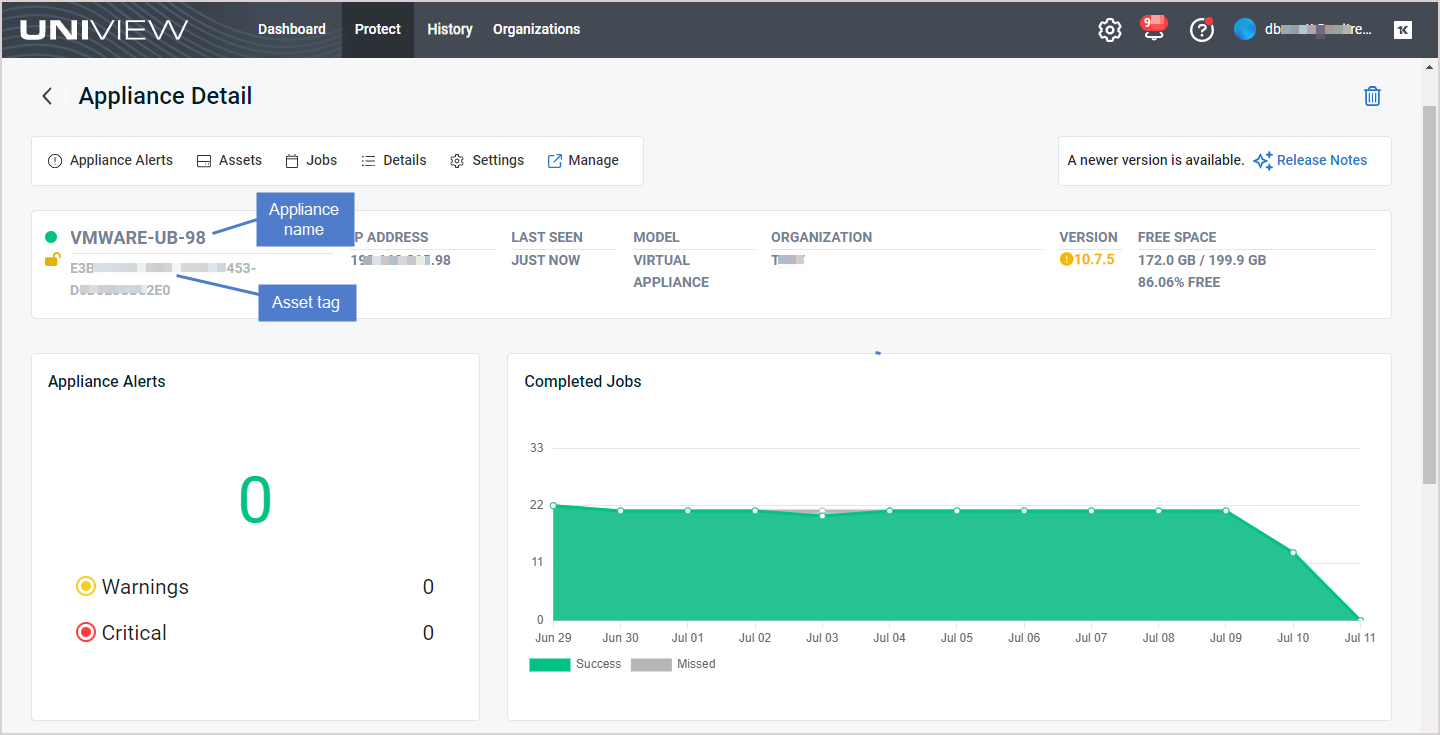
|
| IP Address | Appliance IP address or N/A if your environment is not configured to store IP addresses. | |
| Last Seen | Indicates whether the appliance is online or offline. Just Now indicates the appliance is online. If the appliance is offline, shows the number of hours, days, months, or years since the appliance was last seen. | |
| Model | Appliance model. Virtual Appliance for Unitrends Backup virtual appliances. Model number for Unitrends physical appliances. | |
| Organization | Appliance's organization. | |
| Version |
Unitrends version running on the appliance.
If the appliance is not running the latest release, the version number displays in yellow indicating that an update is available. Click Release Notes above to see details about the latest release. Click Manage to log in to the appliance and install the latest Unitrends software version. NOTE If you see the message Unable to upgrade, contact Unitrends Support or your Authorized Partner for assistance. |
|
| Free Space | Shows the amount of free space on the appliance, in terabytes (TB) or gigabytes (GB), and as a percent of total space. | |
| Appliance Alerts tile | Shows the number of unresolved critical and warning alerts on the appliance. | 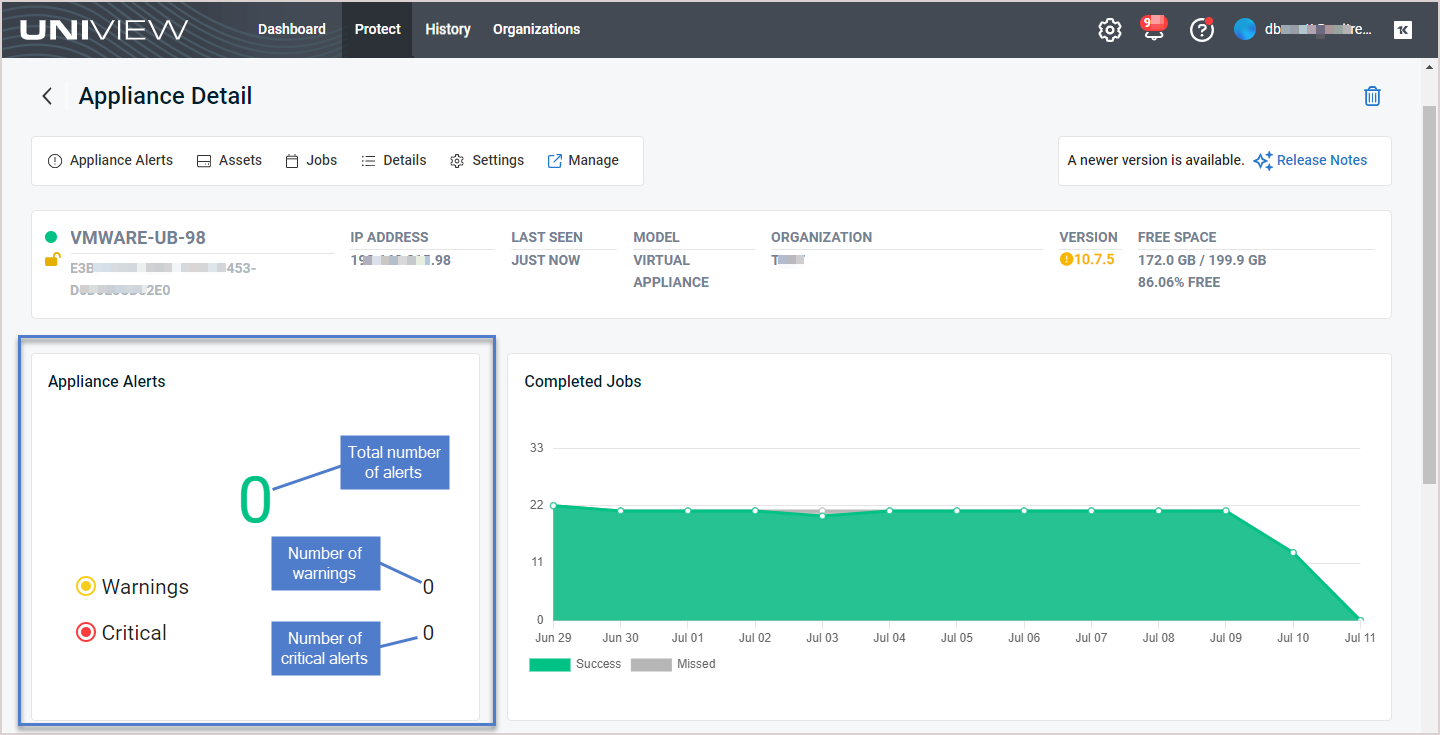
|
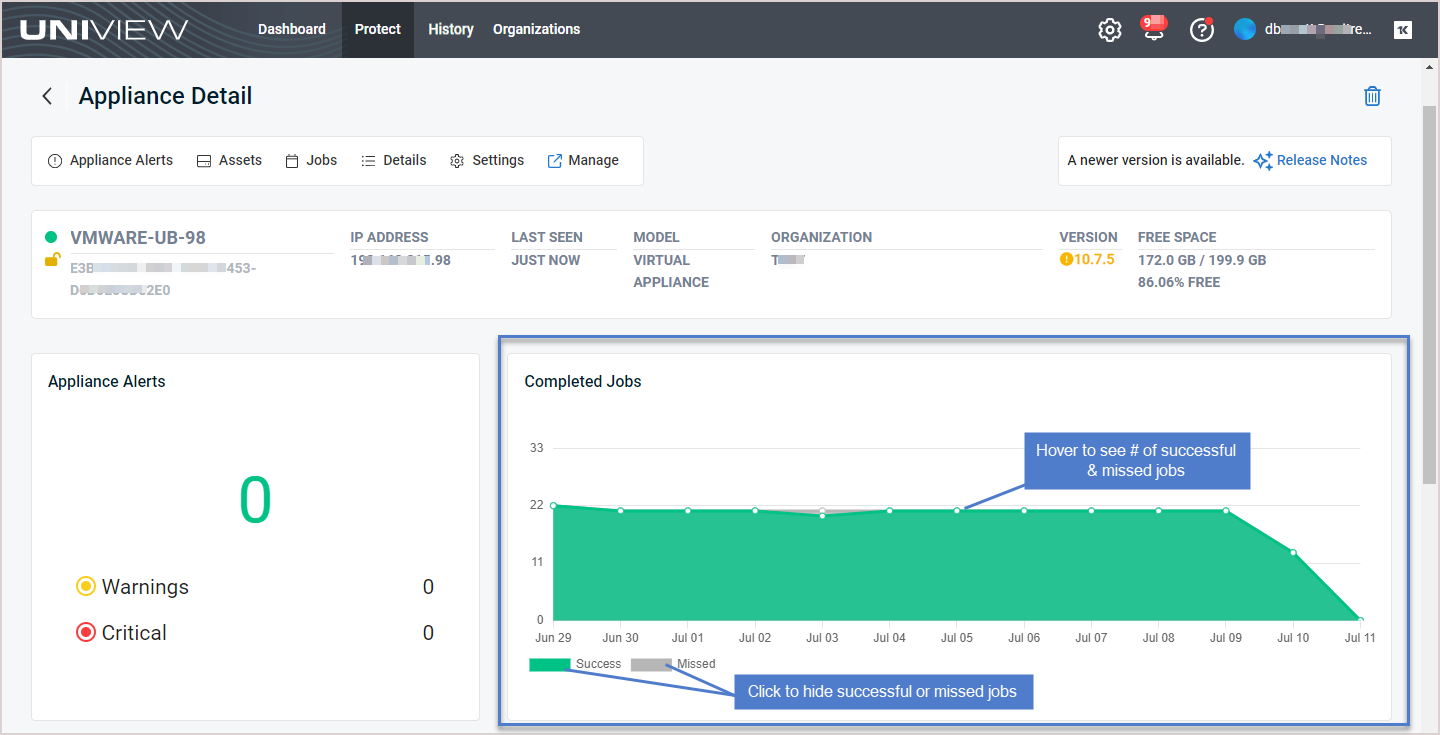
| Completed Jobs tile |
Shows the number of successful and missed jobs completed over the last 13 days.
Hover over a point in the graph to see the number of successful and missed jobs completed that day. Click Missed to hide missed jobs. Click Success to hide successful jobs. |
|
| Appliance Alerts | Lists unresolved alerts. | 
|
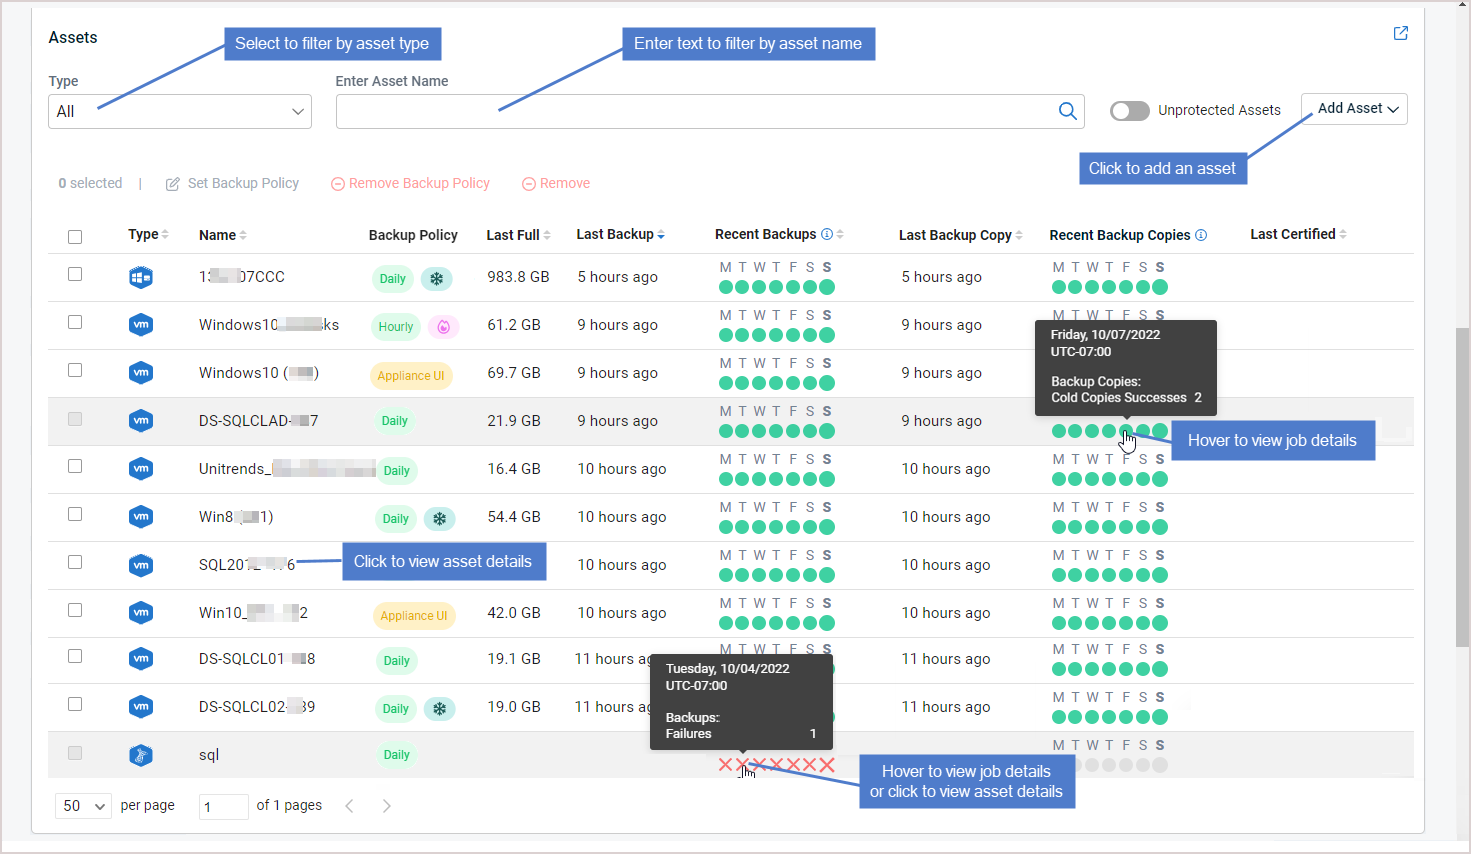
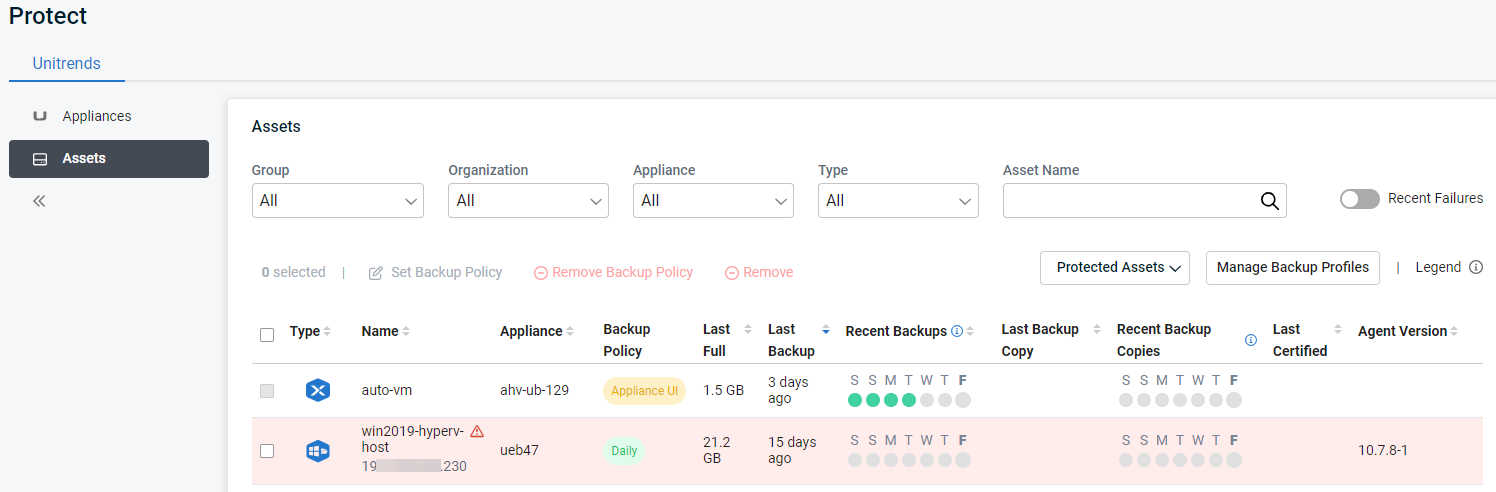
| Assets tile |
Lists the assets protected by the appliance. For each asset, shows the Type, Name, Backup Policy, Last Full backup size and the date/times when recent backups and copies were taken.
|
|
| Jobs | Shows active, scheduled, and recent jobs. | 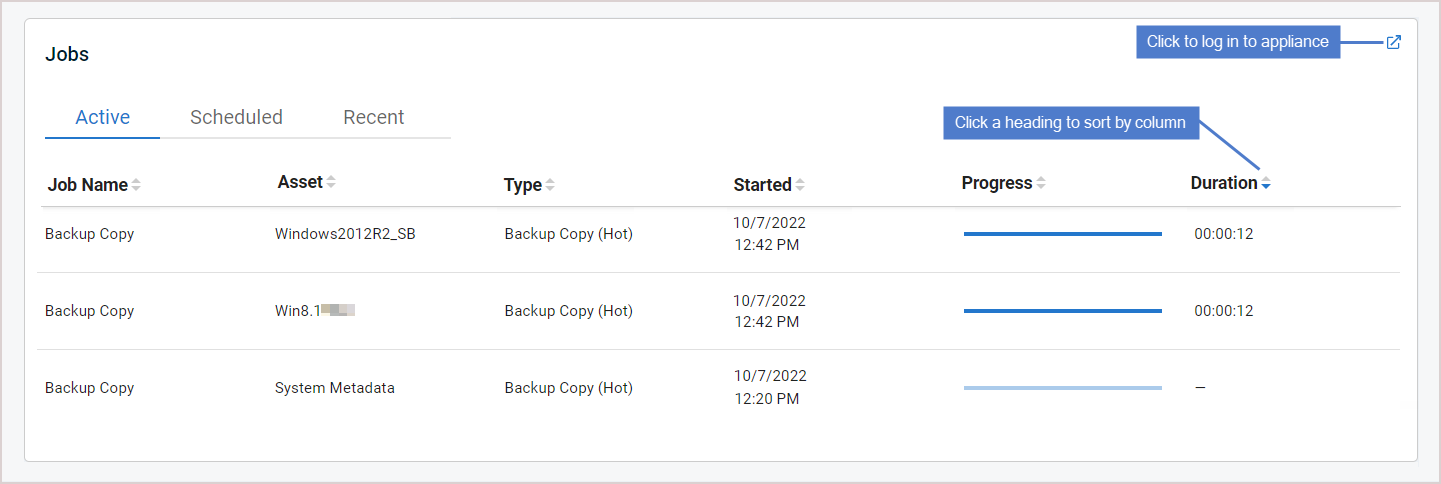
|
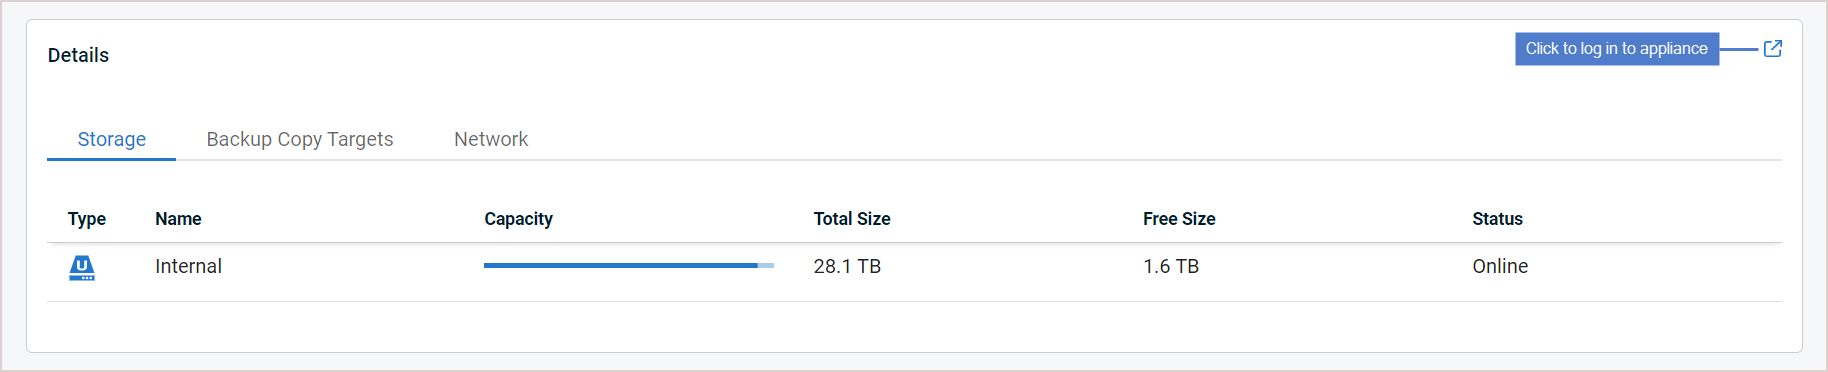
| Details |
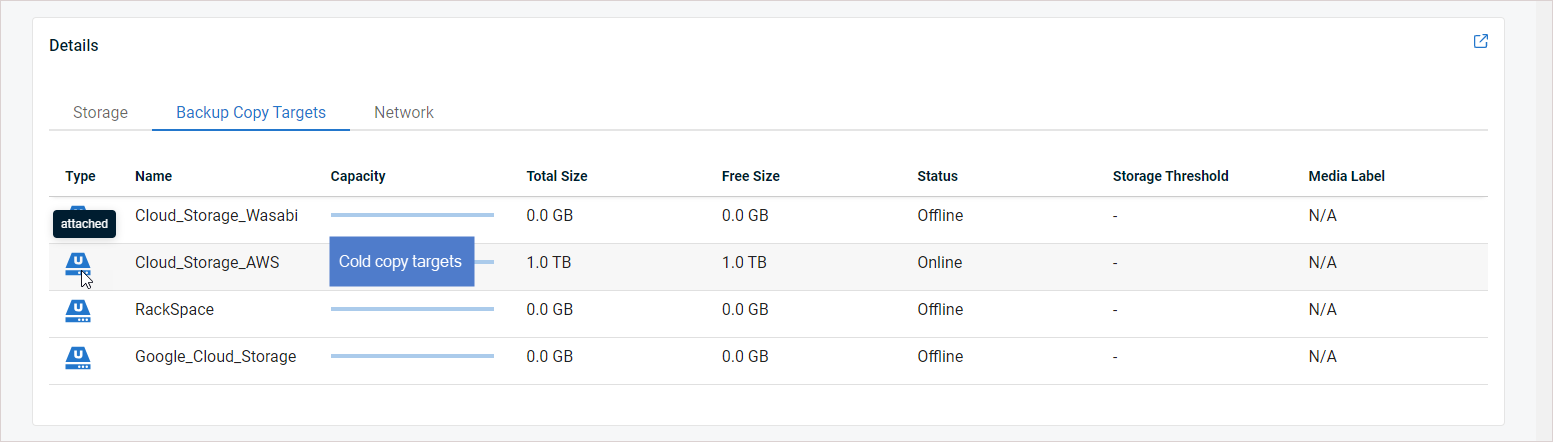
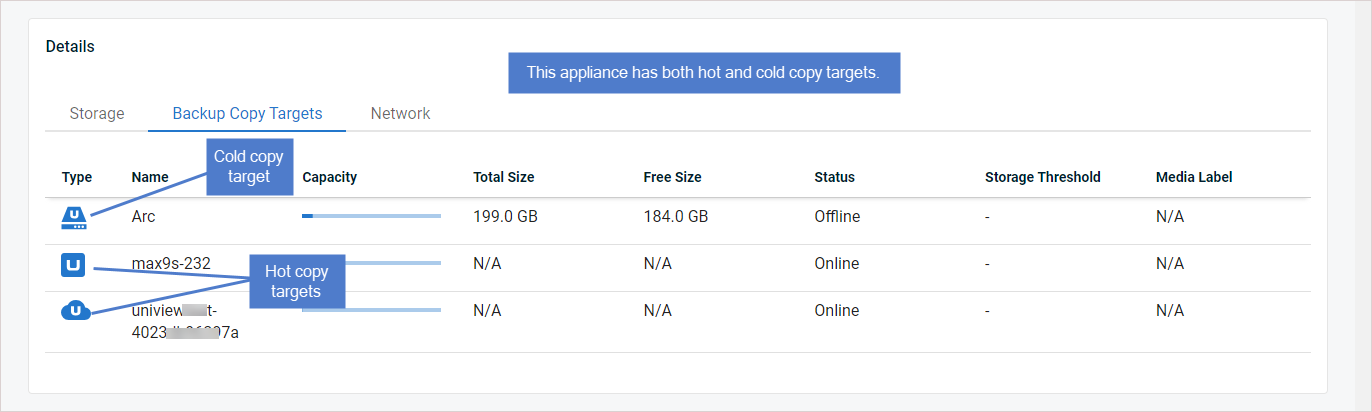
Shows appliance storage, backup copy targets, and network settings.
The Backup Copy Targets tab shows all hot and cold backup copy targets that have been added to the appliance. Backup policies can be configured to copy backups to the Unitrends Cloud or to third-party cloud targets. Other types of backup copy targets are not supported. NOTE Backup copy targets must be added to the appliance through the appliance UI. For details, see Backup copy targets. |
UniView Portal procedures:
Appliance UI procedures: |
| Settings | Click the toggles to block/unblock local access to the appliance or to open/close a support tunnel. | 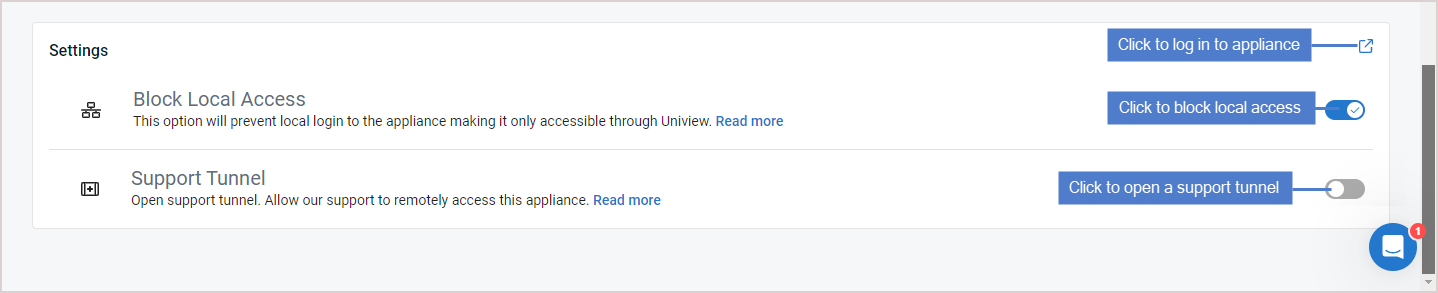
|
Any physical machine, virtual machine, or application you wish to protect is an asset. The first step in protecting an asset is adding it to the Unitrends appliance.
You can add these asset types to your backup appliance— right from UniView:
- Windows physical machines – Adding the machine also adds an any hosted applications (e.g., SQL or Exchange).
- Linux physical machines – Adding the machine also adds any hosted applications (e.g., Oracle on Linux).
- vCenter or ESXi servers – Adding the server also adds its hosted VMs.
- Hyper-V servers – Adding the server also adds its hosted VMs.
To add an asset, review the Prerequisites and considerations, then proceed to the applicable add asset procedure below.
Ensure that these prerequisites have been met before adding your asset:
- Unitrends appliance – The appliance where you are adding the asset must be a Unitrends backup appliance. Adding an asset to a backup copy target appliance is not supported.
- Windows physical machine – You must install the Unitrends Windows agent before adding the asset to the appliance. For details, see Installing the Windows agent.
- Linux physical machine – You must install the Unitrends Linux agent before adding the asset to the appliance. For details, see Installing the Linux agent.
- Hyper-V servers –
- You must install the Unitrends Windows agent on the Hyper-V server before adding it to the appliance. For details, see Installing the Windows agent.
- Hyper-V clusters are not supported.
- VMware considerations –
- Servers running free ESXi versions are not supported and cannot be added to a Unitrends appliance.
NOTE To protect a Windows or Linux VM hosted on free ESXi, you can install the Unitrends agent on the VM and add the VM to the appliance using the To add a Windows or Linux asset procedure. The VM is then protected by the appliance as a physical asset.
If a vCenter is managing your ESXi servers, Unitrends recommends that you add to the appliance each ESXi server and the vCenter server itself. Some features that you can run from the appliance UI require a vCenter server (for example, VM instant recovery). To enable these features, you must add both the ESXi host and the vCenter server to the appliance.
NOTE You must install the Unitrends Windows or Linux agent before running this procedure.
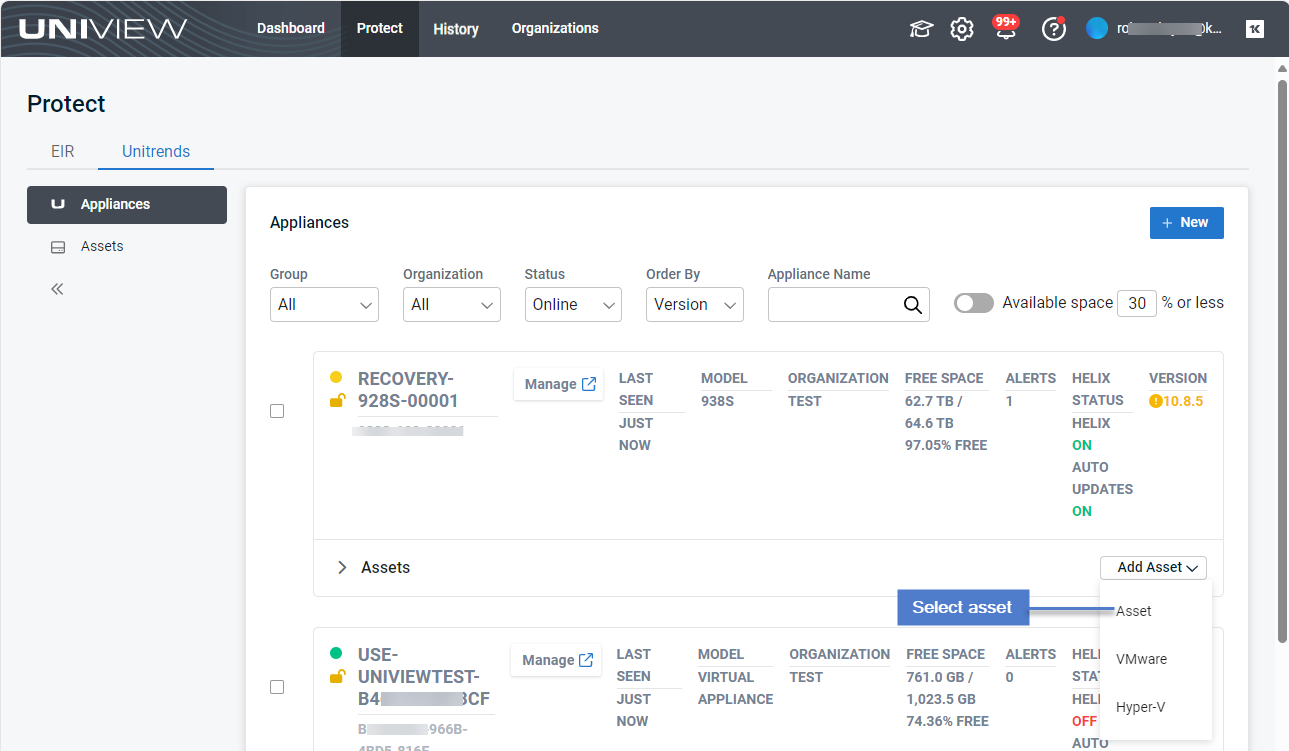
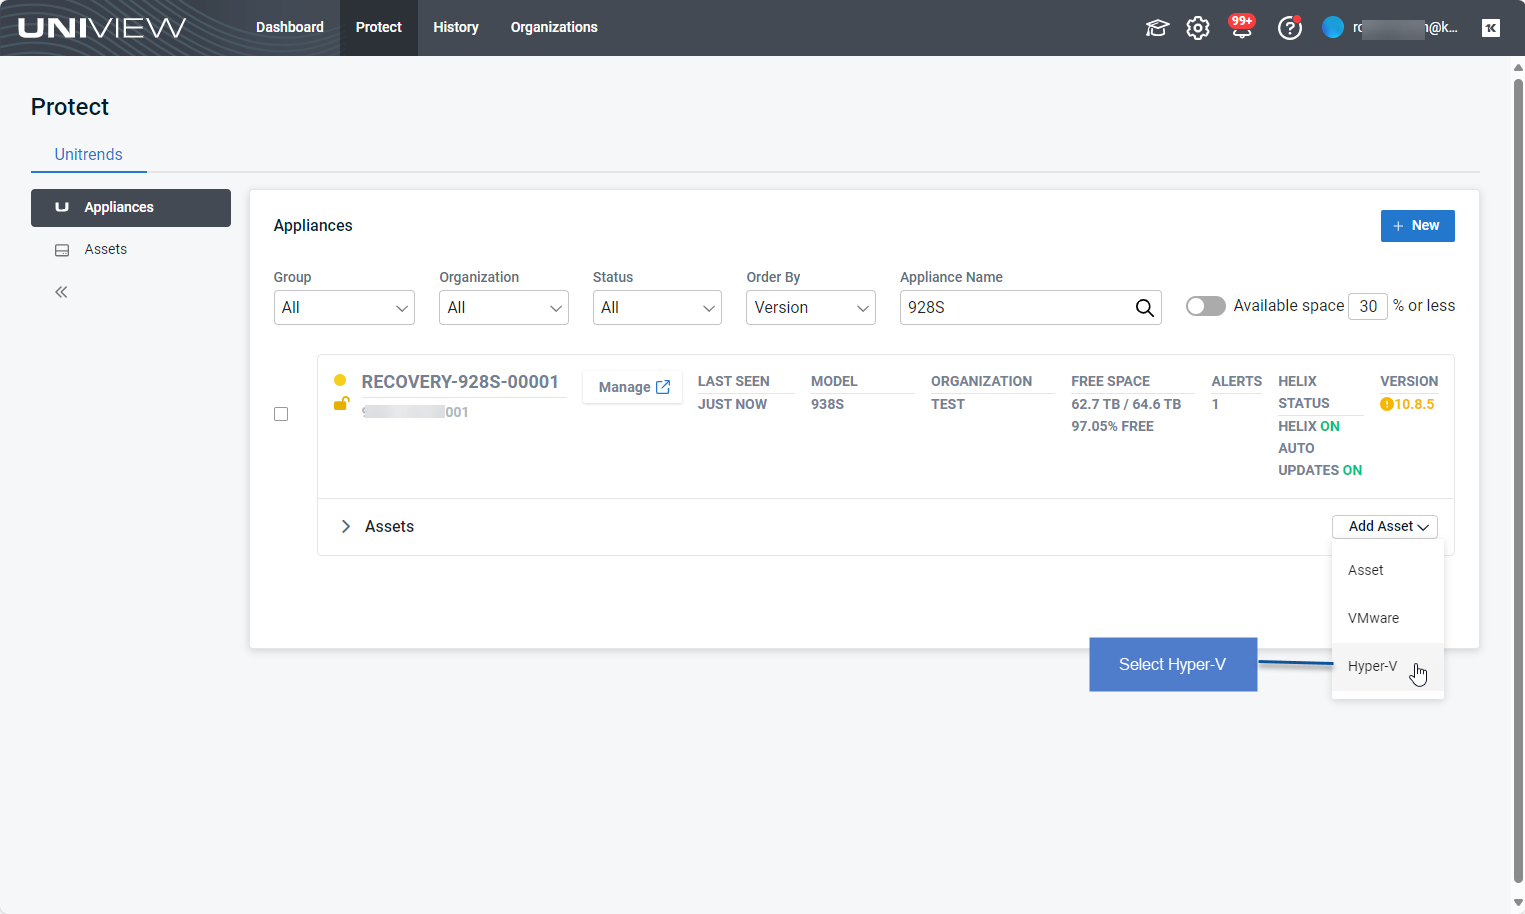
- In the Appliances view, locate the appliance. Click Add Asset, then select Asset.
-
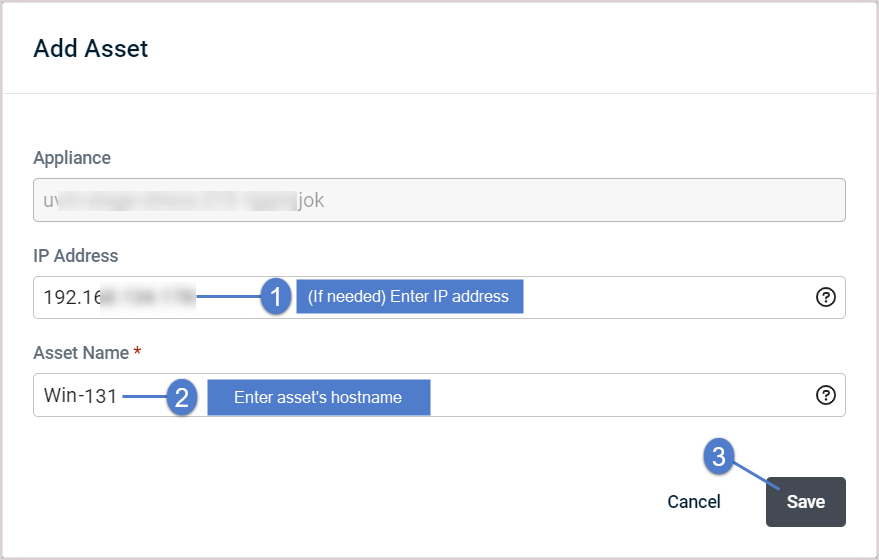
Enter the asset's IP address. This is optional in some cases, as described here:
- DNS registration should be used for assets that obtain their network settings through DHCP. It is optional for assets with static IP addresses.
- If you do not enter a static IP address, make sure that both the asset and the appliance have DNS entries and that reverse lookup is configured.
- If you enter a static IP address, the appliance attempts to connect using this address, but if the attempt fails, it will try to add the asset using DNS.
- Enter the asset's hostname.
- Click Save.
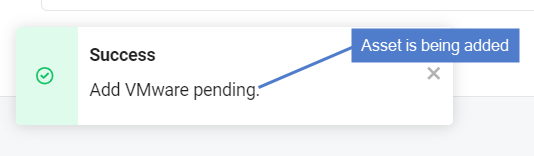
- The asset is added, along with any hosted applications. Go to the Assets page to view the new asset.
NOTE The asset is still being added if you see a spinner icon in the Name column in the Assets list.
- (Optional for Windows only) Apply a backup policy to start running image-level or file-level backups:
NOTES
● If you need to include cold backup copies in the backup policy, do not do this step. Instead, add the backup policy from the Appliance Detail page as described in Applying backup policies to an appliance's assets.
● Backup policies are supported for Windows image-level assets, Windows file-level assets, Hyper-V VMs, and VMware VMs. Support for other asset types will be included in up-coming UniView Portal releases.
File-level backup:
- Check the Windows box.
- Click Set Backup Policy.
- Modify policy settings as needed. Click Save.
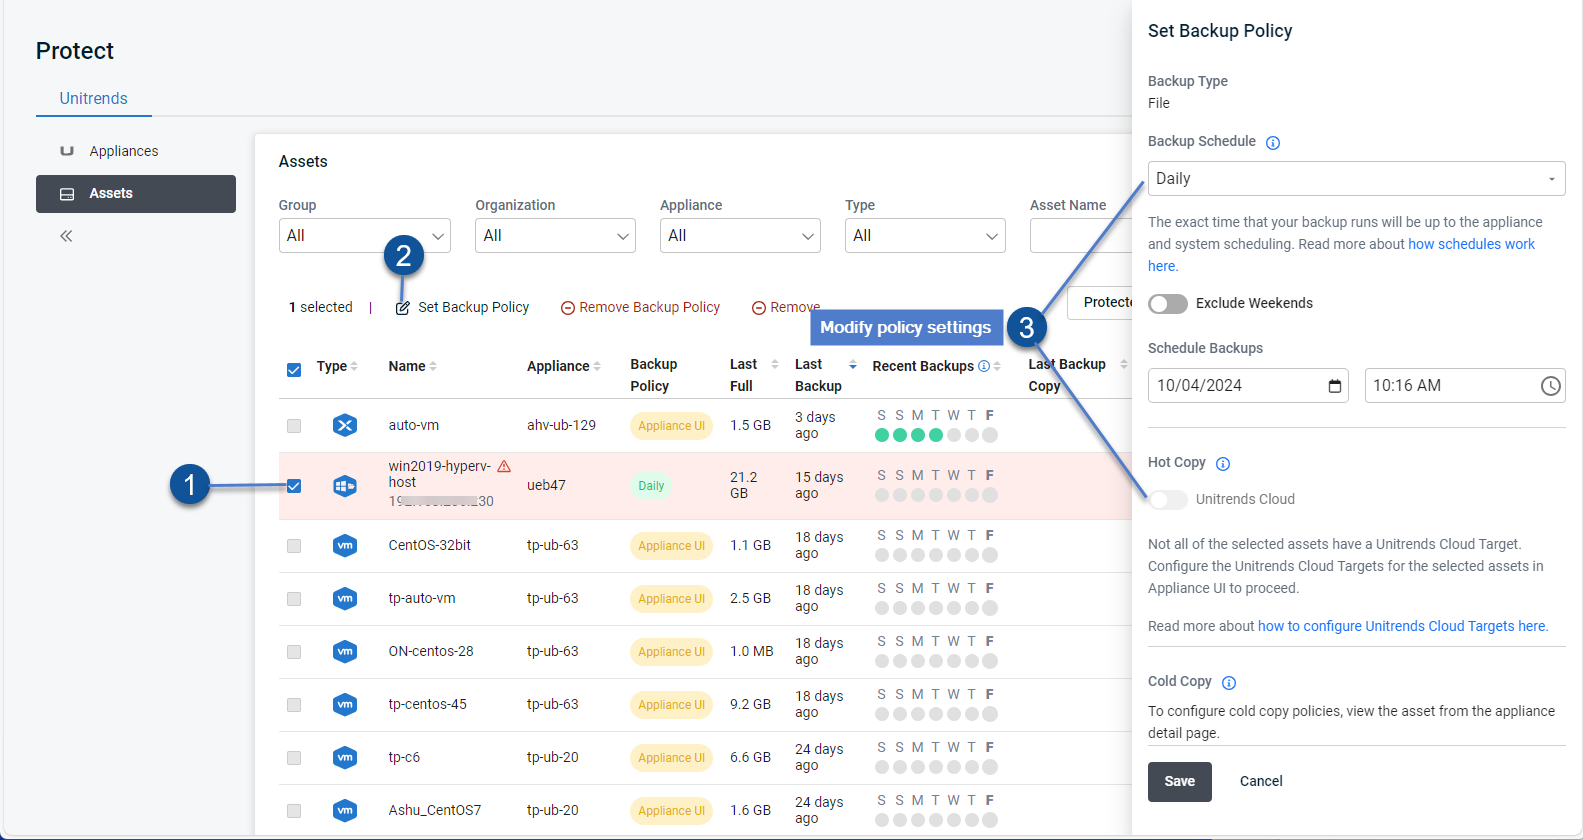
Applying the policy can take a few minutes. A spinner displays in the Backup Policy column until the policy has been applied. For more on backup policies, see Working with backup policies.
- In the Appliances view, locate the appliance. Click Add Asset, then select VMware.
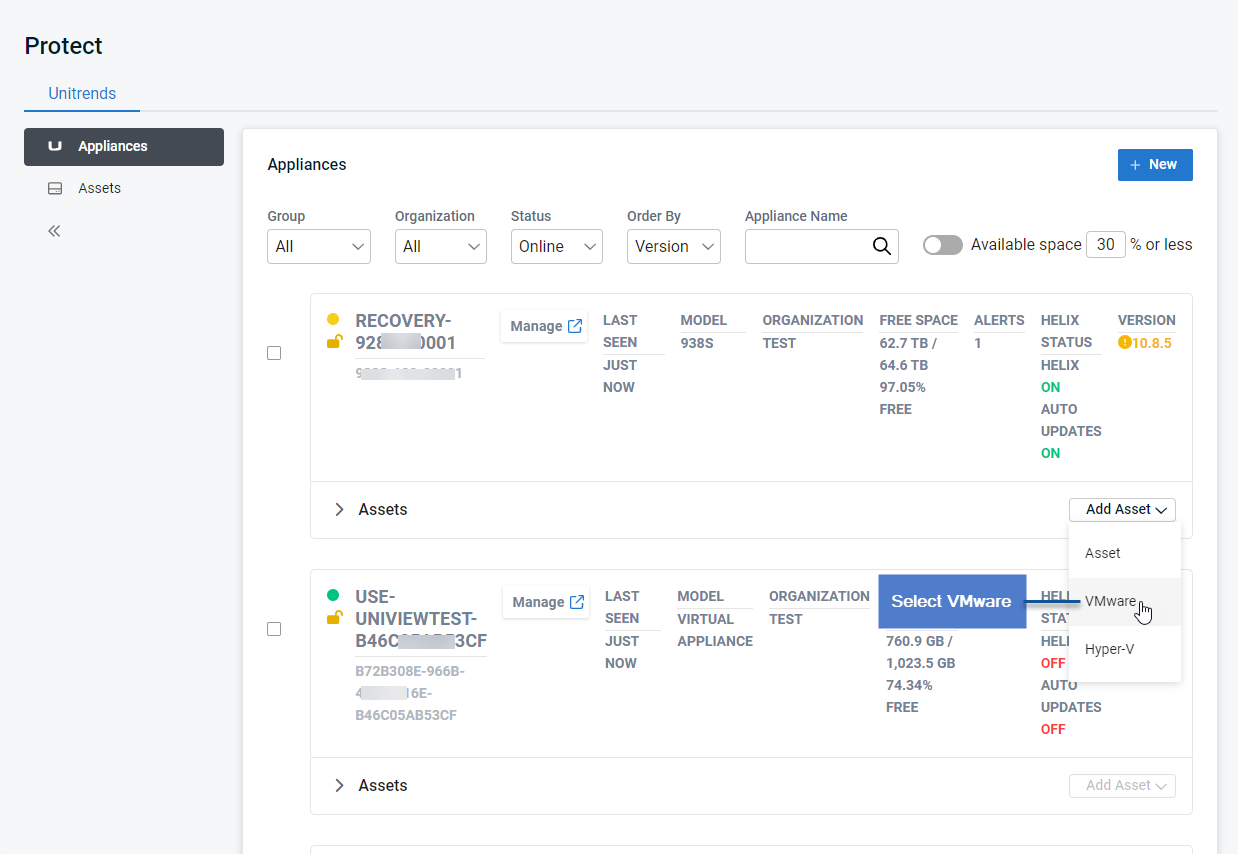
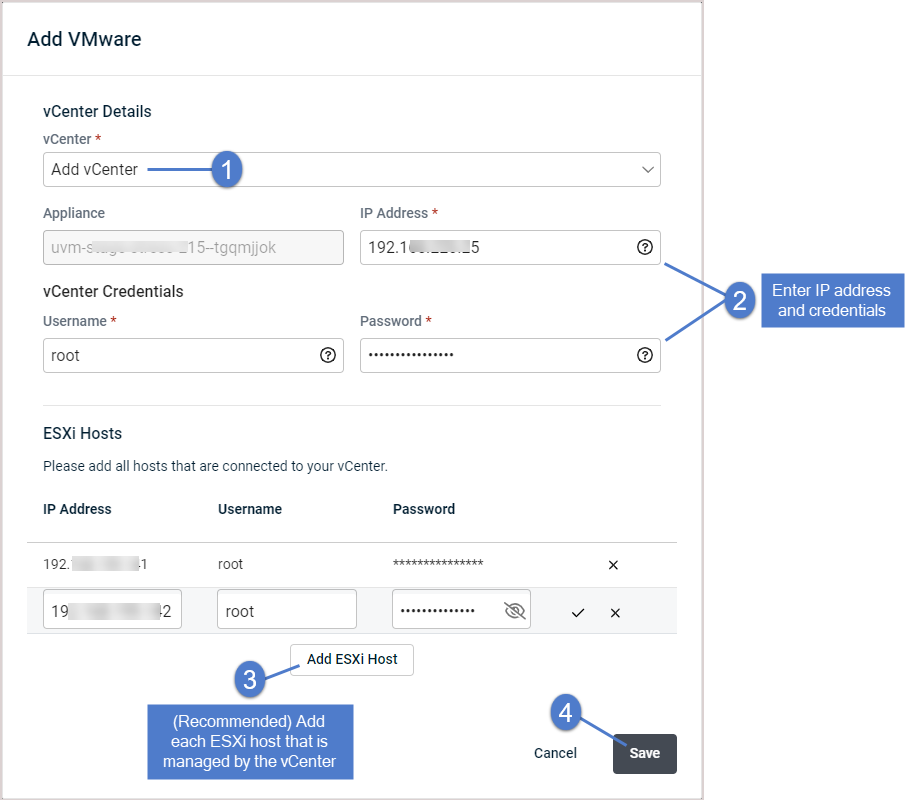
- In the Add VMware dialog:
- Select Add vCenter from the vCenter list.
NOTE If the appliance is running version 10.8.1 or higher and you have already added the vCenter (through the appliance UI), you can select it in the vCenter list instead of clicking Add vCenter.
- Enter the vCenter IP address and credentials.
- (Recommended) For best performance and to enable certain features, add each ESXi host that is managed by this vCenter. Click Add Host, enter the host IP address and credentials, then click the checkmark to save. (Repeat to add another host.)
- Click Save.
-
The following assets are added:
- The vCenter server
- All VMs that reside on the ESXi hosts that this vCenter manages
- Any ESXi hosts that you added with the vCenter
- Click Assets to view these assets. To filter the Assets list, you can select the VMwareType to view the vCenter and ESXi hosts or the VMware: VM InstanceType to view their hosted VMs.
NOTES
● The asset is still being added if you see a spinner icon by the asset in the Assets list.
● For vCenter and ESXi hosts, the Name column displays the server's IP address.
● For VMs, the Name column displays the machine's hostname.
- (Optional) Apply a backup policy to the new VMs to start running VMware host-level backups:
NOTES
● If you need to include cold backup copies in the backup policy, do not do this step. Instead, add the backup policy from the Appliance Detail page as described in Applying backup policies to an appliance's assets.
● Backup policies are supported for Windows image-level assets, Windows file-level assets, Hyper-V VMs, and VMware VMs. Support for other asset types will be included in up-coming UniView Portal releases.
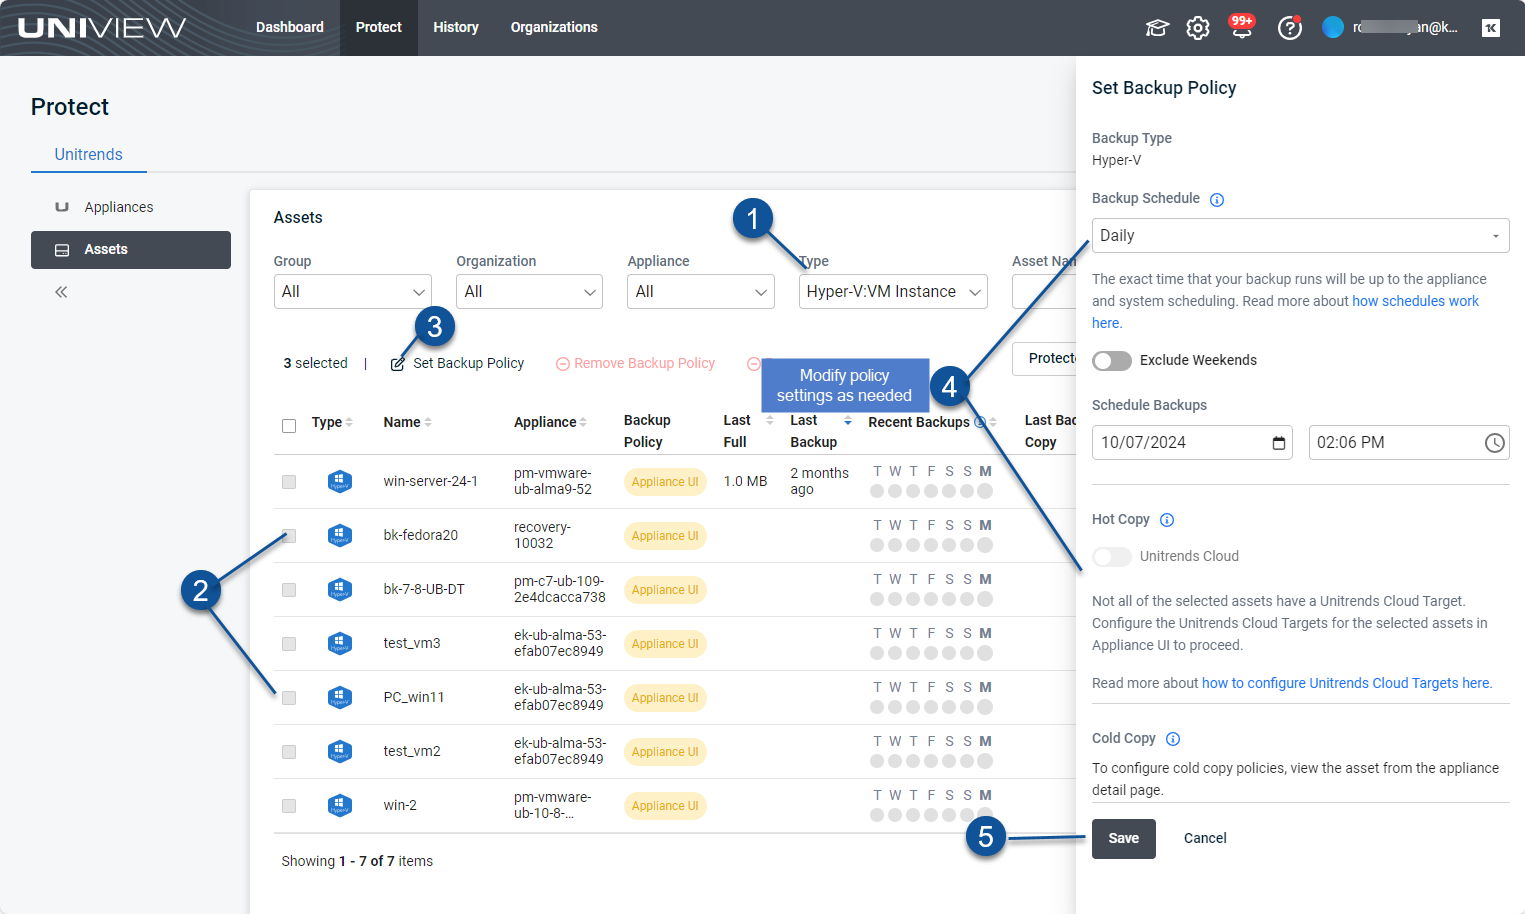
- Filter the asset list by selecting VMware: VM Instance in the Type field.
- Check boxes to select one or more VMs.
- Click Set Backup Policy.
- Modify policy settings as needed. Click Save.
Applying the policy can take a few minutes. A spinner displays in the Backup Policy column until the policy has been applied. For more on backup policies, see Working with backup policies.
Use this procedure to add a stand-alone ESXi host.
NOTE If your ESXi host is being managed by a vCenter, we recommend using the To add a vCenter server procedure to add both the vCenter and the ESXi host.
- In the Appliances view, locate the appliance. Click Add Asset and select VMware.
-
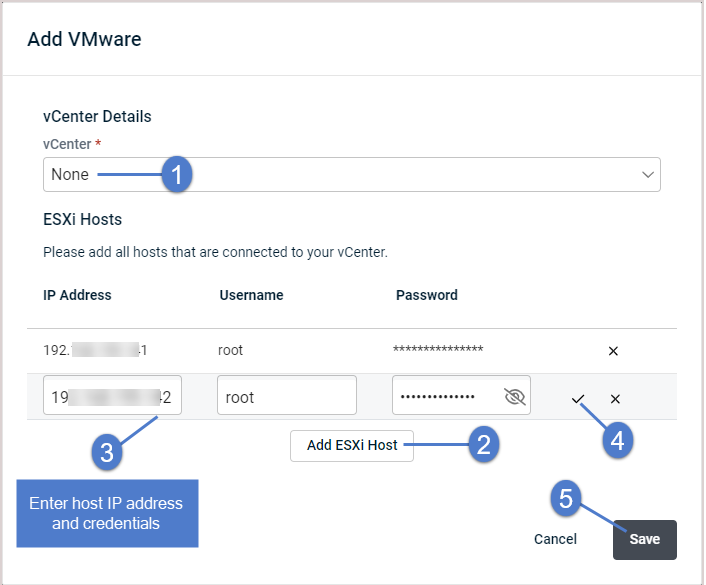
In the Add VMware dialog:
- Select None from the vCenter list.
- Click Add Host. Enter the host IP address and credentials, then click the checkmark to save. Repeat to add another host.
- Click Save.
-
The following assets are added:
- Each ESXi host that you added
- All VMs that reside on the ESXi hosts that you added
- Click Assets to view these assets. To filter the Assets list, you can select the VMwareType to view the ESXi hosts or the VMware: VM InstanceType to view their hosted VMs.
NOTES
● The asset is still being added if you see a spinner icon by the asset in the Assets list.
● When the host is first added, the Name column displays the server's IP address. The IP address is replaced by the server's hostname once the UniView Portal checks in with the Unitrends appliance.
● For VMs, the Name column displays the machine's hostname.
- (Optional) Apply a backup policy to the new VMs to start running VMware host-level backups:
NOTES
● If you need to include cold backup copies in the backup policy, do not do this step. Instead, add the backup policy from the Appliance Detail page as described in Applying backup policies to an appliance's assets.
● Backup policies are supported for Windows image-level assets, Windows file-level assets, Hyper-V VMs, and VMware VMs. Support for other asset types will be included in up-coming UniView Portal releases.
- Filter the asset list by selecting VMware: VM Instance in the Type field.
- Check boxes to select one or more VMs.
- Click Set Backup Policy.
- Modify policy settings as needed. Click Save.
Applying the policy can take a few minutes. A spinner displays in the Backup Policy column until the policy has been applied. For more on backup policies, see Working with backup policies.
NOTE You must install the Unitrends Windows agent on the Hyper-V host before running this procedure.
- In the Appliances view, locate the appliance. Click Add Asset, then select Hyper-V.
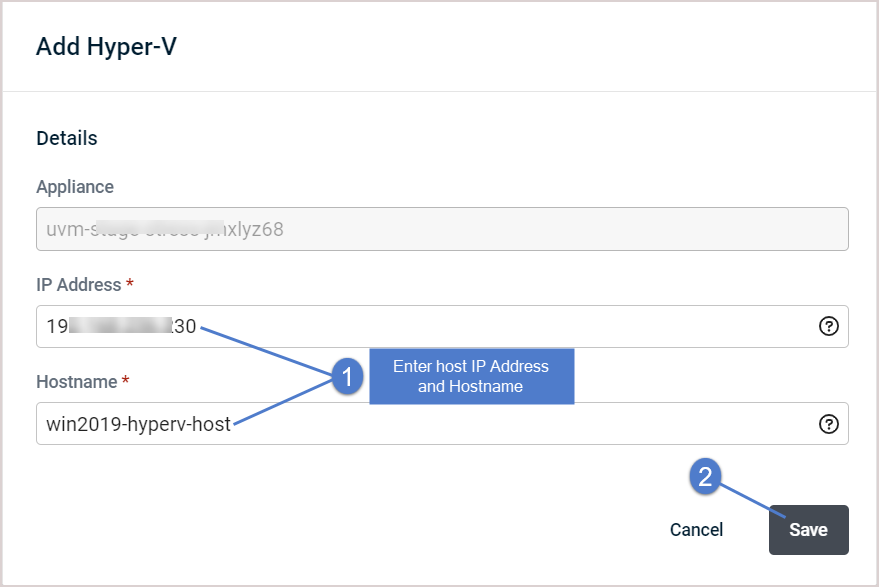
- In the Add Hyper-V dialog:
- Enter the host IP address and hostname.
- Click Save.
-
The following assets are added:
- The Hyper-V host (asset type is Windows)
- Hosted virtual machines (asset type is Hyper-V: VM Instance)
- One or more Hyper-V application instances (asset type is Hyper-V)
- An application instance that can be used to run image-level backups of the Windows Hyper-V host server (asset type is Image Level Instance)
- Click Assets to view the newly added assets.
-
On the Assets page, you can filter the list by asset type or asset name using the fields above. Hover over an icon to see an asset's type.
NOTE The asset is still being added if you see a spinner icon by the asset name in the Assets list.
- (Optional) Apply a backup policy to the new VMs to start running Hyper-V host-level backups:
NOTES
● If you need to include cold backup copies in the backup policy, do not do this step. Instead, add the backup policy from the Appliance Detail page as described in Applying backup policies to an appliance's assets.
● Backup policies are supported for Windows image-level assets, Windows file-level assets, Hyper-V VMs, and VMware VMs. Support for other asset types will be included in up-coming UniView Portal releases.
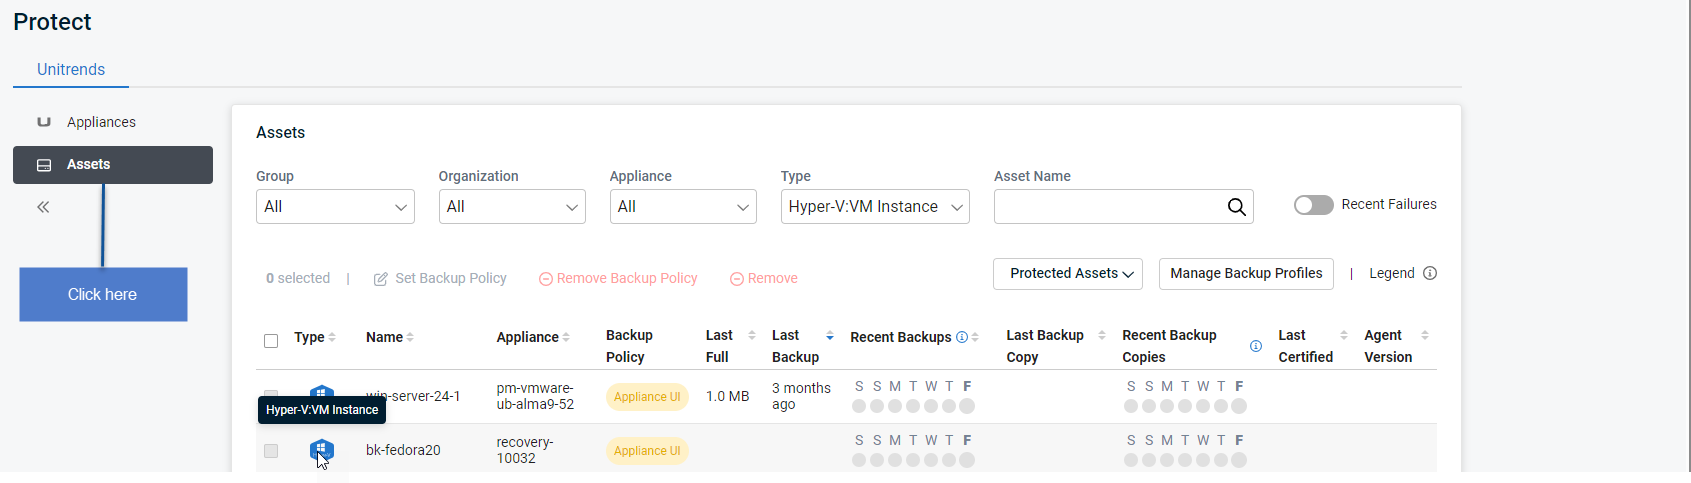
- Filter the asset list by selecting Hyper-V: VM Instance in the Type field.
- Check boxes to select one or more VMs.
- Click Set Backup Policy.
- Modify policy settings as needed. Click Save.
Applying the policy can take a few minutes. A spinner displays in the Backup Policy column until the policy has been applied. For more on backup policies, see Working with backup policies.
Use this procedure to apply a backup policy to an appliance's Windows image-level assets, Windows file-level assets, Hyper-V VMs, or VMware VMs. A single backup policy can contain only one asset type. Repeat this procedure as needed to create separate policies for additional asset types.
NOTES
● This procedure enables you to configure cold backup copies for the backup policy if the appliance is running version 10.8.3 or higher and a third-party cloud target has been added to the appliance. Other types of cold copy targets, such as NAS and tape devices, are not supported.
● Cold copies cannot be included in backup policies that are created from the Assets page because a cold copy target is tied to a specific appliance. (A cold copy target is added to the appliance through the appliance UI. For details, see Adding a third-party cloud backup copy target.)
● Backup policies are supported for Windows image-level assets, Windows file-level assets, Hyper-V VMs, and VMware VMs only. Support for other asset types will be included in up-coming UniView Portal releases.
To apply a backup policy to an appliance's assets
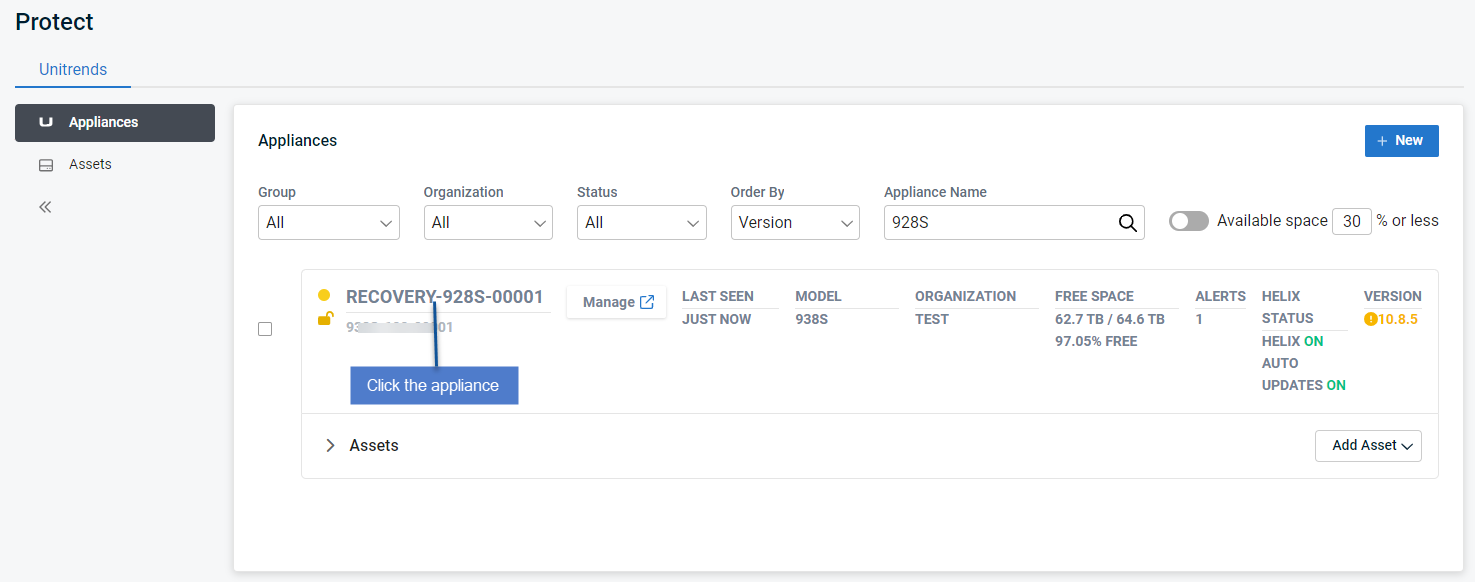
- In the Appliances view, locate the appliance whose assets you will protect. Click the appliance.
- On the Appliance Detail page, click Assets.

- In the Assets tile, filter the assets list by Type to display only the asset type you will include in this backup policy. Examples:
- To protect Windows image-level assets, select Image Level Instance in the Type drop-down.
- To protect Windows file-level assets, select Windows in the Type drop-down.
- To protect VMware virtual machines, select VMware: VM Instance in the Type drop-down.
- To protect Hyper-V virtual machines, select Hyper-V: VM Instance in the Type drop-down.
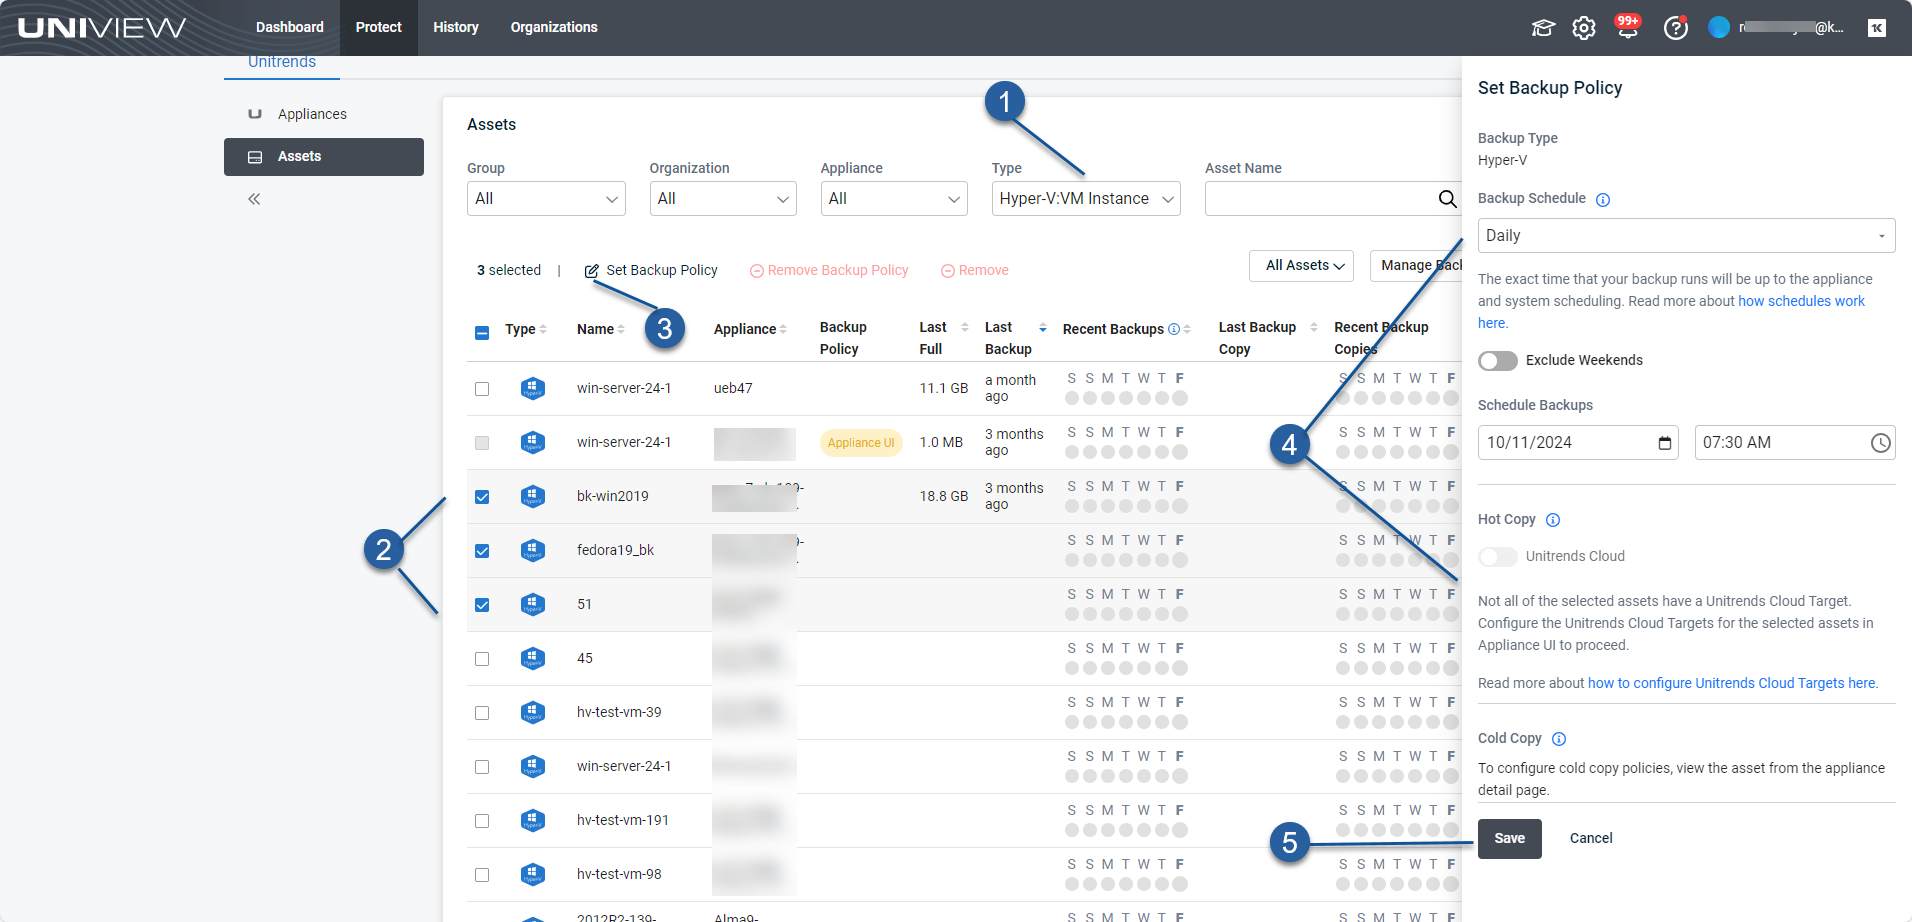
- Check boxes to select the assets you will protect with the backup policy.
-
Click Set Backup Policy.

-
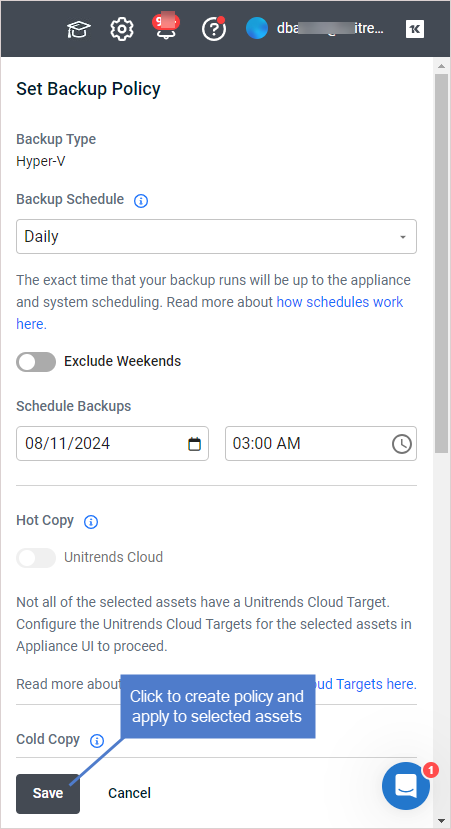
Define the following:
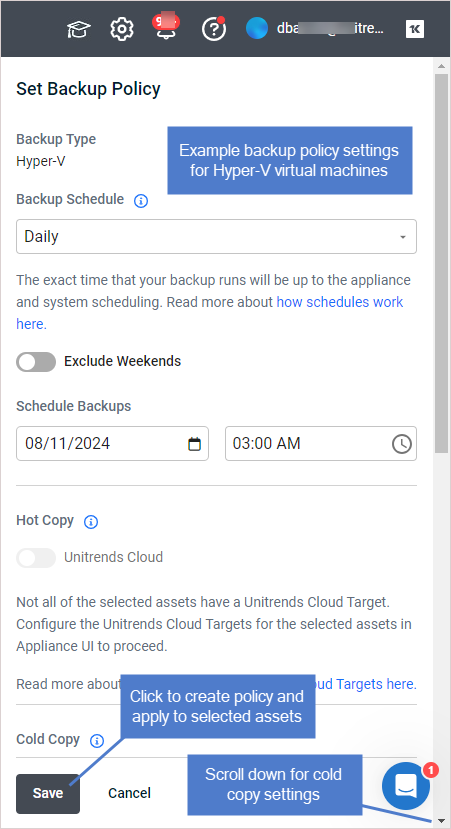
- Backup Schedule – Select a frequency from the list. (For details, see Backup policy descriptions.)
NOTE The asset's first backup is a full, which takes more time to run than subsequent incrementals. Adjust the backup frequency as needed once you have taken some incrementals.
- (Optional) Exclude Weekends – Click to enable the toggle.
- Schedule Backups – Click
to select a start date, click
to select a start time.
NOTE The policy's start date and time use the timezone of the Unitrends appliance.
- Hot Copy Target – Enable or disable the Unitrends Cloud toggle. If enabled, new backups of assets in this policy are copied to the Unitrends Cloud. If disabled, backups are not copied to the Unitrends Cloud.
NOTE The Unitrends Cloud toggle is enabled by default if a Unitrends Cloud hot copy target has been added to the appliance. The toggle is disabled and cannot be enabled if a Unitrends Cloud hot copy target has not been added to the appliance. (To add a Unitrends Cloud target to the appliance using the appliance UI, see Adding a Unitrends Cloud backup copy target.)
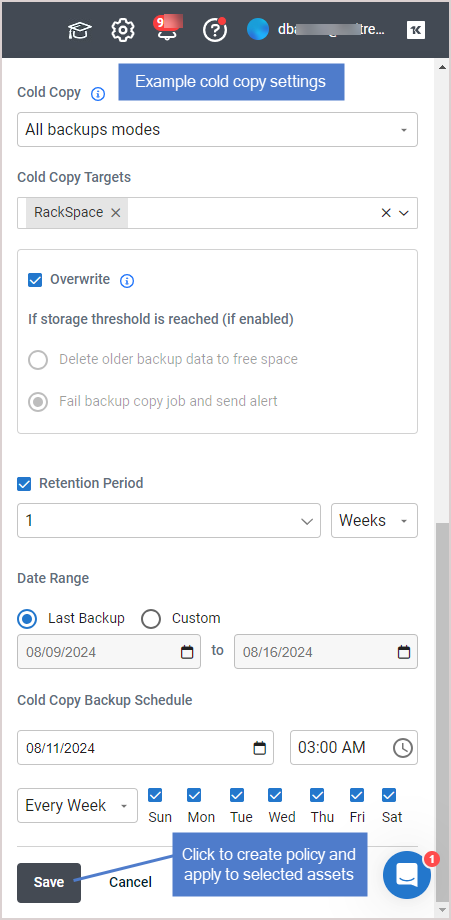
- Cold Copy Targets – If a third-party cloud target has been added to the appliance, you can configure the Cold copy settings described below to copy backups to the target.
| Item | Description |
|---|---|
|
Backups to copy |
Select Fulls only to copy only full backups or All backup modes to copy backups of any mode. Backups that complete successfully (green) or with warnings (yellow) are eligible for backup copy jobs. Failed (red) backups are not copied. |
|
Cold Copy Target |
Select a third-party cloud target from the list to copy backups to the target. NOTE The Cold Copy Target list contains all third-party cloud targets that have been added to the appliance. If you see No supported targets, a third-party cloud target has not been added to the appliance. (To add a third-party cloud target using the appliance UI, see Adding a third-party cloud backup copy target.) |
|
Overwrite |
Use with the Retention Period option. Check the Overwrite box to overwrite backup copies that are older than the specified Retention Period. If you do not use the Overwrite and Retention Period options, copy jobs fail if there is insufficient space available on the backup copy target. Overwrite does the following:
|
|
If storage threshold is reached |
Determines whether to delete copies or fail the job if the target does not have sufficient space. IMPORTANT For Google, Amazon, Rackspace, or Azure Blob cloud targets, you must set a storage threshold to limit the amount of data that can be copied. If no threshold is set, the target will always have sufficient space for the copy job and these options do not apply. For details on setting a threshold using the appliance UI, see To view or edit a backup copy target. |
|
Delete older backup data to free space |
Select this option to remove older copies to make room for new ones.
|
|
Fail backup copy job and send alert |
Select this option to fail the backup copy job if there is insufficient free space on the target. |
|
Retention Period |
Use with the Overwrite or Delete older backup data to free space option. Check the Retention Period box to specify the length of time a copy is retained before it can be deleted or overwritten. To define the retention period, enter a number and select Days, Weeks, Months, or Years. Example: enter 2 and select Weeks to retain copies for at least 2 weeks. If you do not use the Retention Period option, copy jobs fail if there is insufficient space available on the backup copy target. Modifying the retention period does not change the retention period of existing cold copies. The new setting is applied to subsequent backup copies only. |
|
Date Range |
Select whether to copy the most recent backups or specify a date range of backups to copy.
|
|
Cold Copy Backup Schedule |
Select the date and time at which backup copies will begin. Select the backup copy frequency:
|
- Click Save to create the policy.
While the policy is being created, you see a spinner and the asset's checkbox is disabled. Creating the policy can take some time (typically 30 minutes).
The backup policy name displays when the policy has been applied to the asset. If the policy is copying the asset's backups to the Unitrends Cloud, this hot copy icon displays next to the policy name:. If the policy is copying the asset's backups to a third-party cloud target, this cold copy icon displays next to the policy name:
.
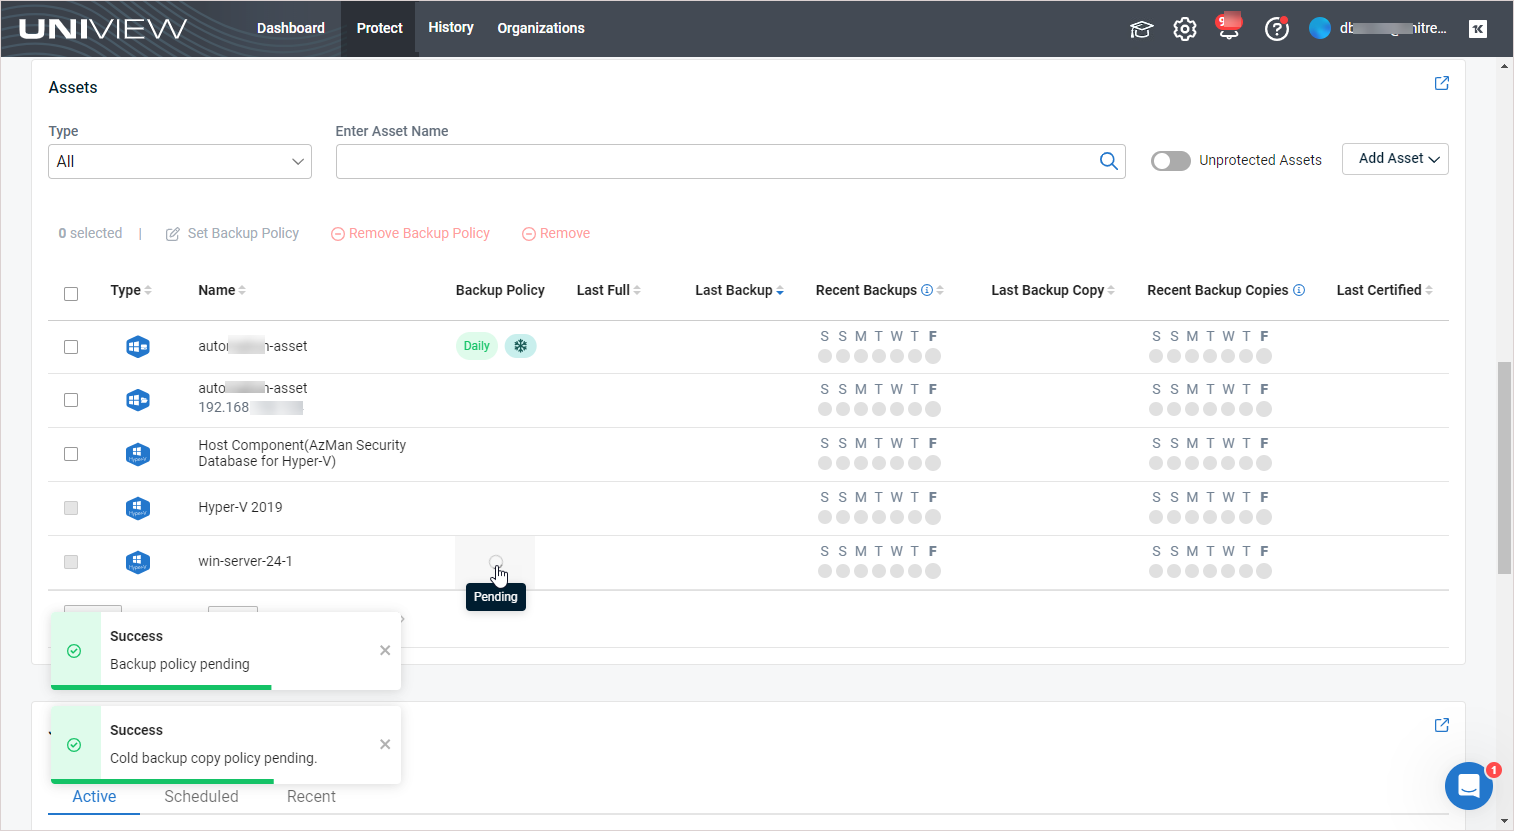
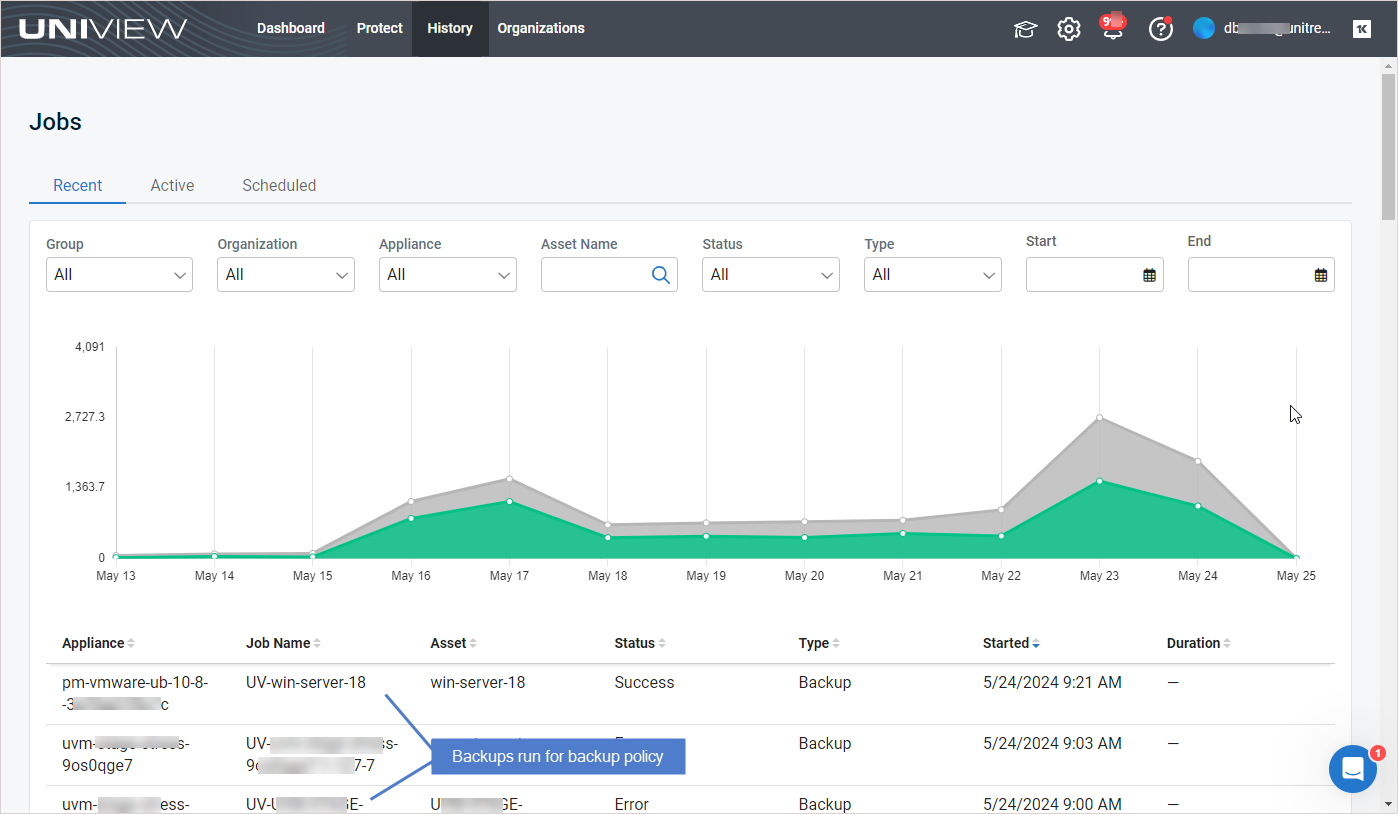
- A backup job is created for each asset in the policy. These jobs display on the UniView Portal Jobs page and the appliance Jobs > Job Manager page:
- On the UniView Portal Jobs page, backups initiated by a policy are labeled with the job name "UV-AssetName" or "UniView-AssetName", as shown here:
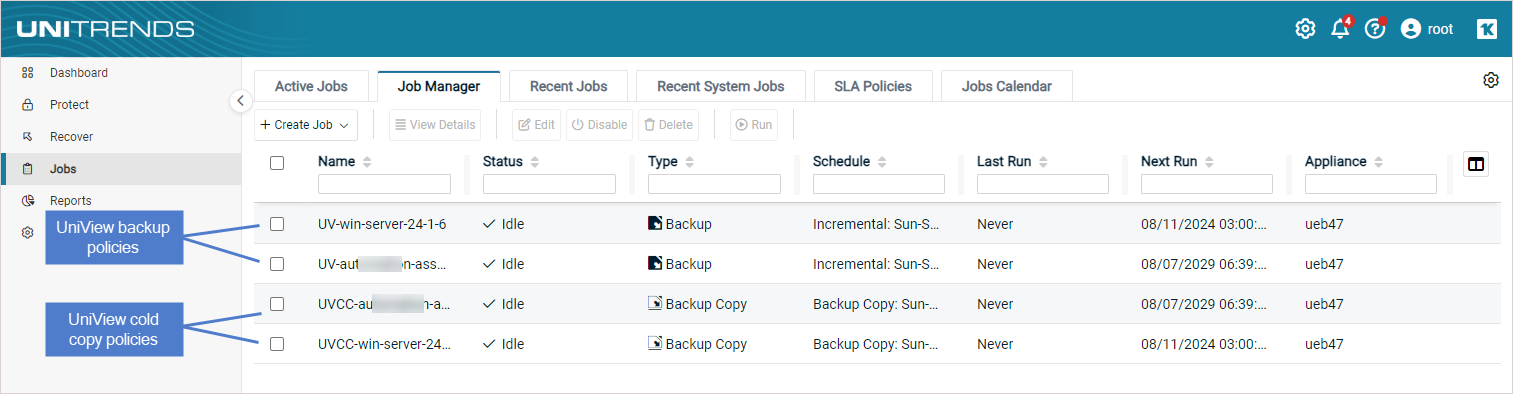
- On the appliance Jobs > Job Manager page, jobs created by a UniView Portal policy are labeled with the job name "UV-AssetName" or "UniView-AssetName", as shown here:
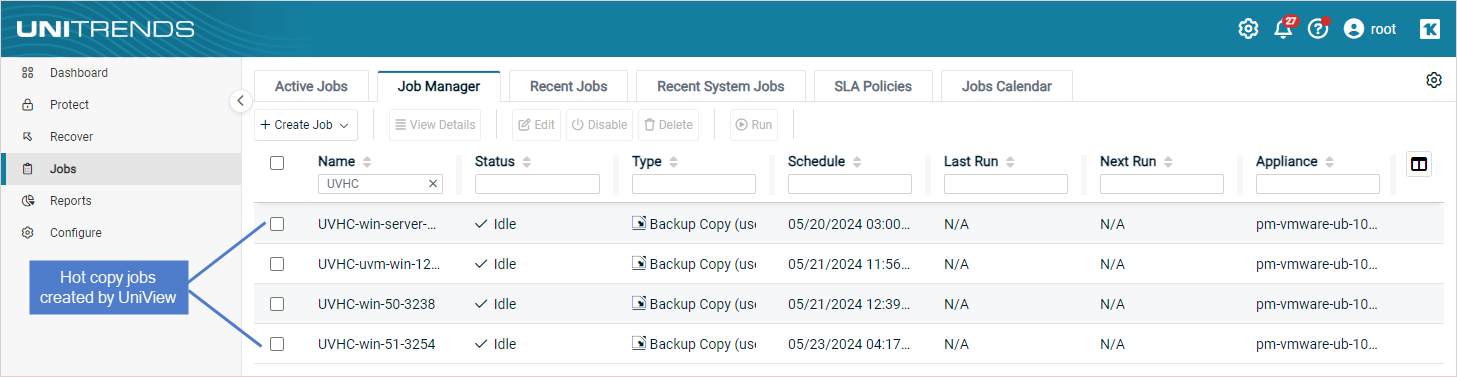
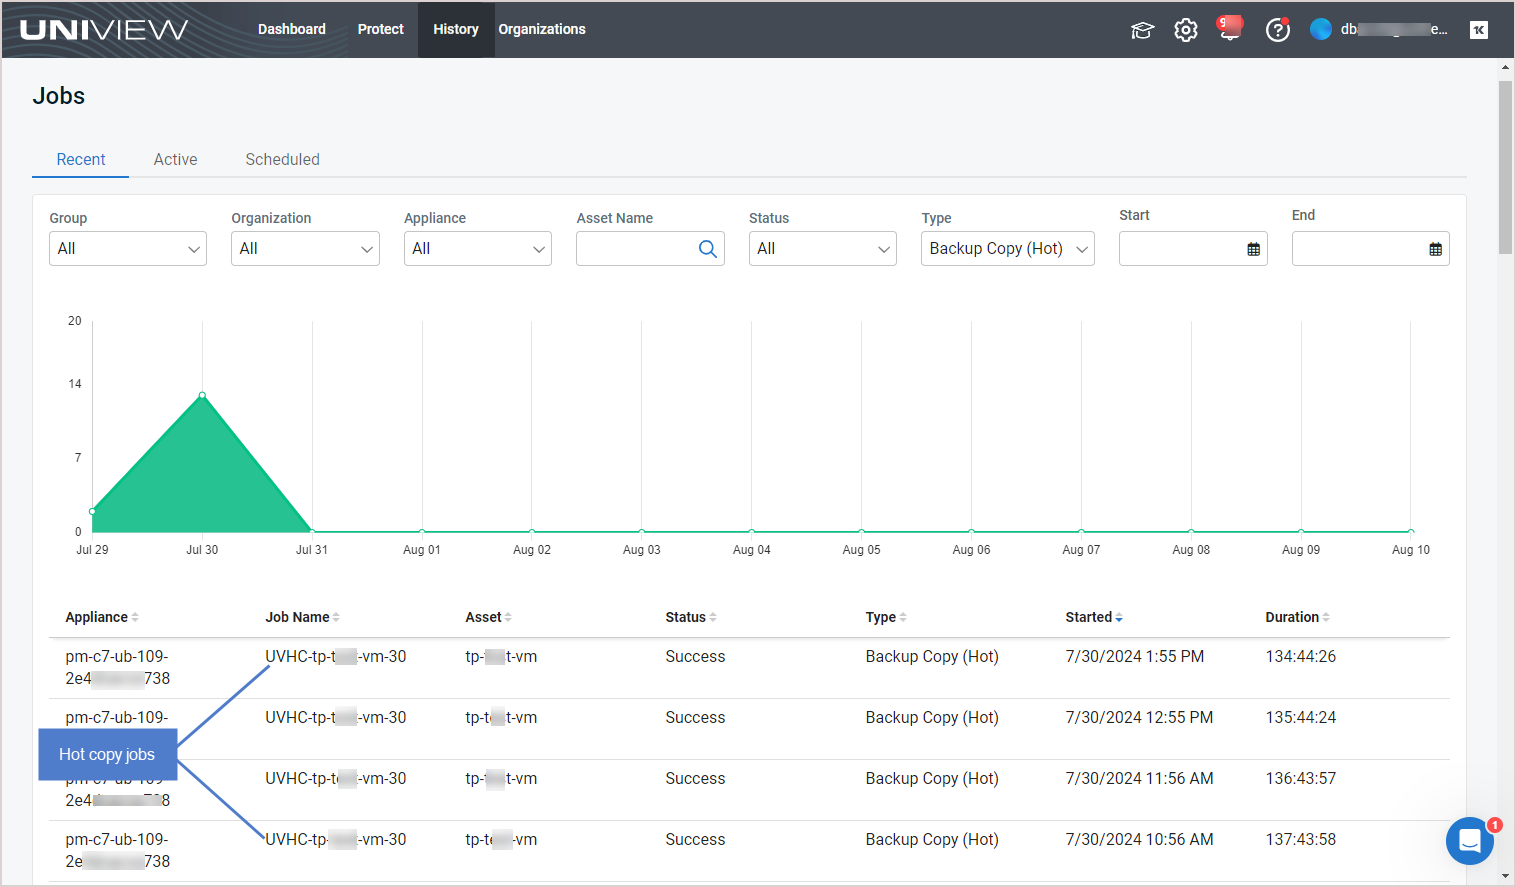
- If hot copies to the Unitrends Cloud were enabled in the policy, hot copy jobs are created for the assets on the Unitrends appliance and also display on the UniView Portal Jobs page. These jobs are named "UVHC-assetName", as shown here:
- If cold copies were enabled in the policy, cold copy jobs are created for the asset on the Unitrends appliance and also display on the UniView Portal Jobs page. These jobs are named "UVCC-assetName", as shown here:

You can remove these asset types from your appliance— right from UniView:
- Windows physical machines
- Linux physical machines
- vCenter or ESXi servers
- Hyper-V servers
From the Appliance Detail page, you can remove one or more assets in a single operation. Before removing an asset, review the Prerequisites and considerations for removing assets. Then use the To remove selected assets from an appliance procedure to remove assets.
NOTE You can also use the Assets page to remove assets from appliances. For details, see Removing assets.
The following requirements and considerations apply:
- Before you can remove an asset, you must remove any UniView backup policy or remove the asset from any Unitrends job schedules.
- When an asset is removed, all associated backups of that asset are also deleted. Please use caution when removing an asset.
- Removing an asset also removes any associated asset instances, along with the backups of those instances. For example, removing an ESXi host removes its hosted VMs and the VM backups. Removing a Windows asset removes its image-level instance and any hosted application instances (e.g., Exchange or SQL), and backups of these instances.
- When a Hyper-V or VMware virtual host is removed, all backups of its VMs are also deleted. However, if you have added a vCenter server and the ESXi hosts it's managing, the VM backups are not deleted from the appliance if you remove only the vCenter server. The backups are not deleted unless you also remove the ESXi host servers.
- Hyper-V runs on a Windows server. When you add a Hyper-V server, the following assets are added:
- The Hyper-V host (which is the Windows server that is running the Hyper-V application; asset type is Windows)
- Hosted virtual machines (asset type is Hyper-V: VM Instance)
- One or more Hyper-V application instances (asset type is Hyper-V)
- An application instance that can be used to run image-level backups of the Windows Hyper-V host server (asset type is Image Level Instance)
To remove the Hyper-V server you must remove the Windows server asset. 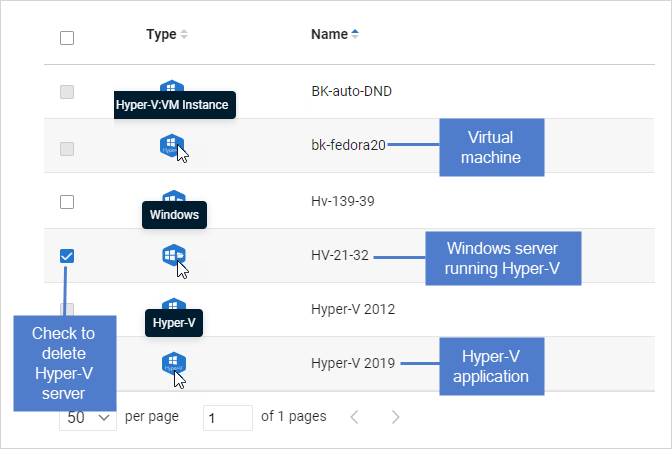
- Windows agent – For Windows assets protected with a Unitrends agent:
- Asset configuration settings are saved in the master.ini file, which is located in the \PCBP directory on the Windows system drive (e.g., C:\PCBP\). Deleting the asset from the Unitrends appliance also removes this file from the asset itself and any customized settings you have added are lost. Be sure to save the asset’s master.ini file before deleting if you think you may want to add the asset to this or another Unitrends appliance and want to use these settings. After adding the asset back to an appliance, replace the standard master.ini file with the one you have saved.
- If you are using Windows replicas and you remove the Windows asset while a virtual recovery is in progress, the deletion may not be instantaneous. The clean up takes time because the recovery is shut down and the virtual replica asset is removed.
- Linux agent – For Linux assets protected with a Unitrends agent, asset configuration settings are saved in the master.ini file (located here by default: /usr/bp/bpinit/master.ini). Deleting the asset from the Unitrends appliance also removes this file from the asset itself and any customized settings you have added are lost. Be sure to save the asset’s master.ini file before deleting if you think you may want to add the asset to this or another Unitrends appliance and want to use these settings. After adding the asset back to an appliance, replace the standard master.ini file with the one you have saved.
IMPORTANT When an asset is removed, all backups of that asset are also deleted. When removing a virtual host, all backups of its VMs are also deleted. Be sure to review the Prerequisites and considerations for removing assets and use caution when removing an asset.
- In the Appliances view, locate the appliance whose assets you will remove. Click the appliance.

- On the Appliance Detail page, click Assets.

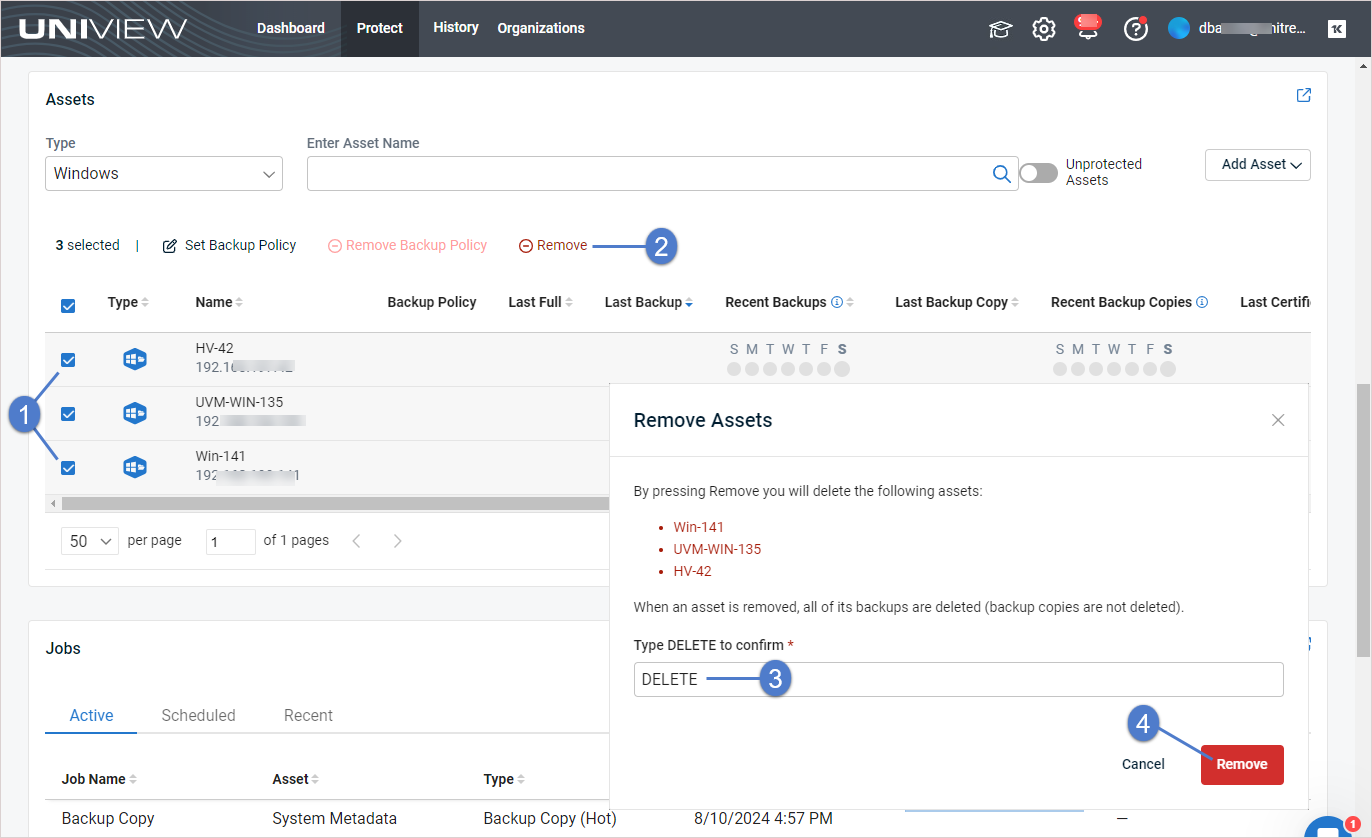
- In the Assets tile, check boxes to select the assets you will remove.
You can remove these asset types (hover over the Type icon to check an asset's type):
- Windows – Use to remove a Windows asset or a Hyper-V server
- Linux – Use to remove a Linux asset
- VMware – Use to remove a vCenter or ESXi server
NOTES
● To filter the assets list, select an asset Type or Enter an Asset Name.
● Removing an asset also removes any hosted application instances and backups of those hosted instances.
- Click Remove.
NOTE If the Remove option is disabled, one or more selected assets cannot be removed. Check the asset type of all selected assets (they must be Windows, Linux, or VMware) and verify that no UniView backup policy or appliance job schedule exists for these assets.
- Type DELETE and click Remove to remove the assets.
UniView enables users to restrict local access to the Unitrends appliance. The appliance UI and management functions can still be accessed through UniView. Blocking local access enforces 2FA, significantly reduces potential security exposure, and allows admins greater access controls through roles and groups in UniView.
Once local access has been blocked, users can no longer log in directly to the appliance UI. Instead, users must connect to the appliance from UniView (as described in Connecting to an appliance).
Consider the following before blocking local access:
- To block or unblock local access, you must log in to UniView as a Superuser, Admin, or Manage user. (UniView users with Monitor access cannot block or unblock local access.)
- To block or unblock local access, the Unitrends appliance must be running version 10.7.2 or higher.
- Hot backup copy to a Unitrends appliance target – To add a Unitrends appliance backup copy target to the appliance, local access must be unblocked on the backup copy target appliance. If needed, use the procedure below to unblock local access on the target appliance before adding the hot backup copy target. Once the target has been added, use the procedure below to block local access.
- Windows bare metal recovery – Local access must be unblocked on the backup appliance. Once you have recovered the Windows asset, use this procedure to block local access on the backup appliance.
- iSeries protection – To protect your iSeries platform, you must log in to the appliance directly from the local network. Do NOT block local access if your appliance is protecting an iSeries environment.
- Appliance disaster recovery (DR) – Local access must be unblocked on the DR target appliance. Once you have recovered the configuration and last backups from the failed appliance, use this procedure to block local access on the target appliance.
To block or unblock local access
- In the Appliances view, click the appliance.
-
On the Appliance Details page, scroll down to the Settings section. In the Block Local Access tile:
indicates that local access is unblocked (users can access the appliance UI by entering https://<applianceIPaddress>/ui/ in a browser on the local network).
indicates that local access is blocked (users must access the appliance UI by logging in to UniView and clicking the appliance's
button, as described in Connecting to an appliance).
-
Do one of the following:
- Click
- Click

NOTES
● If the toggle is disabled ( ), you are using Monitor user credentials and cannot block or unblock local access.
● It may take a minute or two to block or unblock access. During this transition time, the or toggle is disabled ().
● If you see this message, you must upgrade the appliance to enable the Block Local Access feature: 
UniView enables you to open a secure tunnel connection to your Unitrends appliance, which Support can use to quickly troubleshoot issues. The Unitrends appliance must be running version 10.7.9 or later to use the support tunnel feature.
Use this procedure to open a support tunnel. When you're done working with Support, use this procedure to close the tunnel connection.
To open or close a support tunnel
- In the Appliances view, click the appliance.
-
On the Appliance Details page, scroll down to the Settings section. In the Support Tunnel tile:
-
Do one of the following:
- Click
- Click


NOTE If you see this message, you must upgrade the appliance to enable the Support Tunnel feature:
UniView Portal supports opening multiple connections in parallel, so you can configure and manage multiple appliances from a single browser.
Use this procedure to connect to a Unitrends appliance. Repeat these steps to connect to additional appliances. Each connection opens in a separate browser tab.
To connect to an appliance
- In the Appliances view, locate the appliance and click its Manage button.
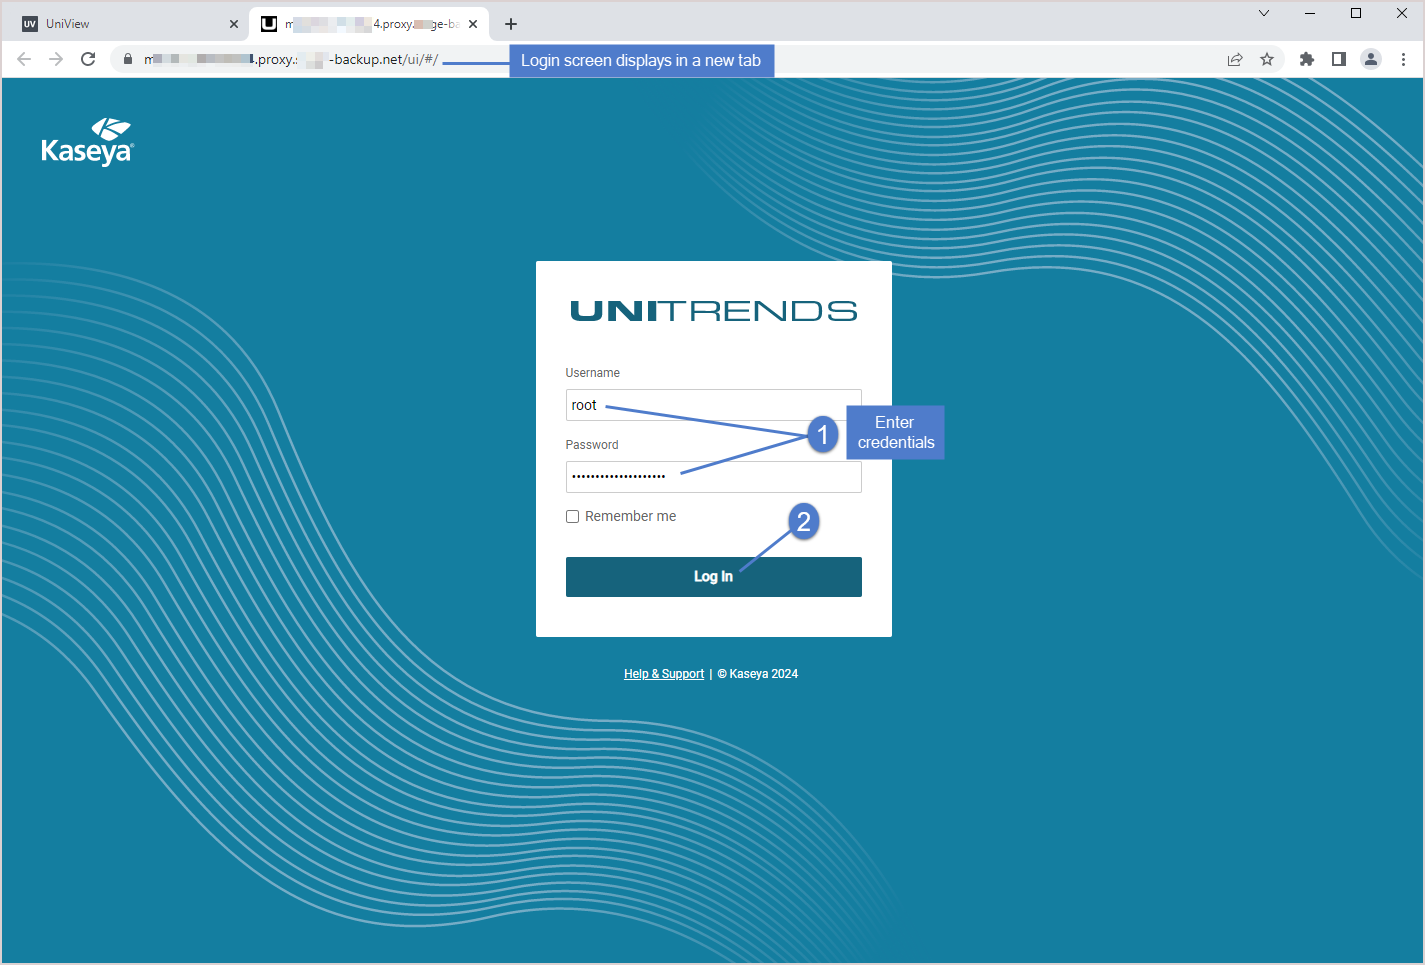
- The appliance Login page displays in a new browser tab. Enter credentials and click Log In.
Helix is an intelligent SaaS remediation platform laser focused on eliminating manual tasks that IT administrators hate performing. Helix uses a SaaS delivery model to keep your Unitrends backup appliances updated, no matter where they are located.
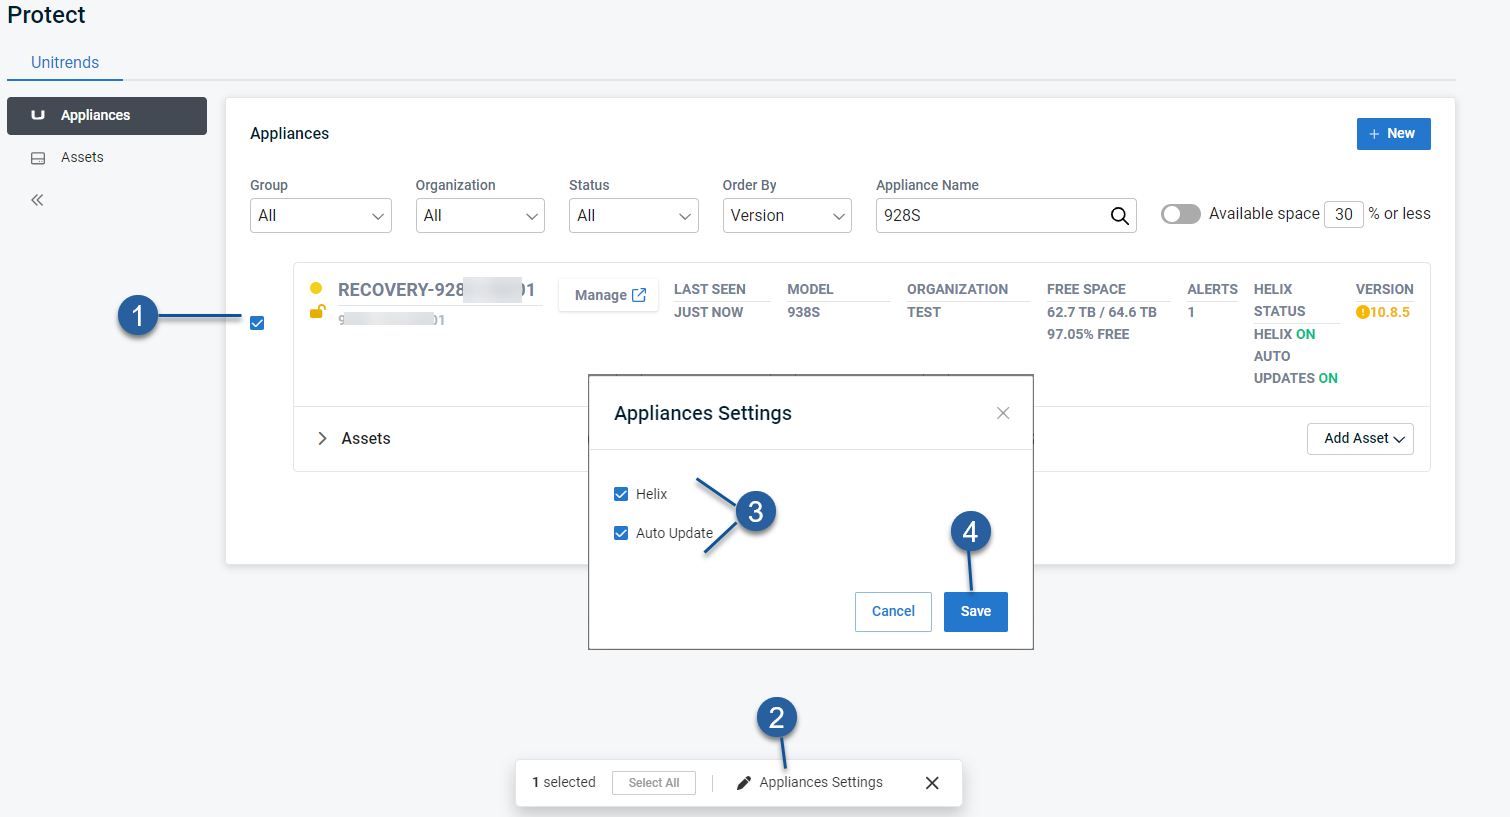
Use these steps to enable or disable Helix and the Helix Auto Update feature on one or more appliances:
- In the Appliances view, check one or more boxes to select the appliances you will modify.
- At the bottom of your screen, click Appliance Settings.
- Enable or disable the Helix and Auto Update features.
NOTES
● Helix must be enabled to use the Auto Update feature. Disabling Helix also disables Auto Update.
● To use the Auto Update feature, the appliance must be running release 10.4.4 or higher and these ports must be open on the appliance:
● 5721 outbound to IP 173.247.66.64 for the TCP and UDP protocols.
● 443 outbound to repo.unitrends.com for the HTTPS protocol.
- Click Save.
-
Helix settings are enabled or disabled for the selected appliances.
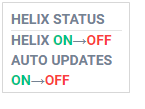
- It can take up to 20 seconds to update these settings. While updates are in progress, a transitional status displays. For example:
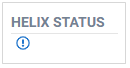
- If Helix is not supported on the appliance or if an error occurs, the features are not enabled. You are notified through a BackupIQ alert and this Helix status displays:
Before adding the appliance, ensure that the Port requirements have been met. Then use this procedure to add the appliance: To add an appliance.
To enable communication between your Unitrends appliance and the UniView Portal, port 443 for the TCP and HTTPS protocols must be open outbound from the appliance to each of these locations:
- login.backup.net
- {homerealm}.backup.net
- proxy.backup.net
- api.backup.net
- download.backup.net
- index.docker.io
- hub.docker.com
- registry-1.docker.io
- production.cloudflare.docker.com
- public.ecr.aws
- *.cloudfront.net
- *.awsglobalaccelerator.com
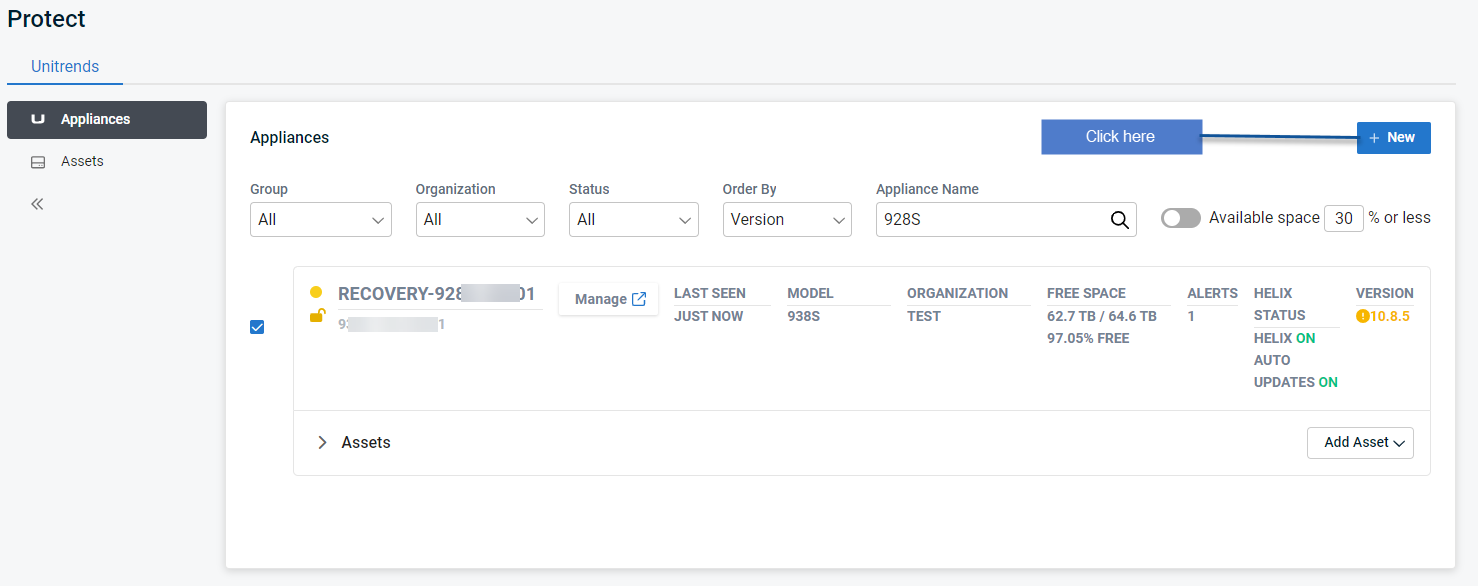
- In the Appliances view, click + New.
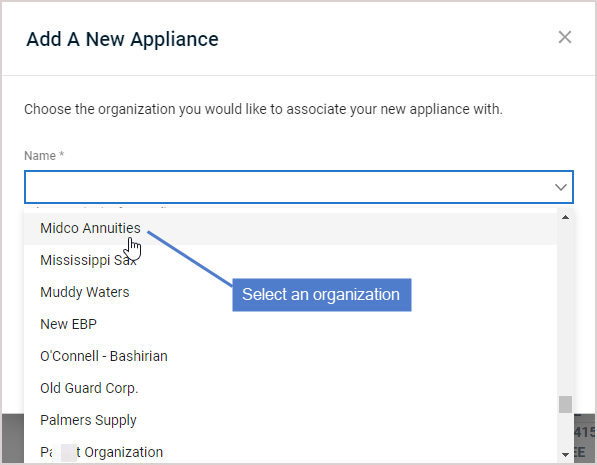
- Assign an organization to the appliance by doing one of the following:
NOTE You cannot change the appliance's organization once it has been assigned. You can, however, edit the organization's name or group at any time. To assign a different organization to an appliance, you must delete the appliance integration from UniView and the appliance UI (see Deleting an appliance) and then add the appliance with the new organization. Backup policies must be recreated upon re-adding the appliance
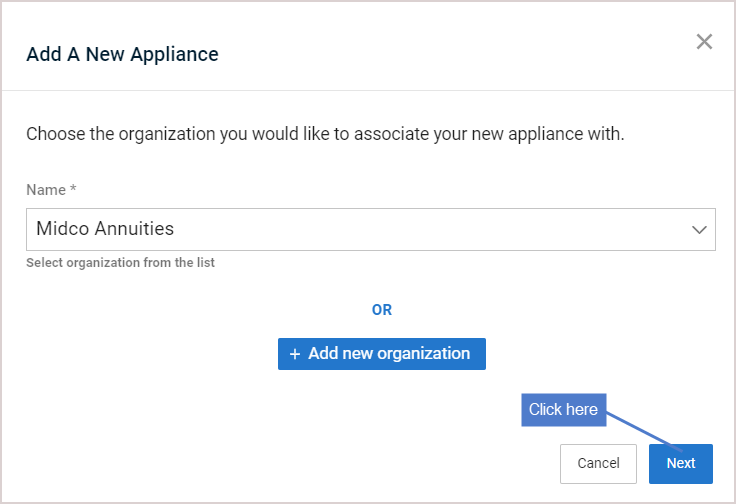
- Select an organization from the Name list.
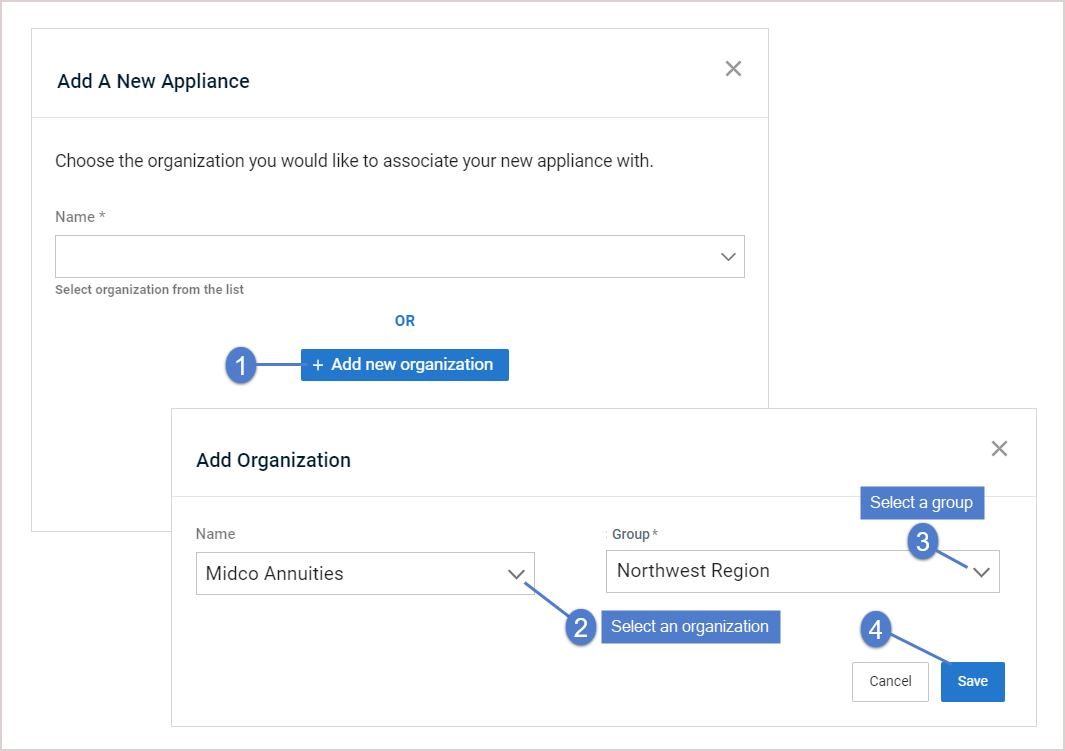
OR- Click Add New Organization and do one of the following:
- If you have integrated your PSA system (ConnectWise Manage, Autotask, BMS, or Vorex), use the Import Organizations dialog to select an organization and group.
- If you have not integrated a PSA system, use the Add Organization dialog to enter the organization name, select a group, and click Save.
- Click Next.
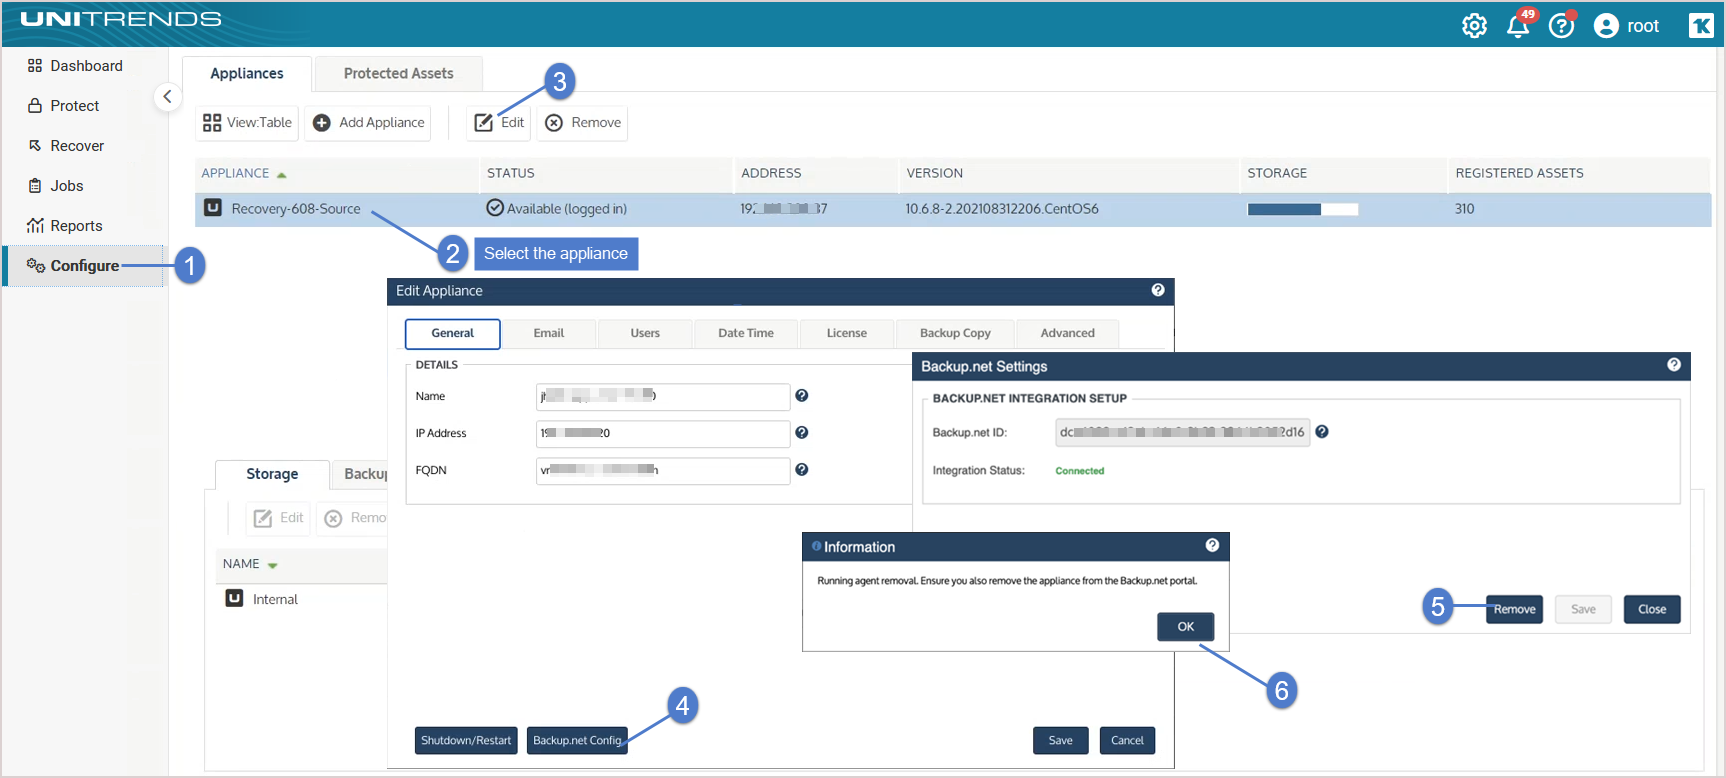
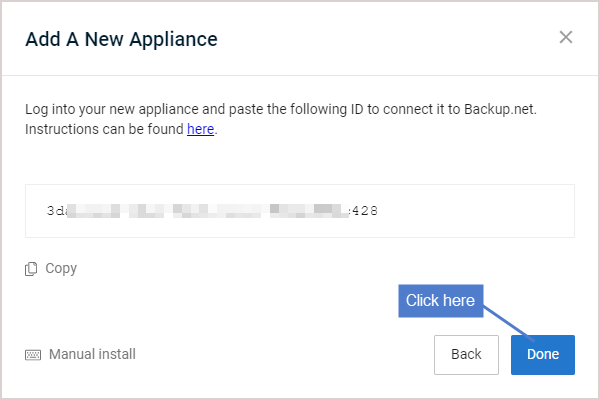
- Copy the backup.net ID that displays. (Leave this dialog open. Do not click Done.)
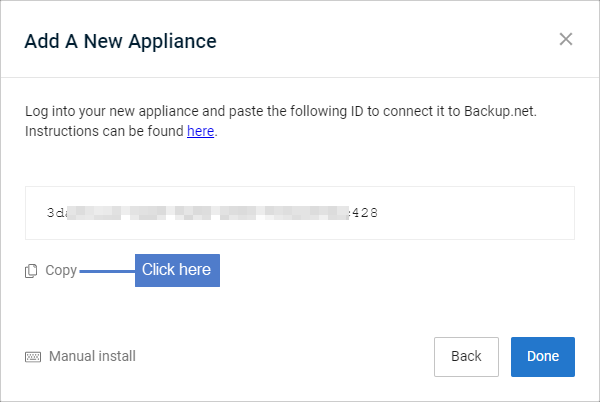
- Log in to the Unitrends appliance. In the Edit Appliance dialog, click Backup.net Config, then paste the ID into the Backup.net ID field. Click Save. Click OK.
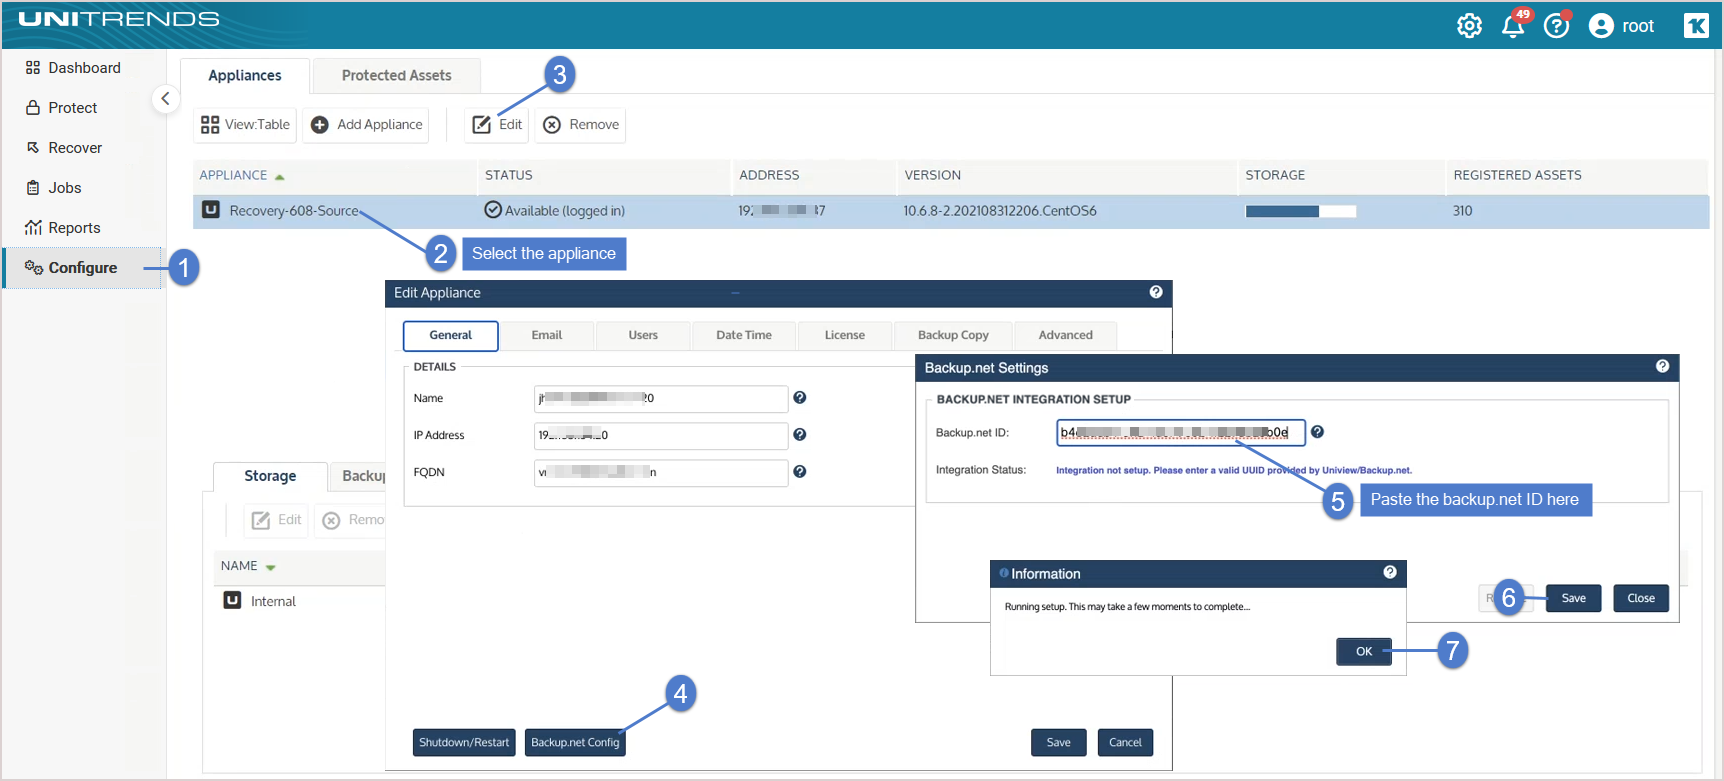
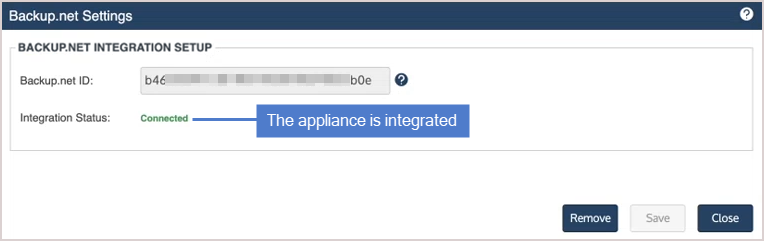
- Return to the UniView Portal. Click Done.
The appliance is added and displays in the Appliances list.
NOTES
● It can take a few minutes for the appliance to display in the list. If needed, refresh the page.
● For increased appliance security, the UniView Portal has a feature that blocks users from logging in directly to the appliance UI. Once local access has been blocked, users must connect to the appliance from UniView. To use this feature, see Blocking or unblocking local access to an appliance.
Deleting an appliance removes all of its data from the UniView Portal. Deleting the appliance does not remove or otherwise alter any of its backup data.
To delete an appliance
IMPORTANT Be sure to complete all steps in this procedure to ensure that the appliance integration is removed from both UniView and the appliance itself.
- In the Appliances view, click the appliance.
- On the Appliance Detail page, click
 . Type DELETE and click the Delete button.
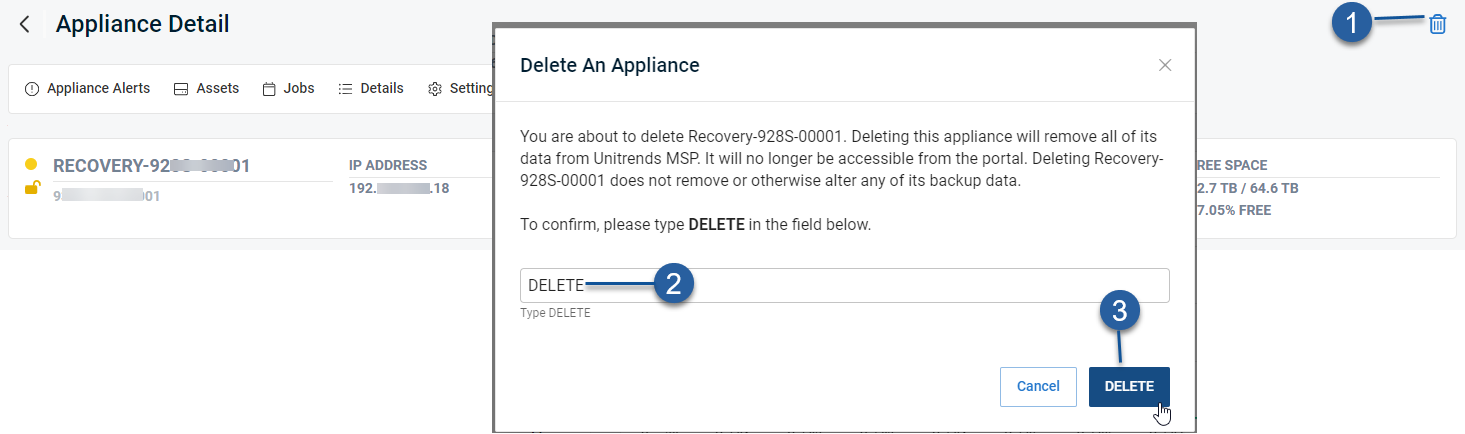
- Log in to the Unitrends appliance. In the Edit Appliance dialog, click Backup.net Config, then click Remove. Click OK.