Using your KaseyaOne integration
With your KaseyaOne integration, you can save time by configuring centralized user management and leverage Cooper AI to ensure operational efficiency and productivity. See these topics for details:
Centralized user management for the UniView Portal module can be configured in the UniView Portal or in KaseyaOne. To configure centralized user management in the UniView Portal, enable the following features:
- Log In with KaseyaOne (Unified Login) – This feature was enabled upon adding the KaseyaOne integration to the UniView Portal. It enables users to access the UniView Portal by using KaseyaOne Unified Login. Use this procedure as needed to disable or re-enable the feature: To disable or re-enable Login with KaseyaOne.
- Require Log In with KaseyaOne – Enable this feature to enforce the use of KaseyaOne Unified Login to access the UniView Portal. For details, see To enable or disable Require Login with KaseyaOne.
- Automatic User Provisioning – Enable this feature to use just-in-time provisioning for the UniView module. For details, see To enable or disable automatic user creation.
- Automatic User Deprovisioning – Enable this feature to deprovision UniView Portal users when they are deleted from KaseyaOne. For details, see To enable or disable automatic user deprovisioning.
- Access Groups (role-based access control) – Automatically assign KaseyaOne Groups to the groups within UniView. For details, see To enable or disable access groups.
NOTE If you prefer to use KaseyaOne to configure centralized user management, see To configure centralized user management from the KaseyaOne UI.
The Enable Login with KaseyaOne toggle must be enabled to use any other centralized user management features. Review these considerations before disabling Login with KaseyaOne:
- Disabling the Enable Login with KaseyaOne toggle prevents all UniView Portal users from logging in by using KaseyaOne credentials but does NOT remove any user mappings.
- Disabling the Enable Login with KaseyaOne toggle automatically disables all other centralized user management settings. If you re-enable the toggle, you can then enable any of these other settings.
Run this procedure to temporarily disallow KaseyaOne login for all users. You can then re-enable the Login with KaseyaOne toggle so that users can resume using their KaseyaOne credentials for the UniView Portal.
- Log in to the UniView Portal as a superuser.
- Click
 :
:
- Select the Integrations view.
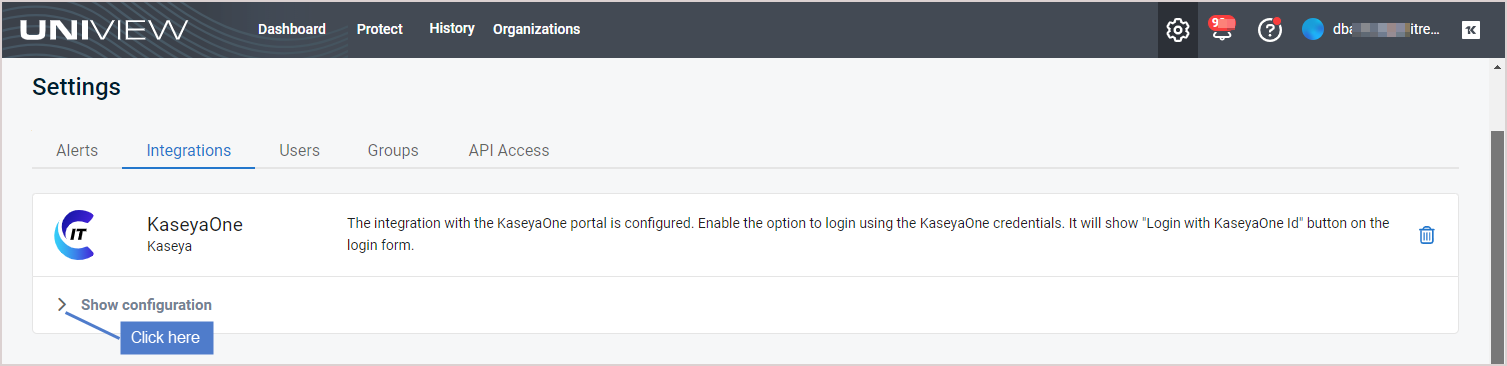
- Locate the KaseyaOne integration and click Show configuration:
- Under Unified Login, click
 to disable or
  to enable Login with KaseyaOne.
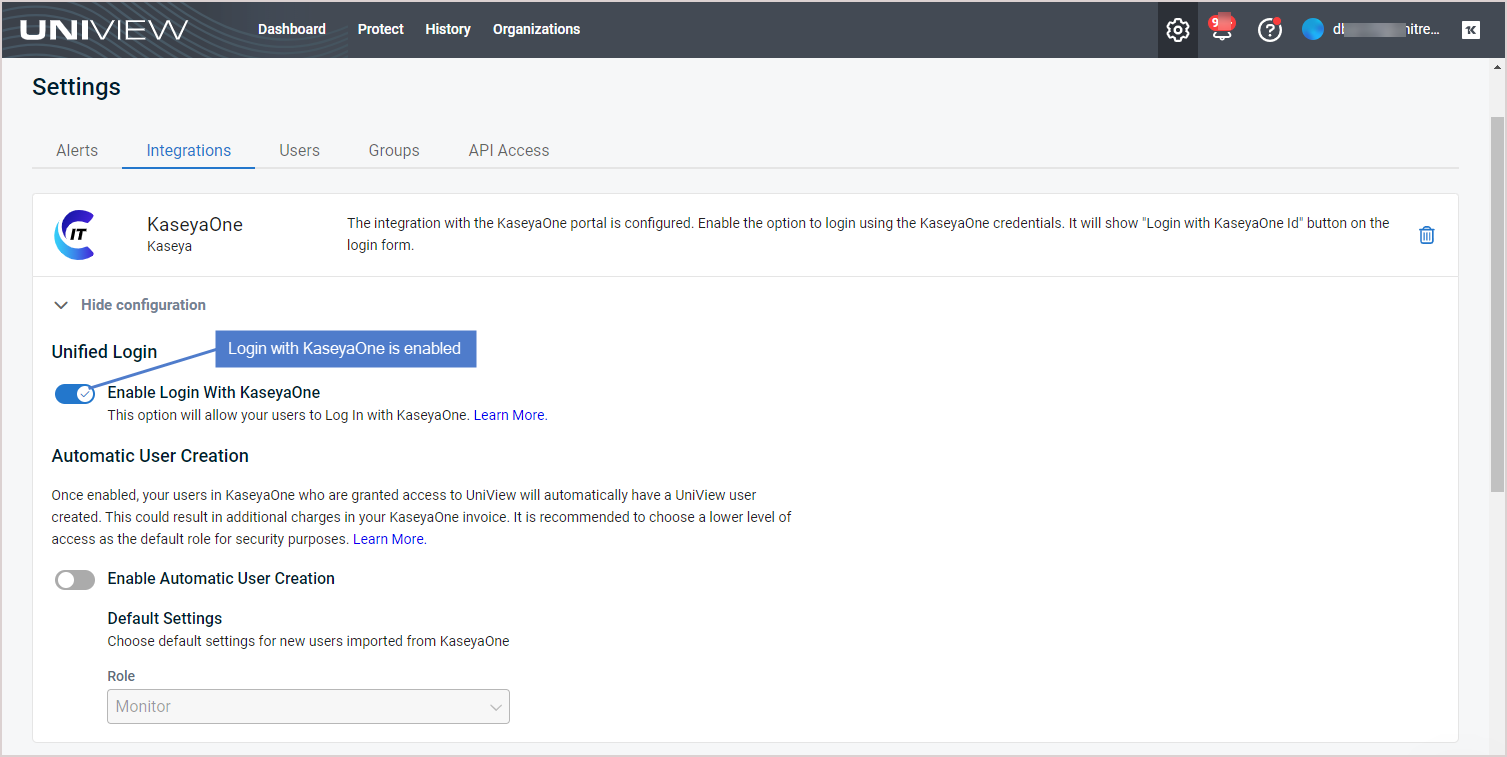
NOTE This toggle must be enabled to use the other centralized user management features. Upon disabling the Log In with KaseyaOne toggle, all other centralized user management settings are disabled and cannot be modified.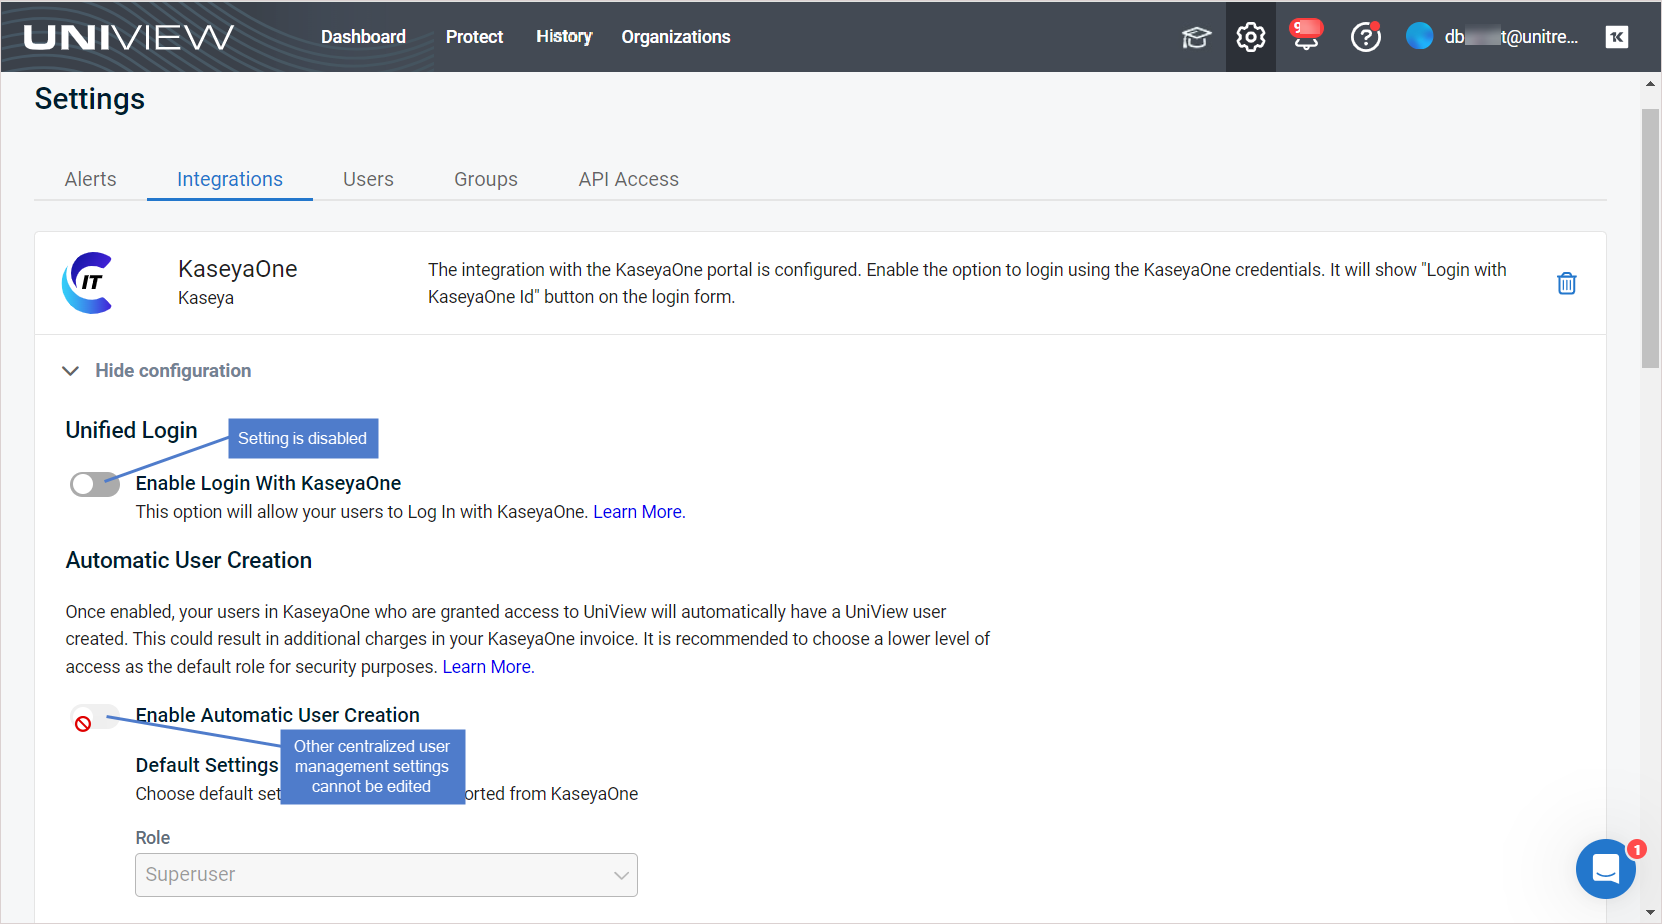
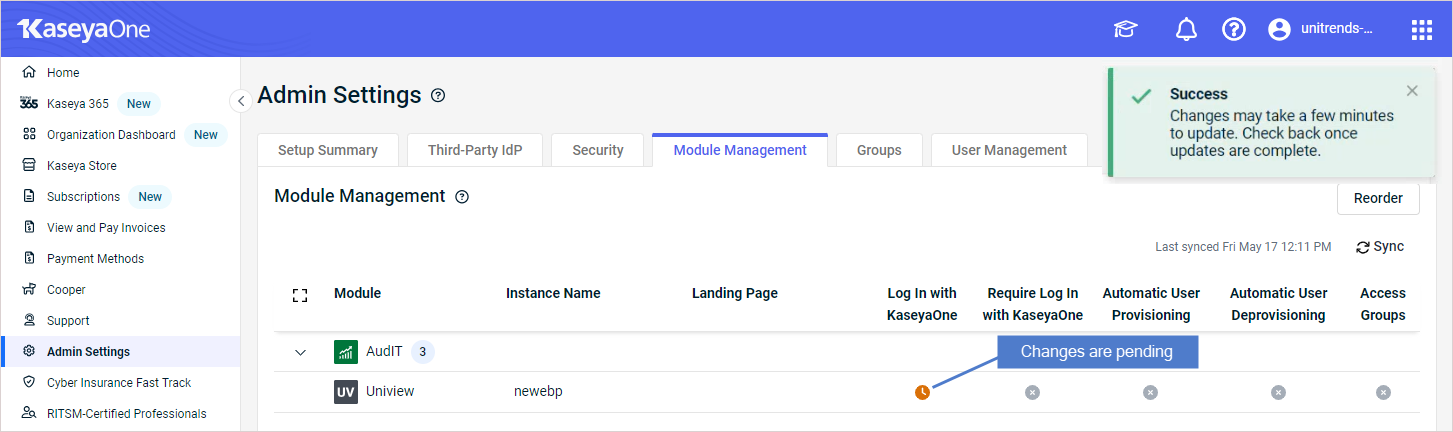
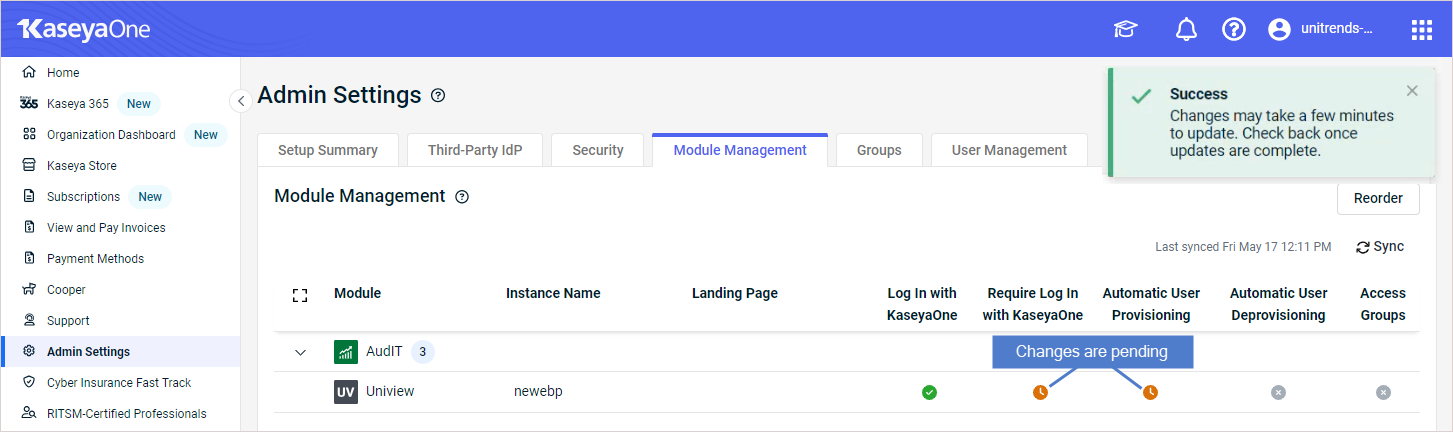
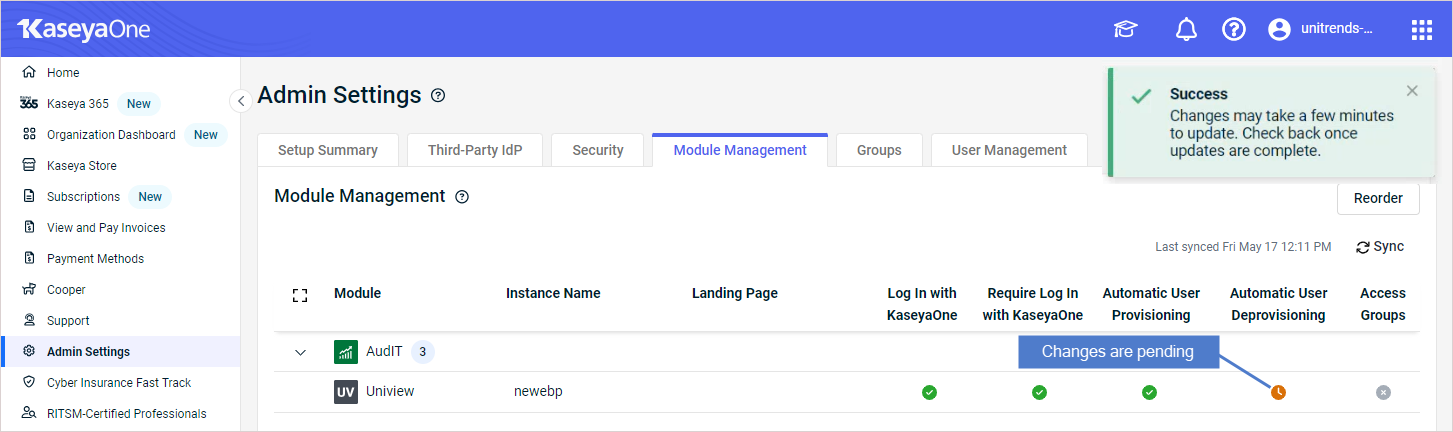
- The configuration change you made is pushed to KaseyaOne. To view the change in KaseyaOne, log in as an admin user and navigate to Admin Settings > Module Management. It can take some time for the change to sync. You see an orange clock icon while the sync is in progress.
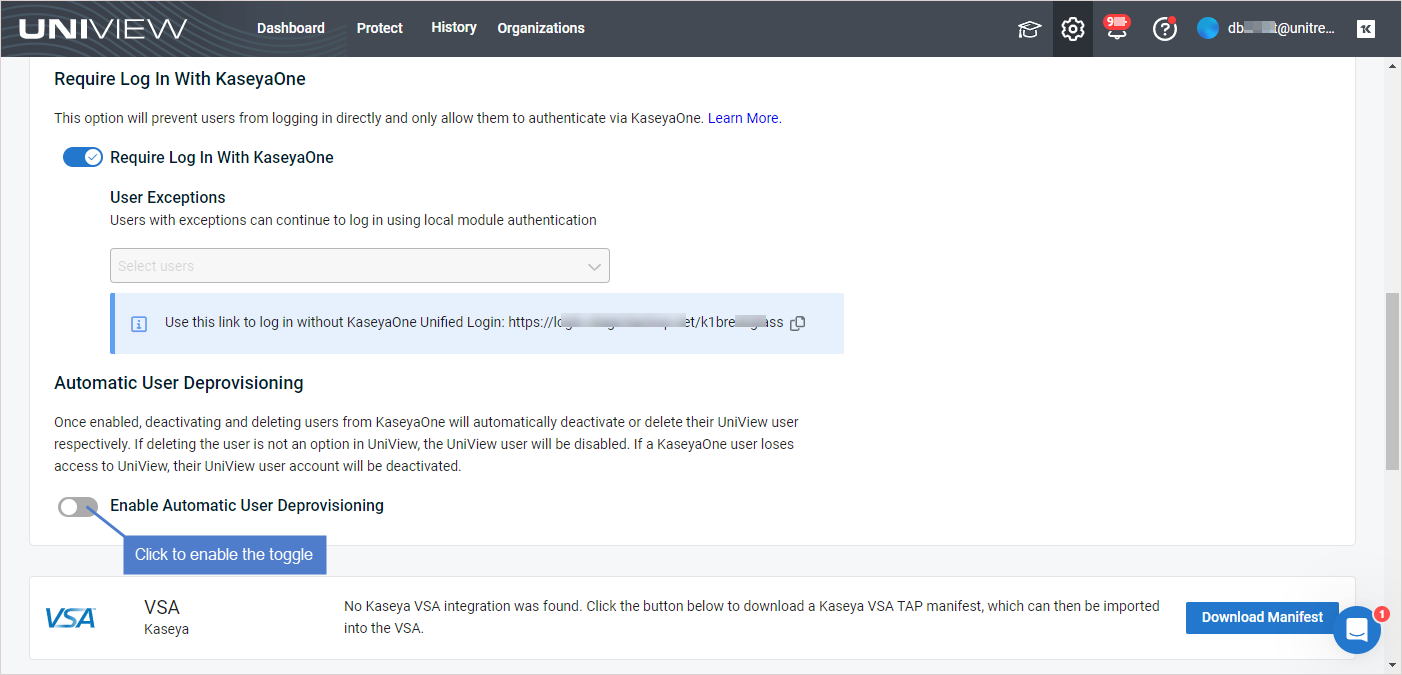
If enabled, the Require Login with KaseyaOne toggle forces users to log in to the UniView Portal with their KaseyaOne Unified Login credentials. When enabling this feature, you are able to grant exceptions to specified users so that these users are still able to log in using their UniView Portal credentials.
Run this procedure to enable or disable require login with KaseyaOne:
- Log in to the UniView Portal as a superuser.
- Click :
- Select the Integrations view.
- Locate the KaseyaOne integration and click Show configuration:
- (If needed) If you are enabling the Require Log In With KaseyaOne feature, ensure that the Enable Login with KaseyaOne toggle is also enabled so that users can log in via KaseyaOne.
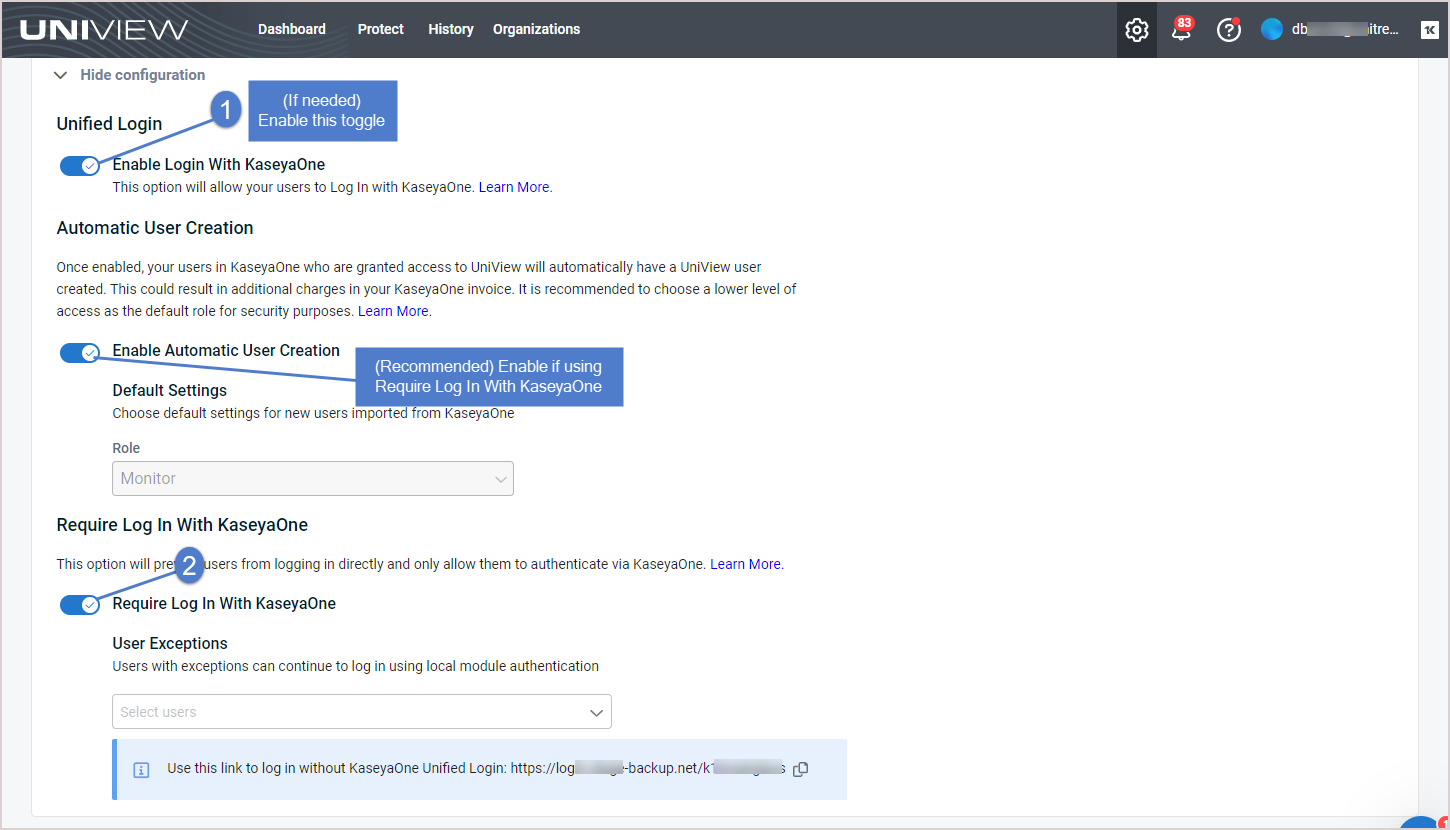
- Under Require Log In With KaseyaOne, click to disable or to enable Require Log In with KaseyaOne.
NOTES
● If you've enabled Require Log In With KaseyaOne, it is best to also enable automatic user creation.
● If the Log In with KaseyaOne toggle is disabled, all other centralized user management settings are disabled and cannot be modified.
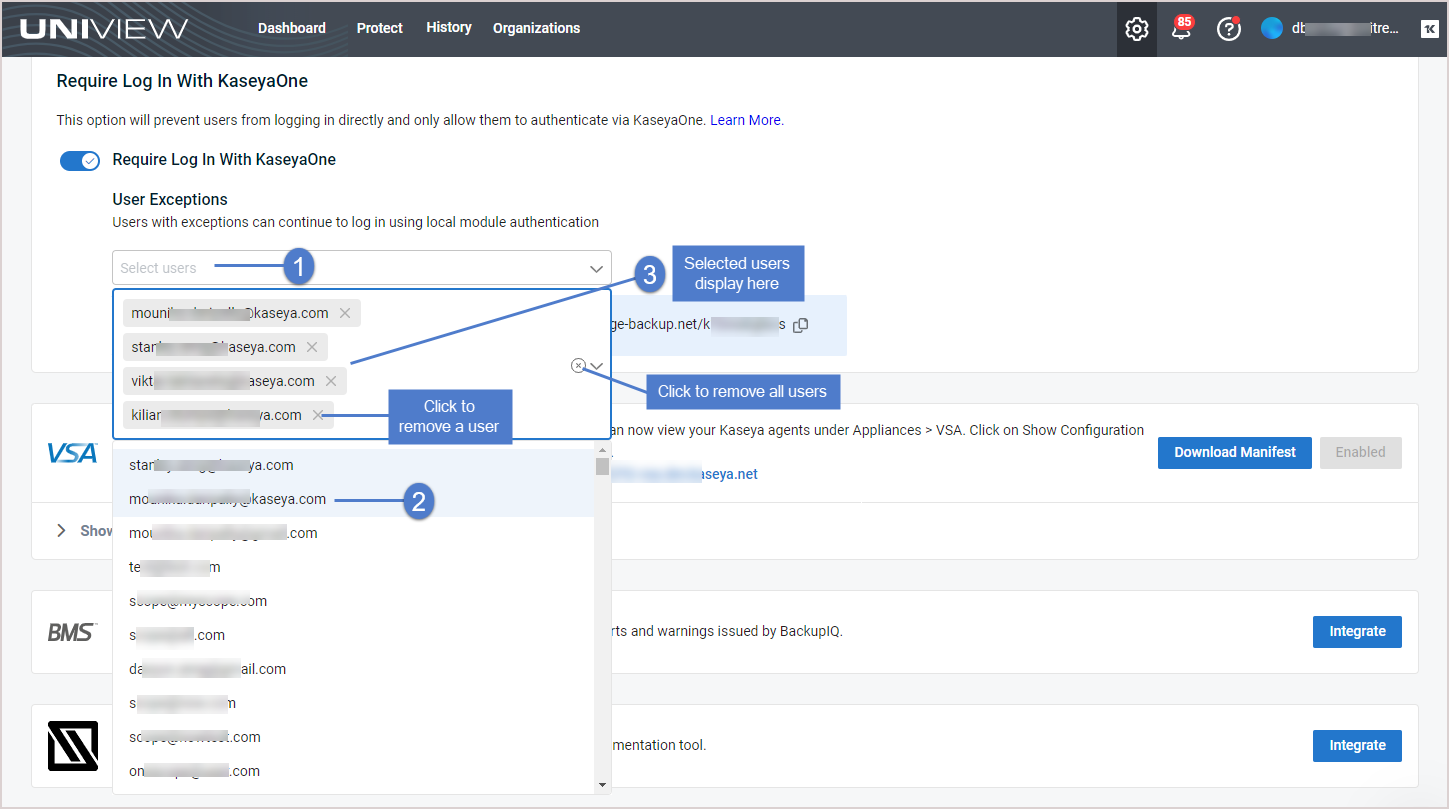
- (Optional) Allow specified users to log in with UniView Portal credentials by granting exceptions to these users:
- Click Select users.
- Click users to add them to the exceptions list.
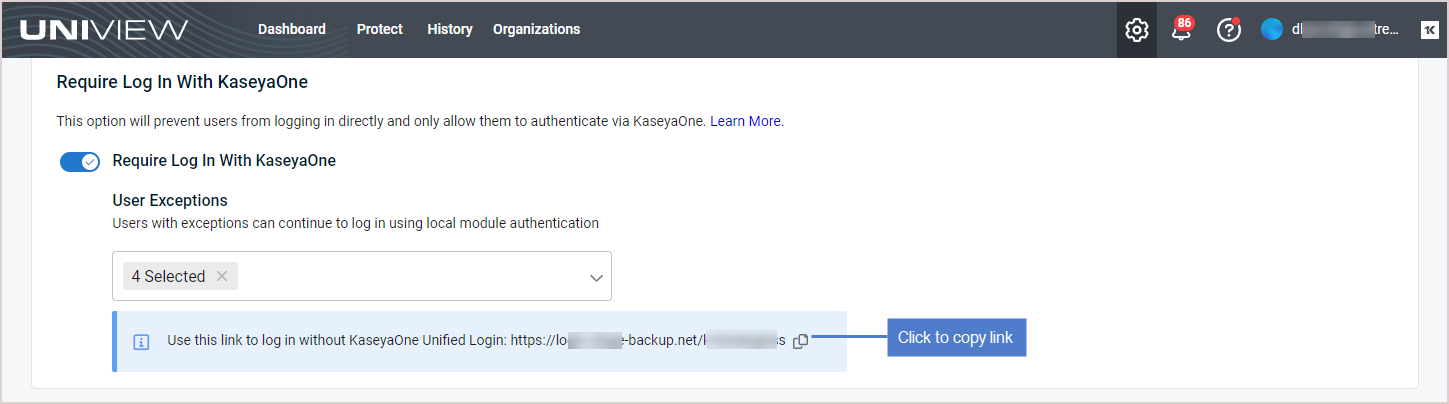
- (Optional) To enable a user to log in with UniView Portal credentials without granting an explicit exception, send the user the log-in link shown here:
- The configuration change you made is pushed to KaseyaOne. To view the change in KaseyaOne, log in as an admin user and navigate to Admin Settings > Module Management. It can take some time for the change to sync. You see an orange clock icon while the sync is in progress.
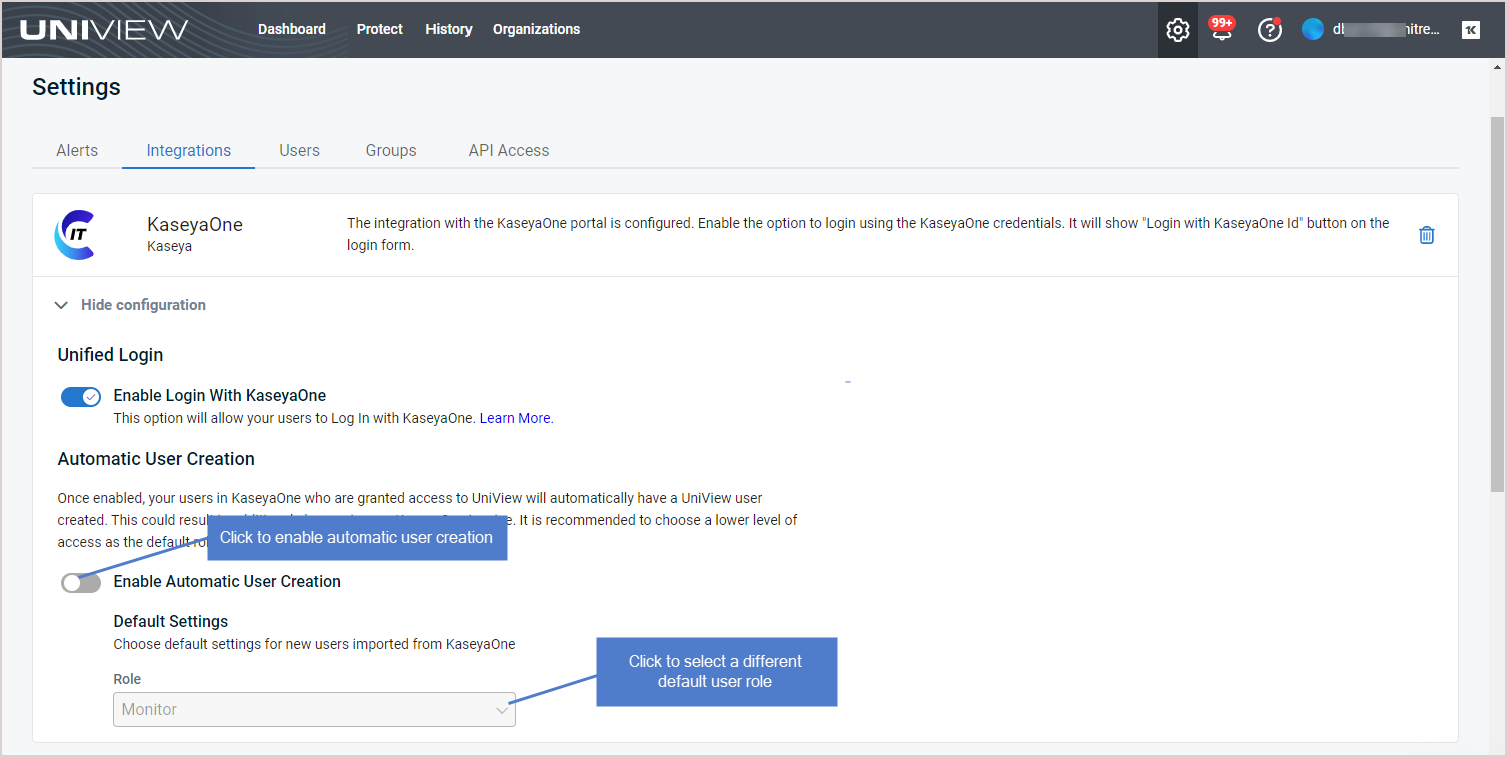
The KaseyaOne integration has an Automatic User Creation setting that you can enable to use the just-in-time user provisioning feature.
-
If you enable Automatic User Creation, then just-in-time provisioning is used for the UniView module. UniView Portal user accounts are created automatically with a specified default role whenever new KaseyaOne users are granted access to the UniView module.
-
If you disable Automatic User Creation, then new KaseyaOne users must ask their administrator to create a UniView Portal account for them after they are granted access to the UniView module.
NOTE Creating additional users could result in additional charges in your KaseyaOne invoice.
Run this procedure to enable or disable automatic user creation:
- Log in to the UniView Portal as a superuser.
- Click :
- Select the Integrations view.
- Locate the KaseyaOne integration and click Show configuration:
- (If needed) If you are enabling the Automatic User Creation feature, ensure that the Enable Login with KaseyaOne toggle is also enabled.
- Under Automatic User Creation, click to disable or to enable automatic user creation.
NOTE If the Log In with KaseyaOne toggle is disabled, all other centralized user management settings are disabled and cannot be modified.
- (Optional) Under Default Settings, modify the default role assigned to the newly created users. It is recommended to choose a lower level of access as the default role for increased security. See About UniView Portal user accounts for a description of each role.
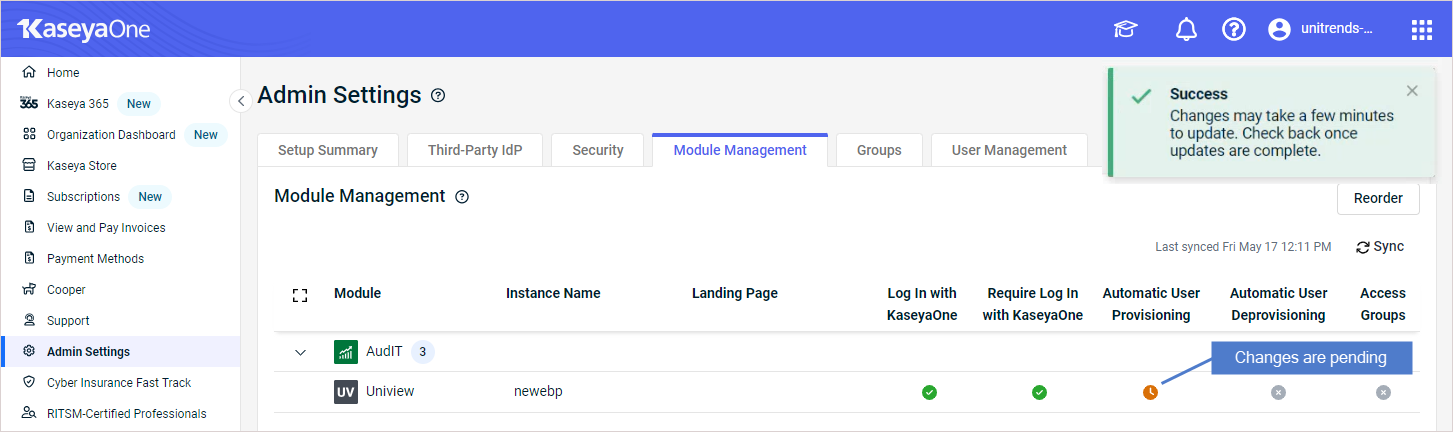
- The configuration change you made is pushed to KaseyaOne. To view the change in KaseyaOne, log in as an admin user and navigate to Admin Settings > Module Management. It can take some time for the change to sync. You see an orange clock icon while the sync is in progress.
The KaseyaOne integration has an Automatic User Deprovisioning setting that you can enable to use the just-in-time user deprovisioning feature.
-
If you enable Automatic User Deprovisioning, then just-in-time user deprovisioning is used for the UniView module as follows:
- UniView Portal users are disabled or deleted when they are deactivated or deleted in KaseyaOne.
- UniView Portal users are disabled if deleting users is not an option in the UniView module.
- UniView Portal user accounts are disabled when KaseyaOne users lose access to the UniView module.
-
If you disable Automatic User Deprovisioning, then you must manually disable or delete UniView Portal users whenever they are deactivated or deleted in KaseyaOne.
Run this procedure to enable or disable automatic user deprovisioning:
- Log in to the UniView Portal as a superuser.
- Click :
- Select the Integrations view.
- Locate the KaseyaOne integration and click Show configuration:
- (If needed) If you are enabling the Automatic User Deprovisioning feature, ensure that the Enable Login with KaseyaOne toggle is also enabled.
- Under Automatic User Deprovisioning, click to disable or to enable automatic user deprovisioning.
NOTE If the Log In with KaseyaOne toggle is disabled, all other centralized user management settings are disabled and cannot be modified.
- The configuration change you made is pushed to KaseyaOne. To view the change in KaseyaOne, navigate to Admin Settings > Module Management. It can take some time for the change to sync. You see an orange clock icon while the sync is in progress.
Groups (formerly known as scopes) define which organizations are visible to the user in the UniView Portal. Groups can be applied to users manually (by using the Add User and Edit User dialogs) or automatically by KaseyaOne's Access Groups (role-based access control) feature.
The KaseyaOne integration has an Access Groups setting that you can enable to use KaseyaOne's role-based access control feature. If you enable Access Groups, then role-based access control is used for the UniView module as follows:
- Groups are automatically imported into UniView from KaseyaOne when you enable the Access Groups setting in the UniView Portal (Settings > Integrations > KaseyaOne > Show Configuration > Enable Access Groups). This initial import can take up to four hours.
- Groups that were imported from KaseyaOne must be manually mapped to an organization in the UniView Portal.
- Newly imported groups display on the Settings > Groups page. Any existing groups that were added manually also display on the page.
- The Settings > Groups page is now view-only. You can no longer add, edit, or remove groups through the UniView Portal. Instead, perform these operations in KaseyaOne (Admin Settings > Groups).
- Groups are automatically synced from KaseyaOne every four hours. This process adds groups to UniView and removes groups from UniView as needed to mirror the groups in KaseyaOne. (Groups that were added to the UniView Portal manually are not deleted by the sync process.)
- Each time a user logs in to the UniView Portal, that user's groups are updated in UniView to match their current group settings in KaseyaOne. Groups are applied to or removed from the user in UniView as needed.
Use these procedures to enable or disable access groups:
-
Log in to the UniView Portal as a superuser.
-
Click
: -
Select the Integrations view.
-
Locate the KaseyaOne integration and click Show configuration:
-
Under Unified Login, ensure that Login with KaseyaOne is enabled. If needed, click
to enable Login with KaseyaOne.
-
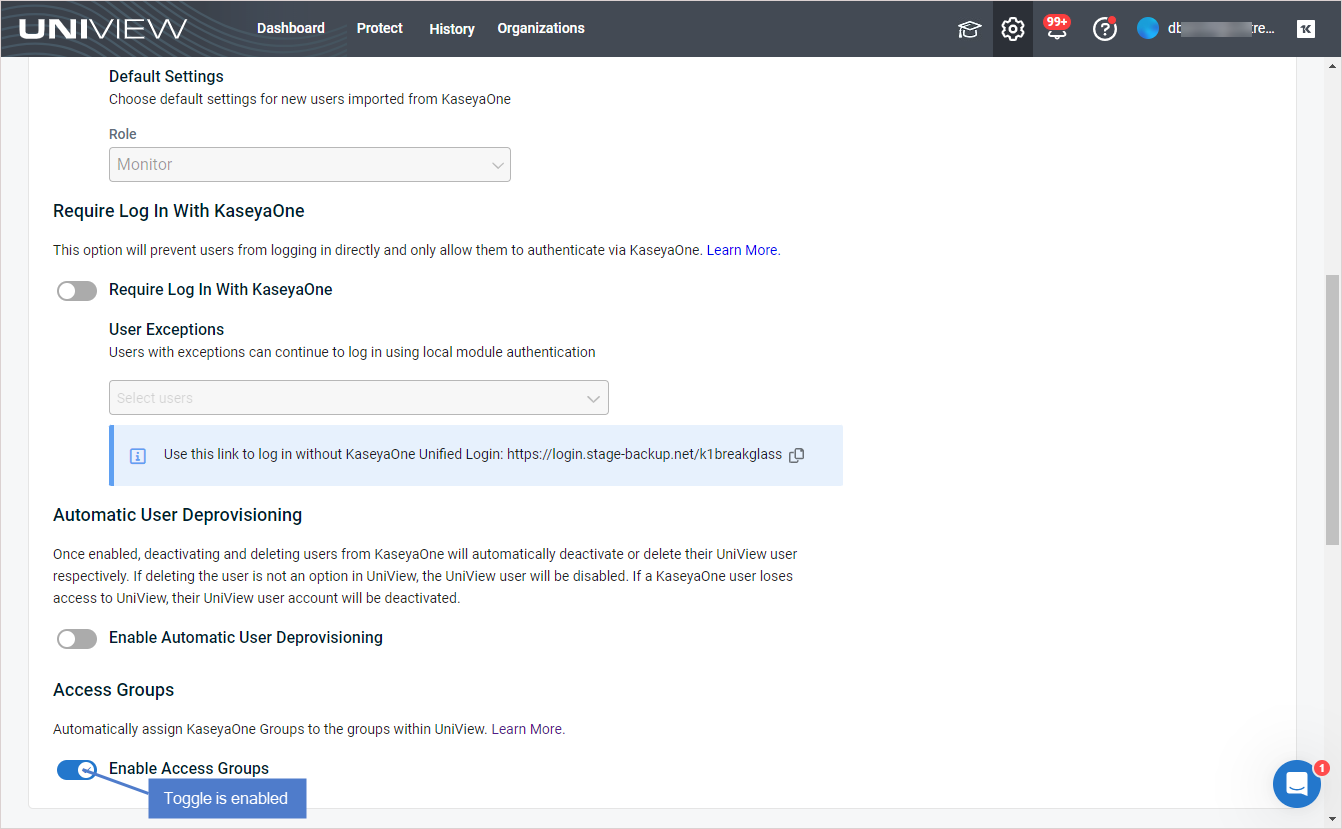
Under Access Groups, enable the Enable Access Groups toggle.
NOTE If the Log In with KaseyaOne toggle is disabled, all other centralized user management settings are disabled and cannot be modified.
-
Groups are imported into UniView from KaseyaOne. The initial import process can take up to four hours.
-
When the import is complete:
- KaseyaOne groups display on the Settings > Groups page and the page is now view-only. You can no longer add, edit, or remove groups through the UniView Portal. Instead, perform these operations in KaseyaOne (Admin Settings > Groups).
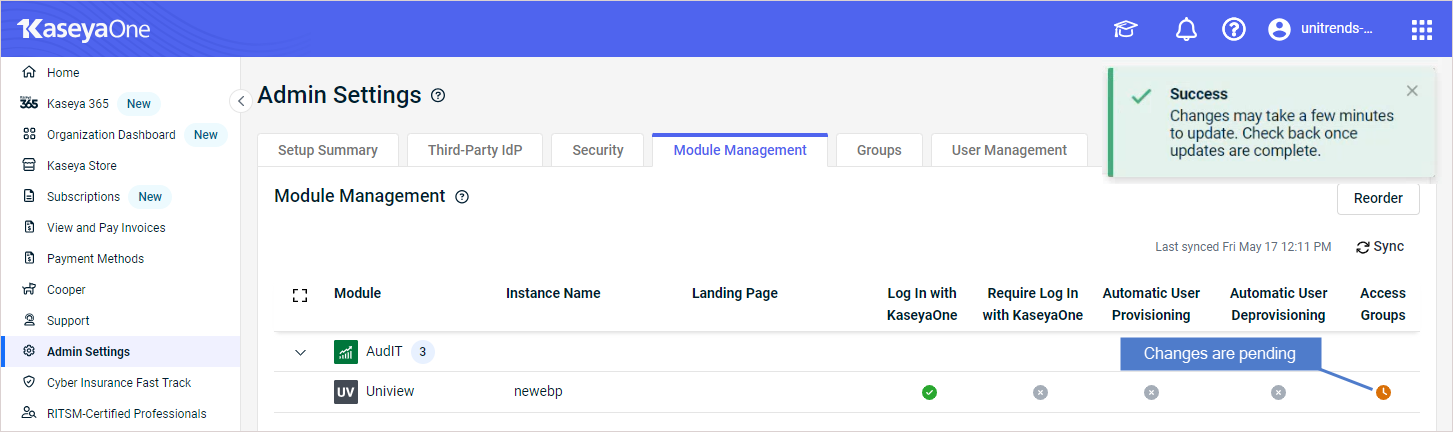
- The configuration change you made is pushed to KaseyaOne. To view the change in KaseyaOne, log in as an admin user and navigate to Admin Settings > Module Management. It can take some time for the change to sync. You see an orange clock icon while the sync is in progress.
-
Map the newly imported groups to UniView organizations. This mapping is needed for users in the group to view the organization's data in the UniView Portal. If a user's groups are not mapped to any organization, they see no data when they log in to the UniView Portal.
- See Editing an organization to map a group to an existing organization.
- See Adding an organization to add a new organization and map it to a group.
-
Log in to the UniView Portal as a superuser.
-
Click
: -
Select the Integrations view.
-
Locate the KaseyaOne integration and click Show configuration:
-
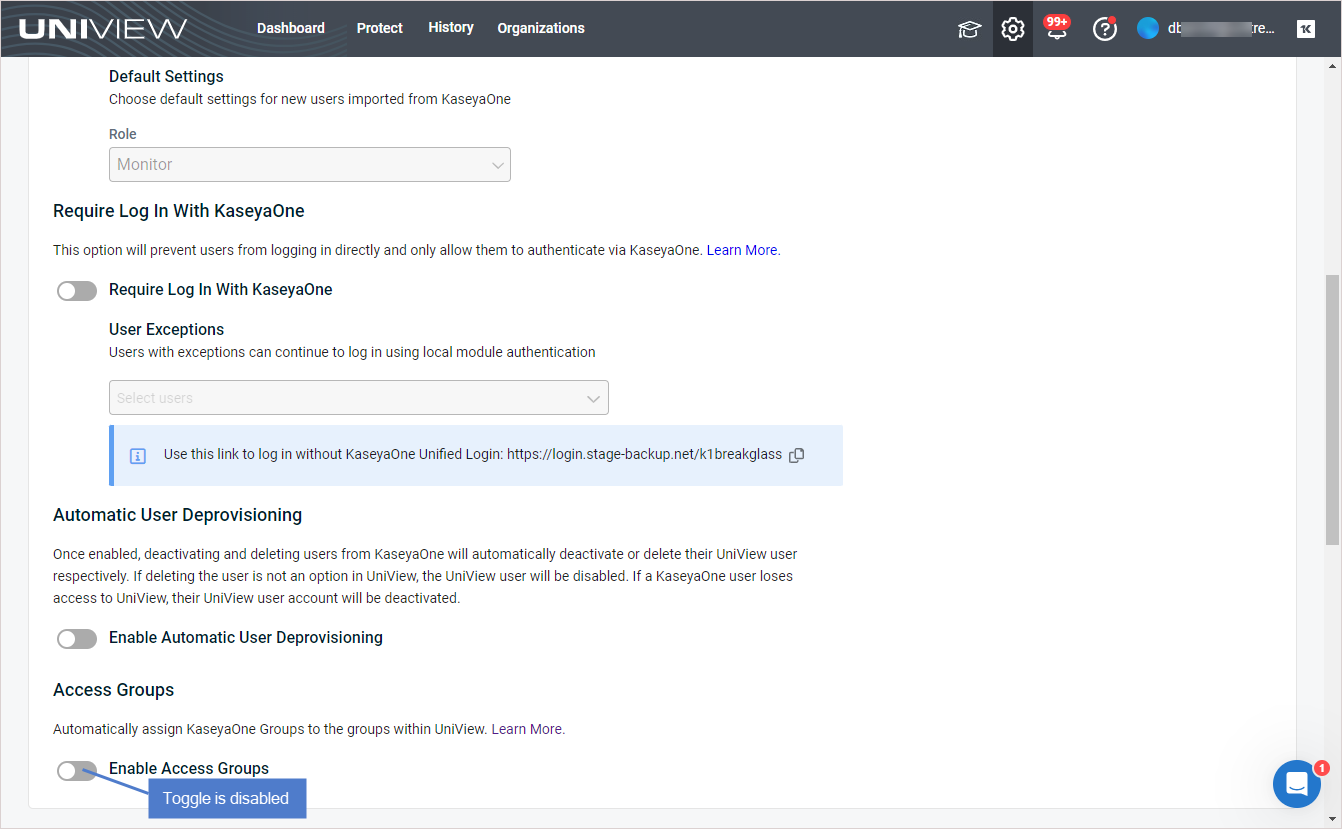
Under Access Groups, disable the Enable Access Groups toggle.
NOTE If the Log In with KaseyaOne toggle is disabled, all other centralized user management settings are disabled and cannot be modified.
-
Groups are no longer managed by KaseyaOne. You must manage groups manually on the Settings > Groups page. For details, see Working with groups.
The configuration change you made is pushed to KaseyaOne. To view the change in KaseyaOne, log in as an admin user and navigate to Admin Settings > Module Management. It can take some time for the change to sync. You see an orange clock icon while the sync is in progress.
NOTE This procedure identifies where to configure centralized user management for the UniView module from within the KaseyaOne UI. For more detail about these settings, review the UniView Portal centralized user management configuration procedures above.
NOTE Run this procedure to configure centralized user management in KaseyaOne:
- Log in to KaseyaOne as an admin user.
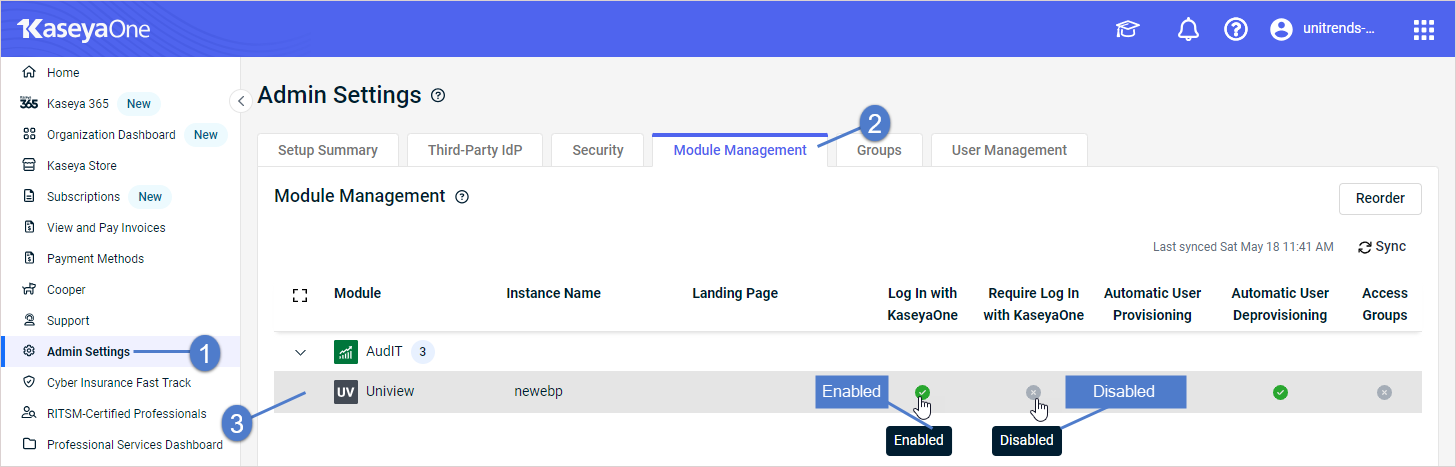
- Navigate to Admin Settings > Module Management.
- Locate the Uniview module and click the row containing your instance. (If needed, expand the module to display multiple instances.)
- In the Module Details dialog, click Edit.

- Modify settings. Click Review.
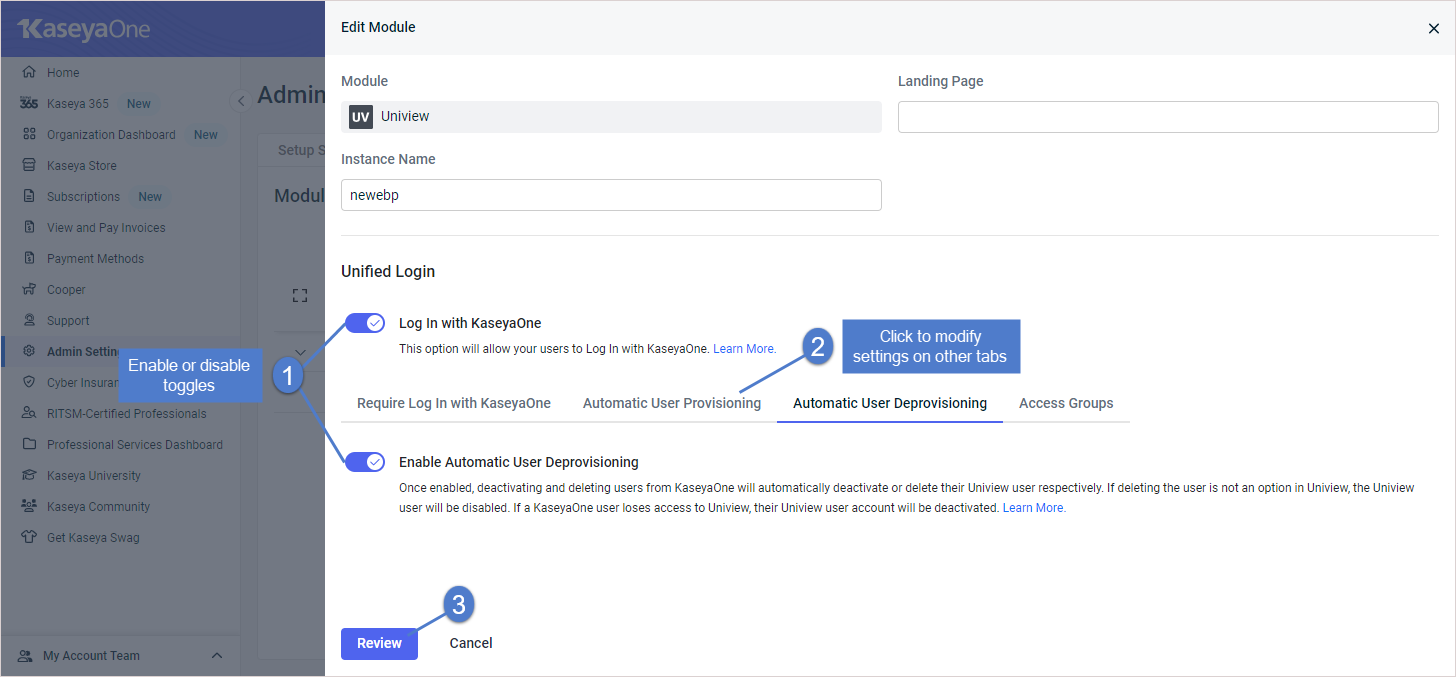
NOTE For some changes an additional pop-up confirmation message displays before you can click Review. If applicable, confirm the change in the pop-up, then click Review to continue.
- Review your changes. Click Confirm.
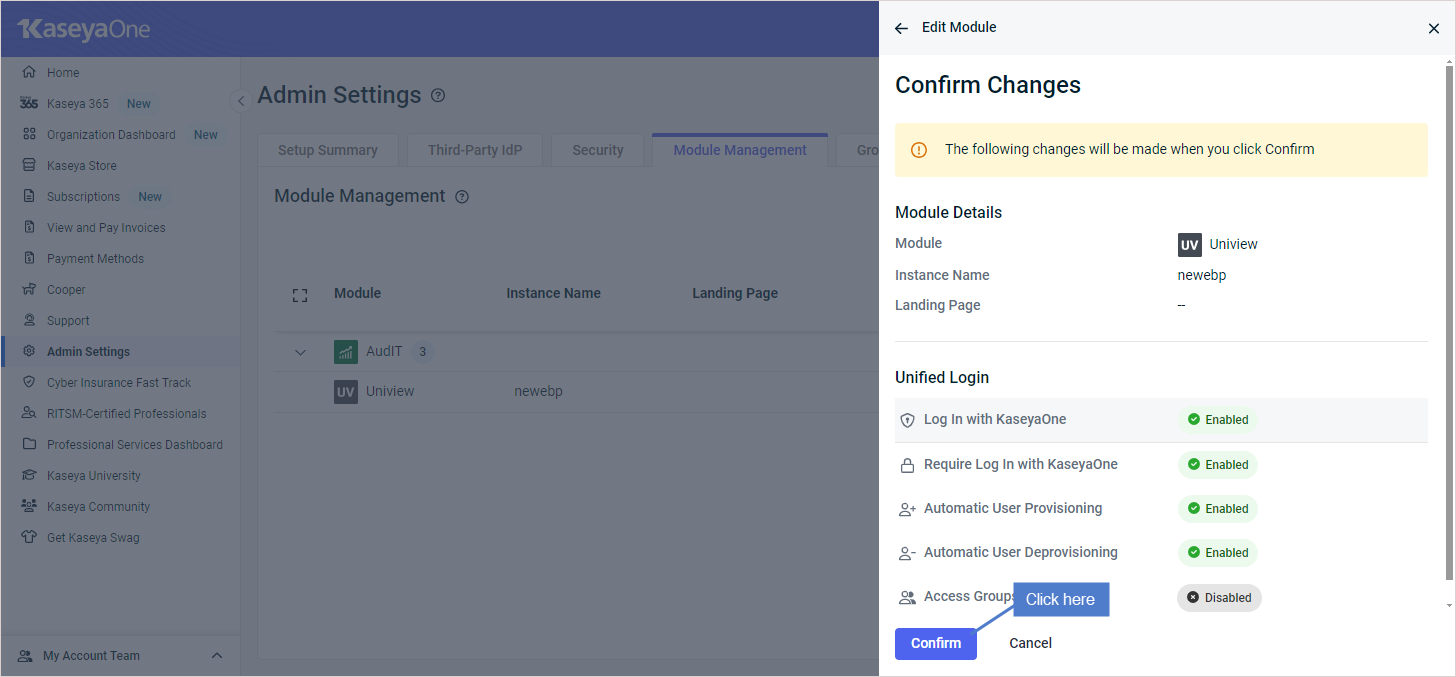
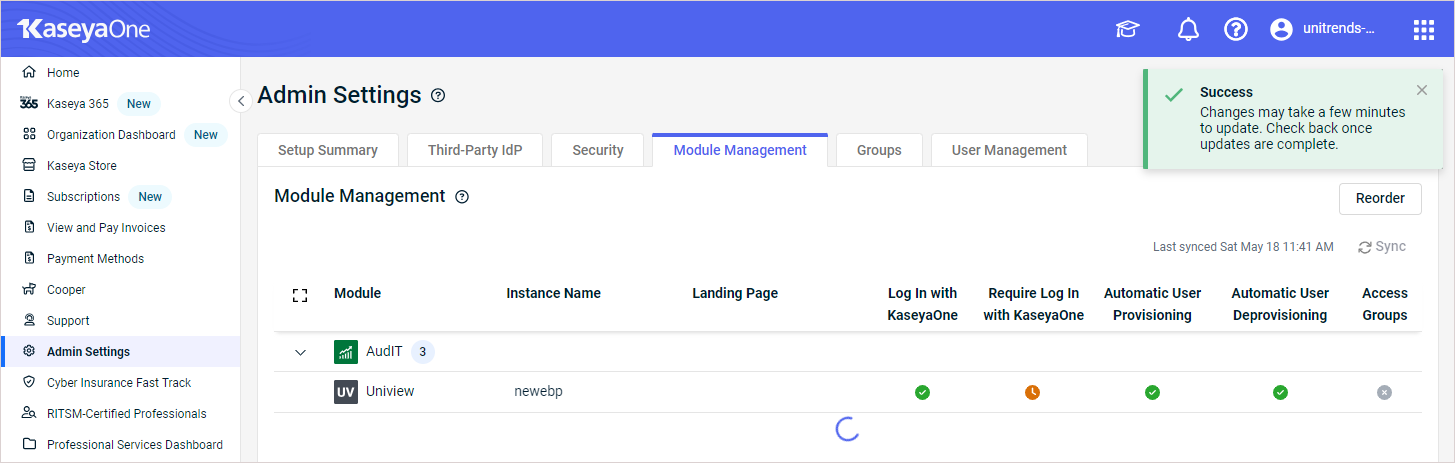
- The configuration change you made is pushed to UniView. It can take some time for the change to sync. You see an orange clock icon in KaseyaOne while the sync is in progress.
- To view the change in UniView, select the Integrations view, locate the KaseyaOne integration and click Show configuration.
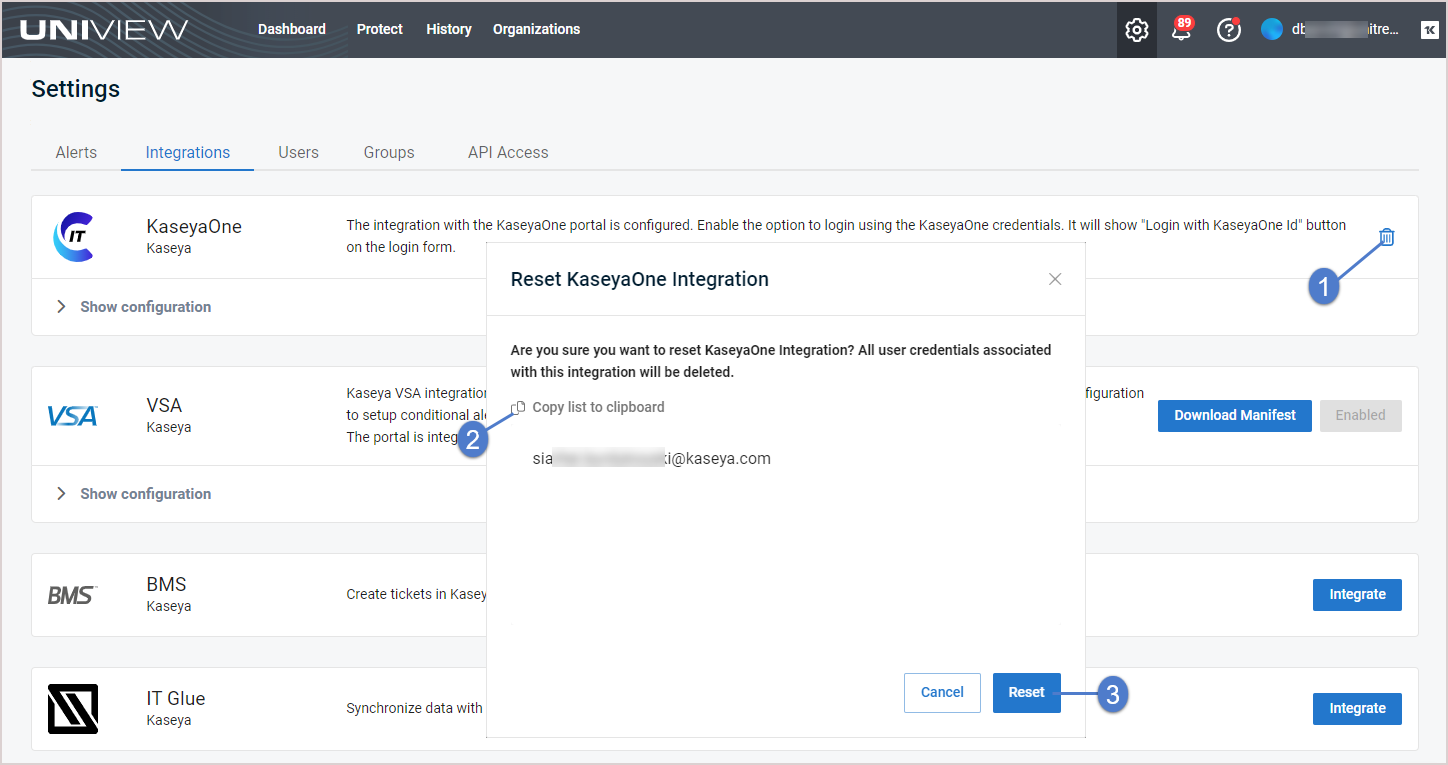
Use this procedure to reset the KaseyaOne integration. This procedure removes the integration and all associated user mappings from UniView, and removes the UniView module from KaseyaOne. (To temporarily disable login via KaseyaOne without removing the user mappings, see To disable or re-enable Login with KaseyaOne.)
- Log in to the UniView Portal as a superuser.
- Click :
- Select the Integrations view.
- Locate the KaseyaOne integration and click
 .
. - (Optional) In the Reset KaseyaOne Integration dialog, click Copy list to clipboard to copy and save a list of the integration's users. (You may need to refer to this list as the reset removes these users.)
- Click Reset to confirm that this will remove the integration and all of its user mappings.

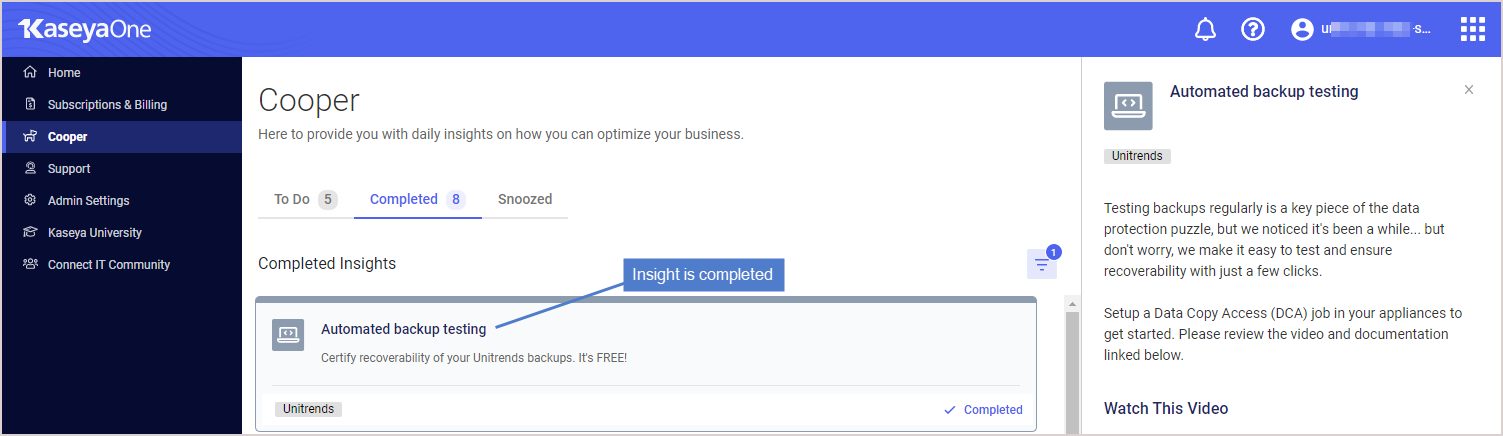
The Cooper Intelligence Engine provides insights based on telemetry gathered from your module usage. These insights are designed to help you get the most out of your Kaseya modules. Insights let you know about features that drive the most value for your business and guide you toward following industry leading best practices.
Once you have integrated KaseyaOne, Unitrends insights are enabled and added to Cooper if trigger conditions are met. See these topics for details:
- Insight details for a description of each Unitrends insight
- To view and manage insights for steps used to review and resolve insights
For more on KaseyaOne and Cooper Insights, see KaseyaOne's Cooper Intelligence Engine topic.
Haven't used KaseyaOne? It's free! Contact Support to get started.
UniView Portal includes these Unitrends insights:
|
Component & Insight Name |
Summary |
Triggers |
Excludes |
|---|---|---|---|
|
Appliance updates |
|
||
|
You could be missing out on critical updates |
Enable Helix auto updates to keep your appliances updated to the latest release. |
Send if Helix auto updates have not been enabled on any appliance in the UniView Portal. |
● Tenant was added < 7 days ago. ● A Unitrends appliance with at least one protected asset has not been added to the UniView Portal |
|
Backup |
|
||
|
Automated backup testing |
Certify recoverability of your backups by running Unitrends Data Copy Access (DCA) jobs. It's FREE! |
Send if there are no scheduled DCA jobs. |
● Tenant was added < 7 days ago. |
|
You haven't set up backup alerting yet |
Set a threshold for how long machines can go without a good backup and receive alerts if this threshold is exceeded. |
Send if backup alerting has not been set up in the UniView Portal. |
● Tenant was added < 7 days ago. |
|
Backup copy |
|
||
|
You are one incident away from total data loss! |
Prevent data loss by setting up a backup copy job on the Unitrends appliance to store copies of your backups off-site. |
Send if there are no scheduled backup copy jobs. |
● Tenant was added < 7 days ago. ● A Unitrends appliance with at least one protected asset has not been added to the UniView Portal |
|
You haven't set up replication alerting yet |
Set a threshold for how long machines can go without a good off-site replication and receive alerts if this threshold is exceeded. |
Send if replication alerting has not been set up in the UniView Portal. |
● Tenant was added < 7 days ago. |
|
PSA integration |
|
||
|
You're losing time without PSA ticketing integration |
Integrate your PSA system (ConnectWise Manage, Autotask, BMS, or Vorex) so that each BackupIQ alert also creates a ticket in the PSA. |
Send if no PSA system has been integrated. |
● Tenant was added < 7 days ago. |
|
Your tickets could be going to the wrong inbox |
Map your UniView Portal organizations to PSA companies or accounts to ensure tickets are assigned to the correct queue. |
Send if no organizations have been mapped to your PSA accounts or companies. |
● Tenant was added < 7 days ago. ● PSA integration was added < 7 days ago. |
|
You could be saving more time with automated ticketing updates! |
Use your UniView Portal PSA integration to automatically close tickets. |
Send if your PSA integration settings have not been configured to automatically close tickets by status. |
● Tenant was added < 7 days ago. ● No PSA system has been integrated with UniView Portal. |
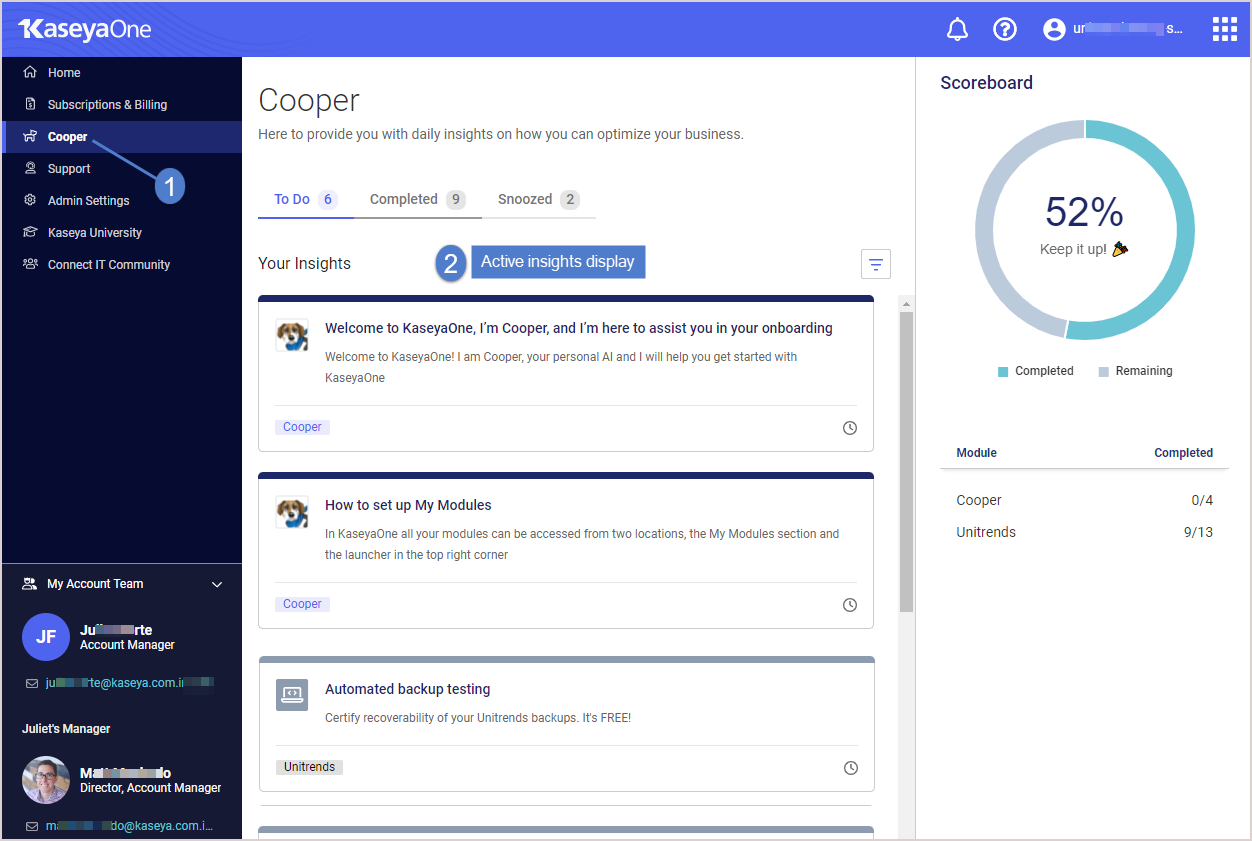
- Log in to KaseyaOne and select Cooper.
- Active insights display in the To Do list.
- (Optional) Filter the To Do list to display only Unitrends insights: click
 , check the Unitrends Module box, and click Apply.
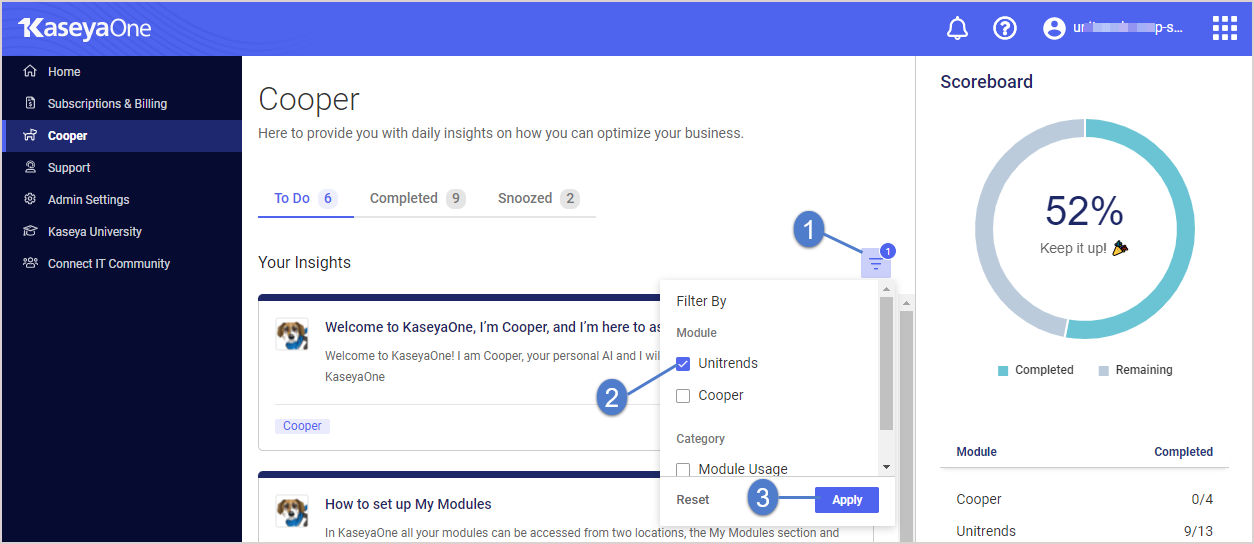
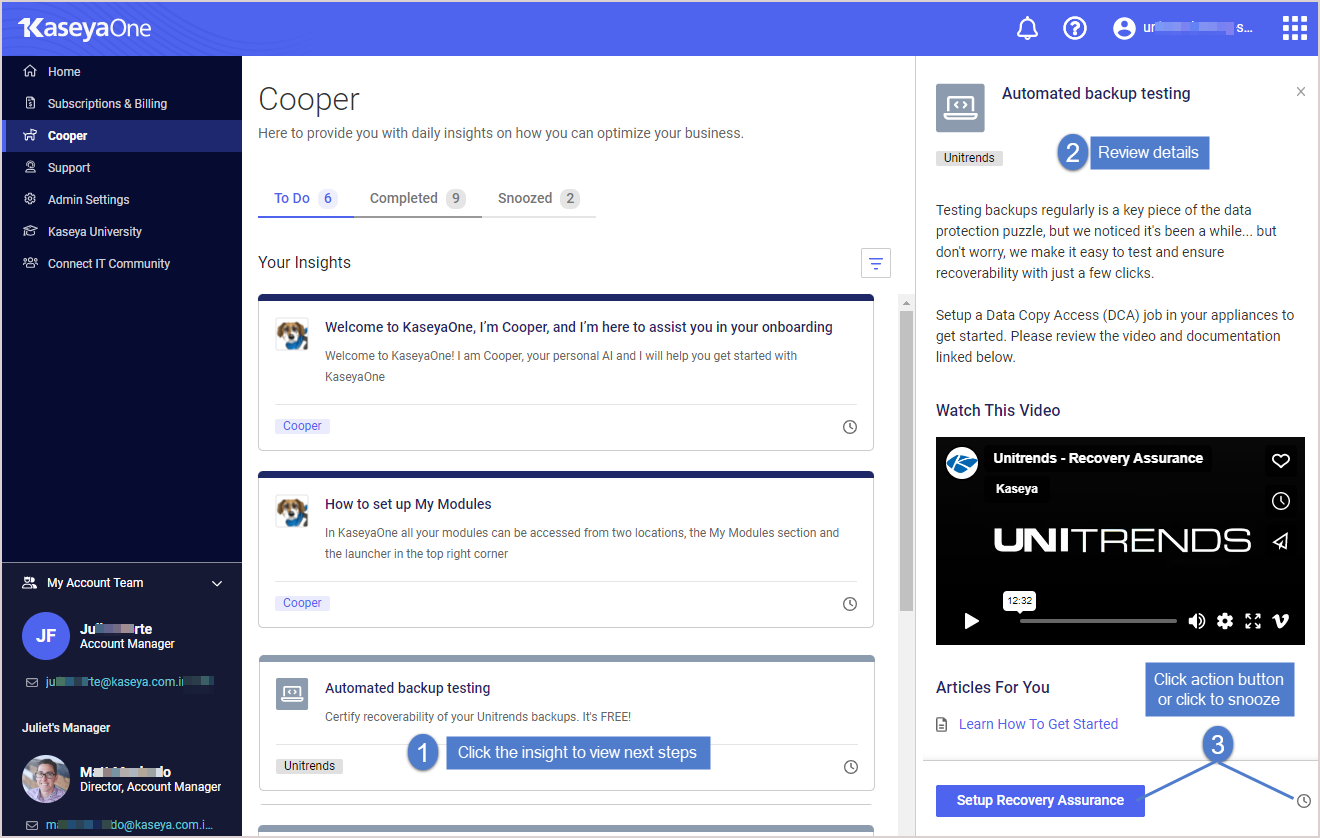
- Click a Unitrends insight.
- Review insight details. Do one of the following:
- Click the action button to address the insight (Setup Recovery Assurance in our example). For details, see Resolving insights below.
- Click
to move the insight to the Snoozed list.
Find your insight in this table for next steps:
|
Component |
Insight |
Steps to resolve |
|---|---|---|
|
Appliance updates |
You could be missing out on critical updates |
Enable Helix auto updates for an appliance. See Modifying Helix Auto Update settings for details. |
|
Backup |
Automated backup testing |
Create a DCA job on a Unitrends appliance. See Recovery Assurance in the Administrator Guide for Recovery Series, Recovery MAX, ION/ION+, and Unitrends Backup for details. |
|
Backup |
You haven't set up backup alerting yet |
Set up conditional alarm thresholds for backups. SeeAlerts for details. |
|
Backup copy |
You are one incident away from total data loss! |
Backup copies are duplicates of your backups that are stored off-site. You can copy your backups to the following types of targets: Unitrends Cloud, a secondary Unitrends appliance, cloud storage (managed by Amazon, AWS, Google, or Rackspace), disks, NAS devices, and other media. To resolve this insight, add a backup copy target to a Unitrends appliance and create a backup copy job to copy backups to the target. See these topics in the Administrator Guide for Recovery Series, Recovery MAX, ION/ION+, and Unitrends Backup for details: Backup copy targets and Creating backup copy jobs. |
|
Backup copy |
You haven't set up replication alerting yet |
Set up conditional alarm thresholds for offsite replications. See Alerts for details. |
|
PSA integration |
You're losing time without PSA ticketing integration |
Integrate your PSA with the UniView Portal to enable BackupIQ to create PSA tickets for your alerts. See the following for details: Integrating Autotask, Integrating ConnectWise Manage, or Integrating Kaseya's Billing Management System (BMS) or Vorex. |
|
PSA integration |
Your tickets could be going to the wrong inbox |
Map your PSA's accounts or companies to UniView Portal organizations to ensure tickets are sent to the correct PSA queue. See Mapping companies and accounts to organizations for details. |
|
PSA integration |
You could be saving more time with automated ticketing updates! |
Edit your PSA's integration settings to automatically close tickets by selecting a status in the Close Ticket Status field. See the following for details: To view or modify Autotask integration settings, To view or modify ConnectWise Manage integration settings, or To view or modify BMS or Vorex integration settings. |
When the insight condition is resolved, the insight moves to the Completed list.